
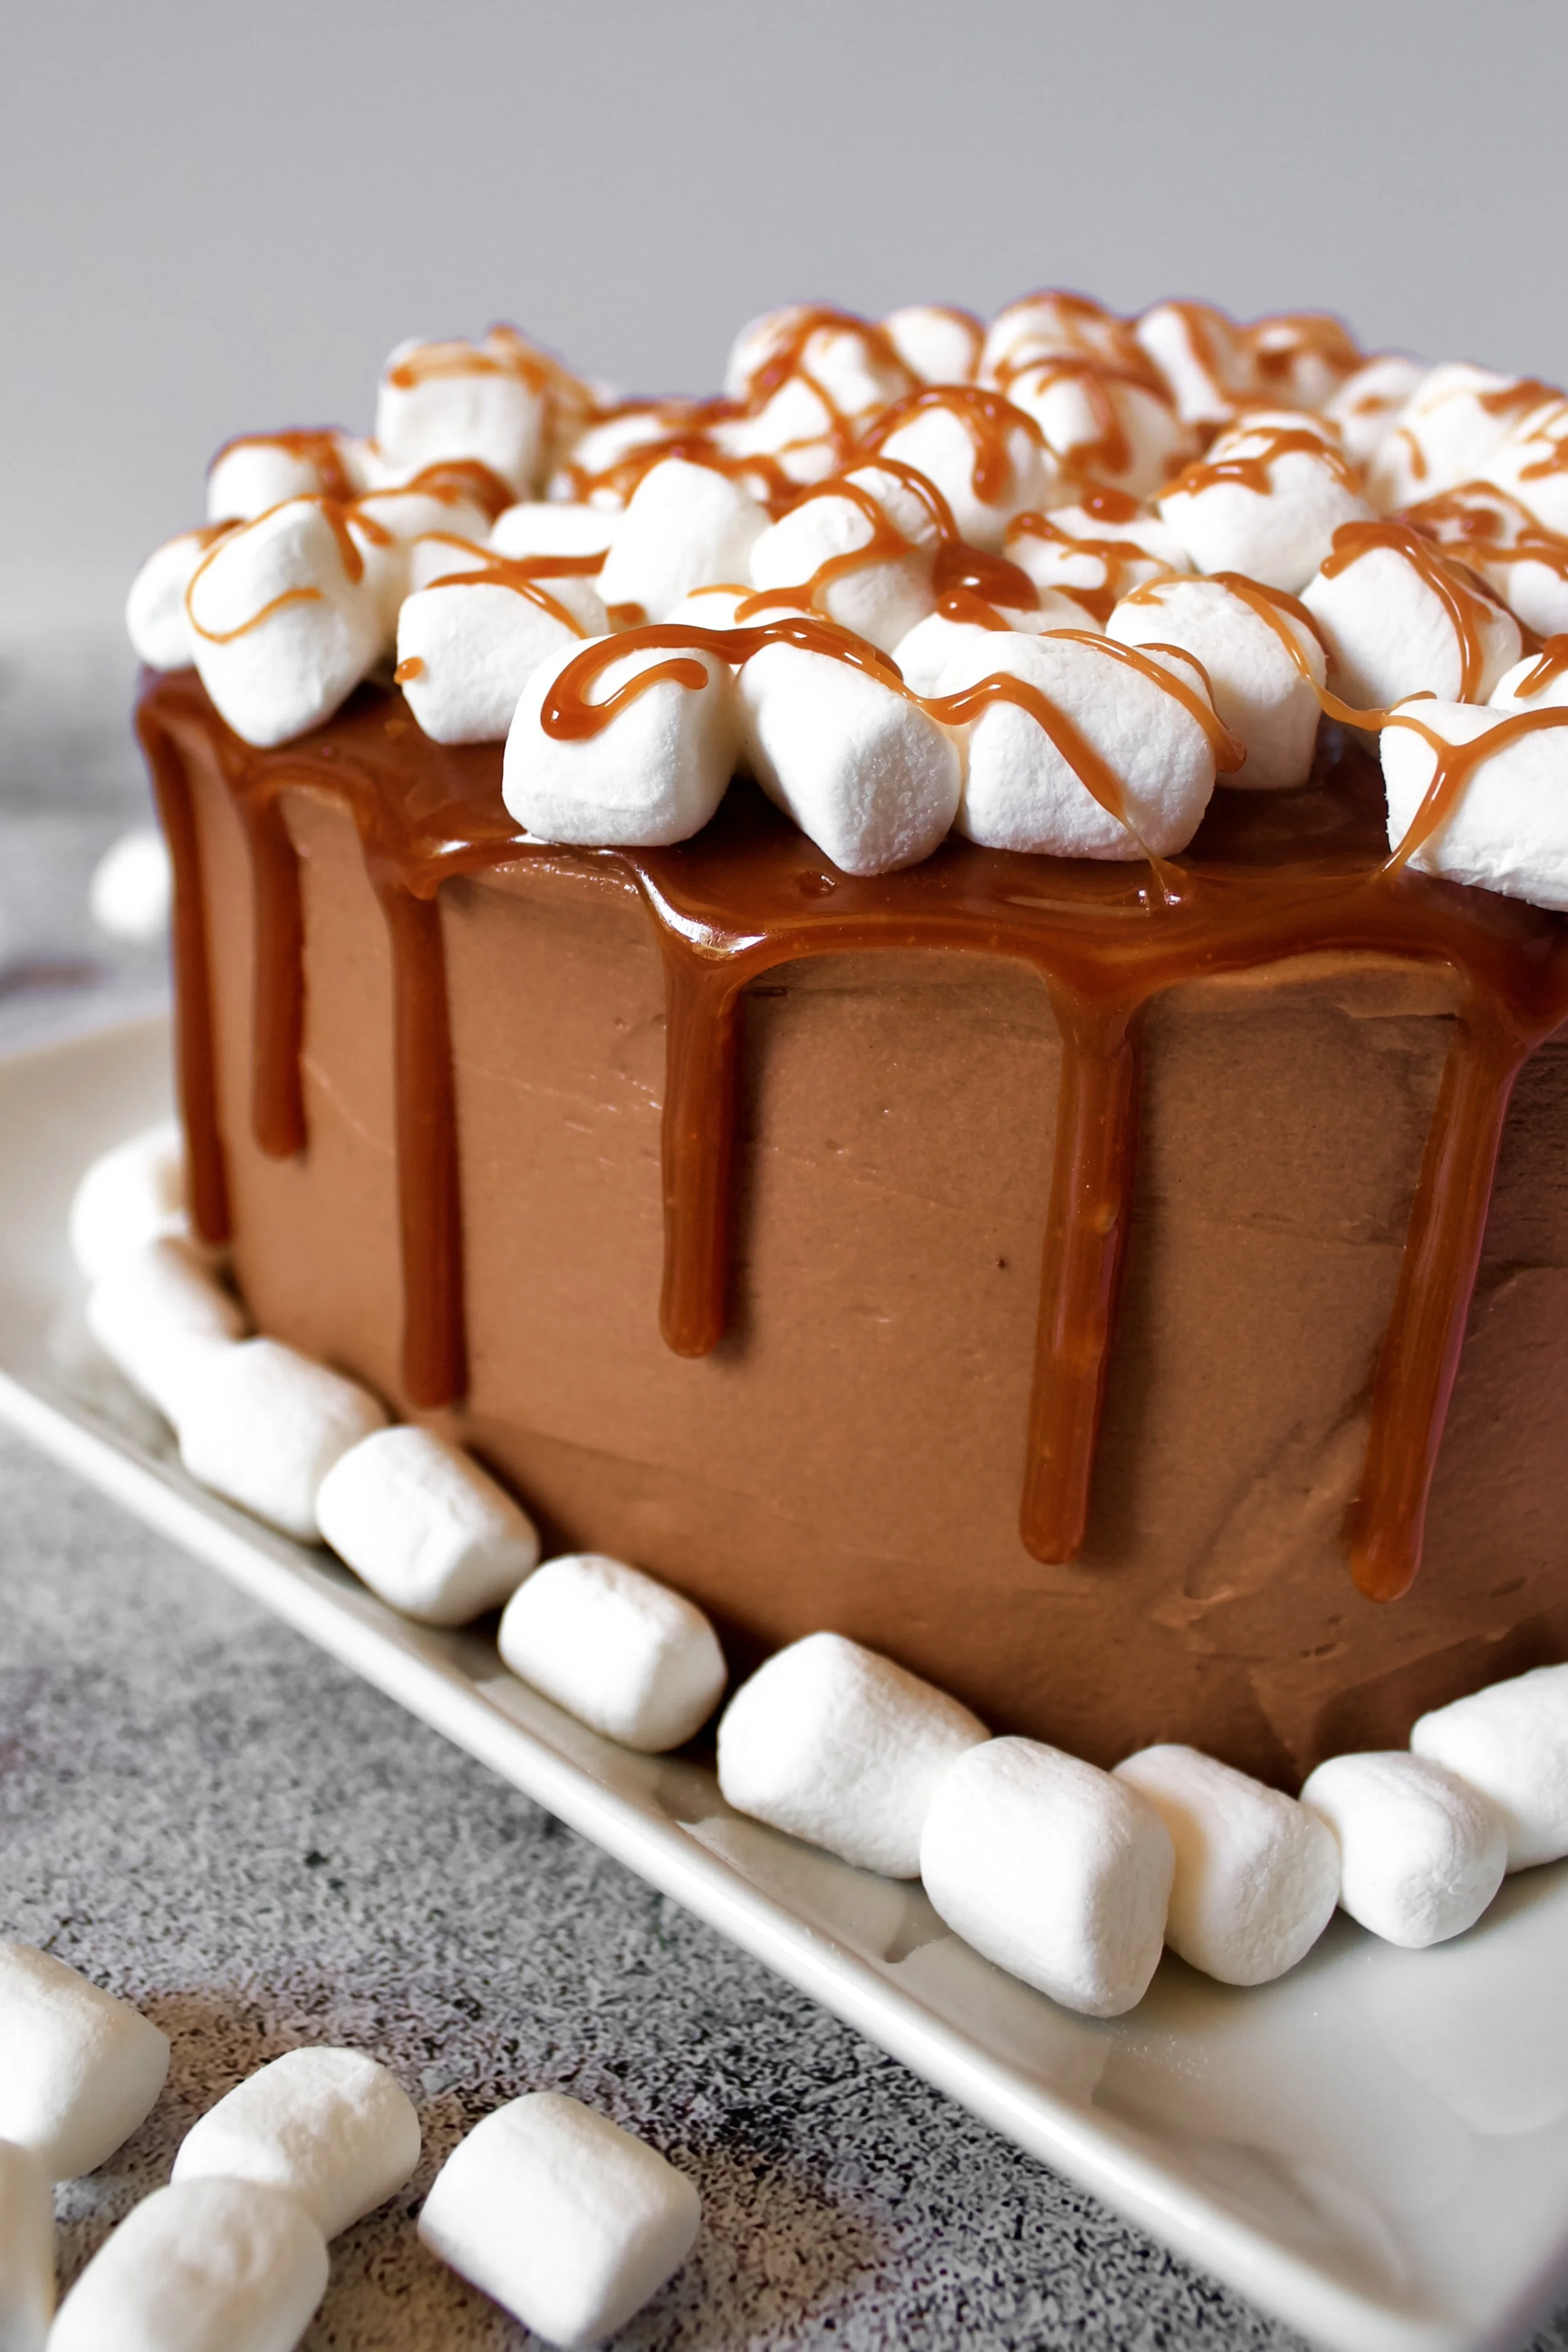
Chocolate Caramel "Scotchmallow" Cake
Rich chocolate cake filled with marshmallow buttercream and homemade caramel sauce, frosted in chocolate marshmallow buttercream, and topped with more caramel and marshmallows! This cake is modeled after the Scotchmallow candies (marshmallow and caramel dipped in chocolate) and is as delicious as it sounds!
This post may contain affiliate links from which, at no additional cost to you, I may earn a small commission to keep this site running. Only products I myself would or do use are recommended.
Any Scotchmallow fans out there? Or, if you’re not familiar with this divine creation by See’s Candy, have you ever had a chocolate caramel marshmallow? Disneyland sells several variations of this as well, with a whopping three marshmallows on a stick. My favorite are the ones dipped in caramel then chocolate coating, which is basically a Scotchmallow. My husband introduced me to them when we first started dating.
It was a little dangerous finding out I can get one of my favorite treats anytime I want.
So, a few years ago, I decided to make a Scotchmallow cake for my mother-in-law’s birthday. It was actually dubbed one of my best creations yet by my father-in-law, who doesn’t generally care for desserts.
Win.


Why this recipe works
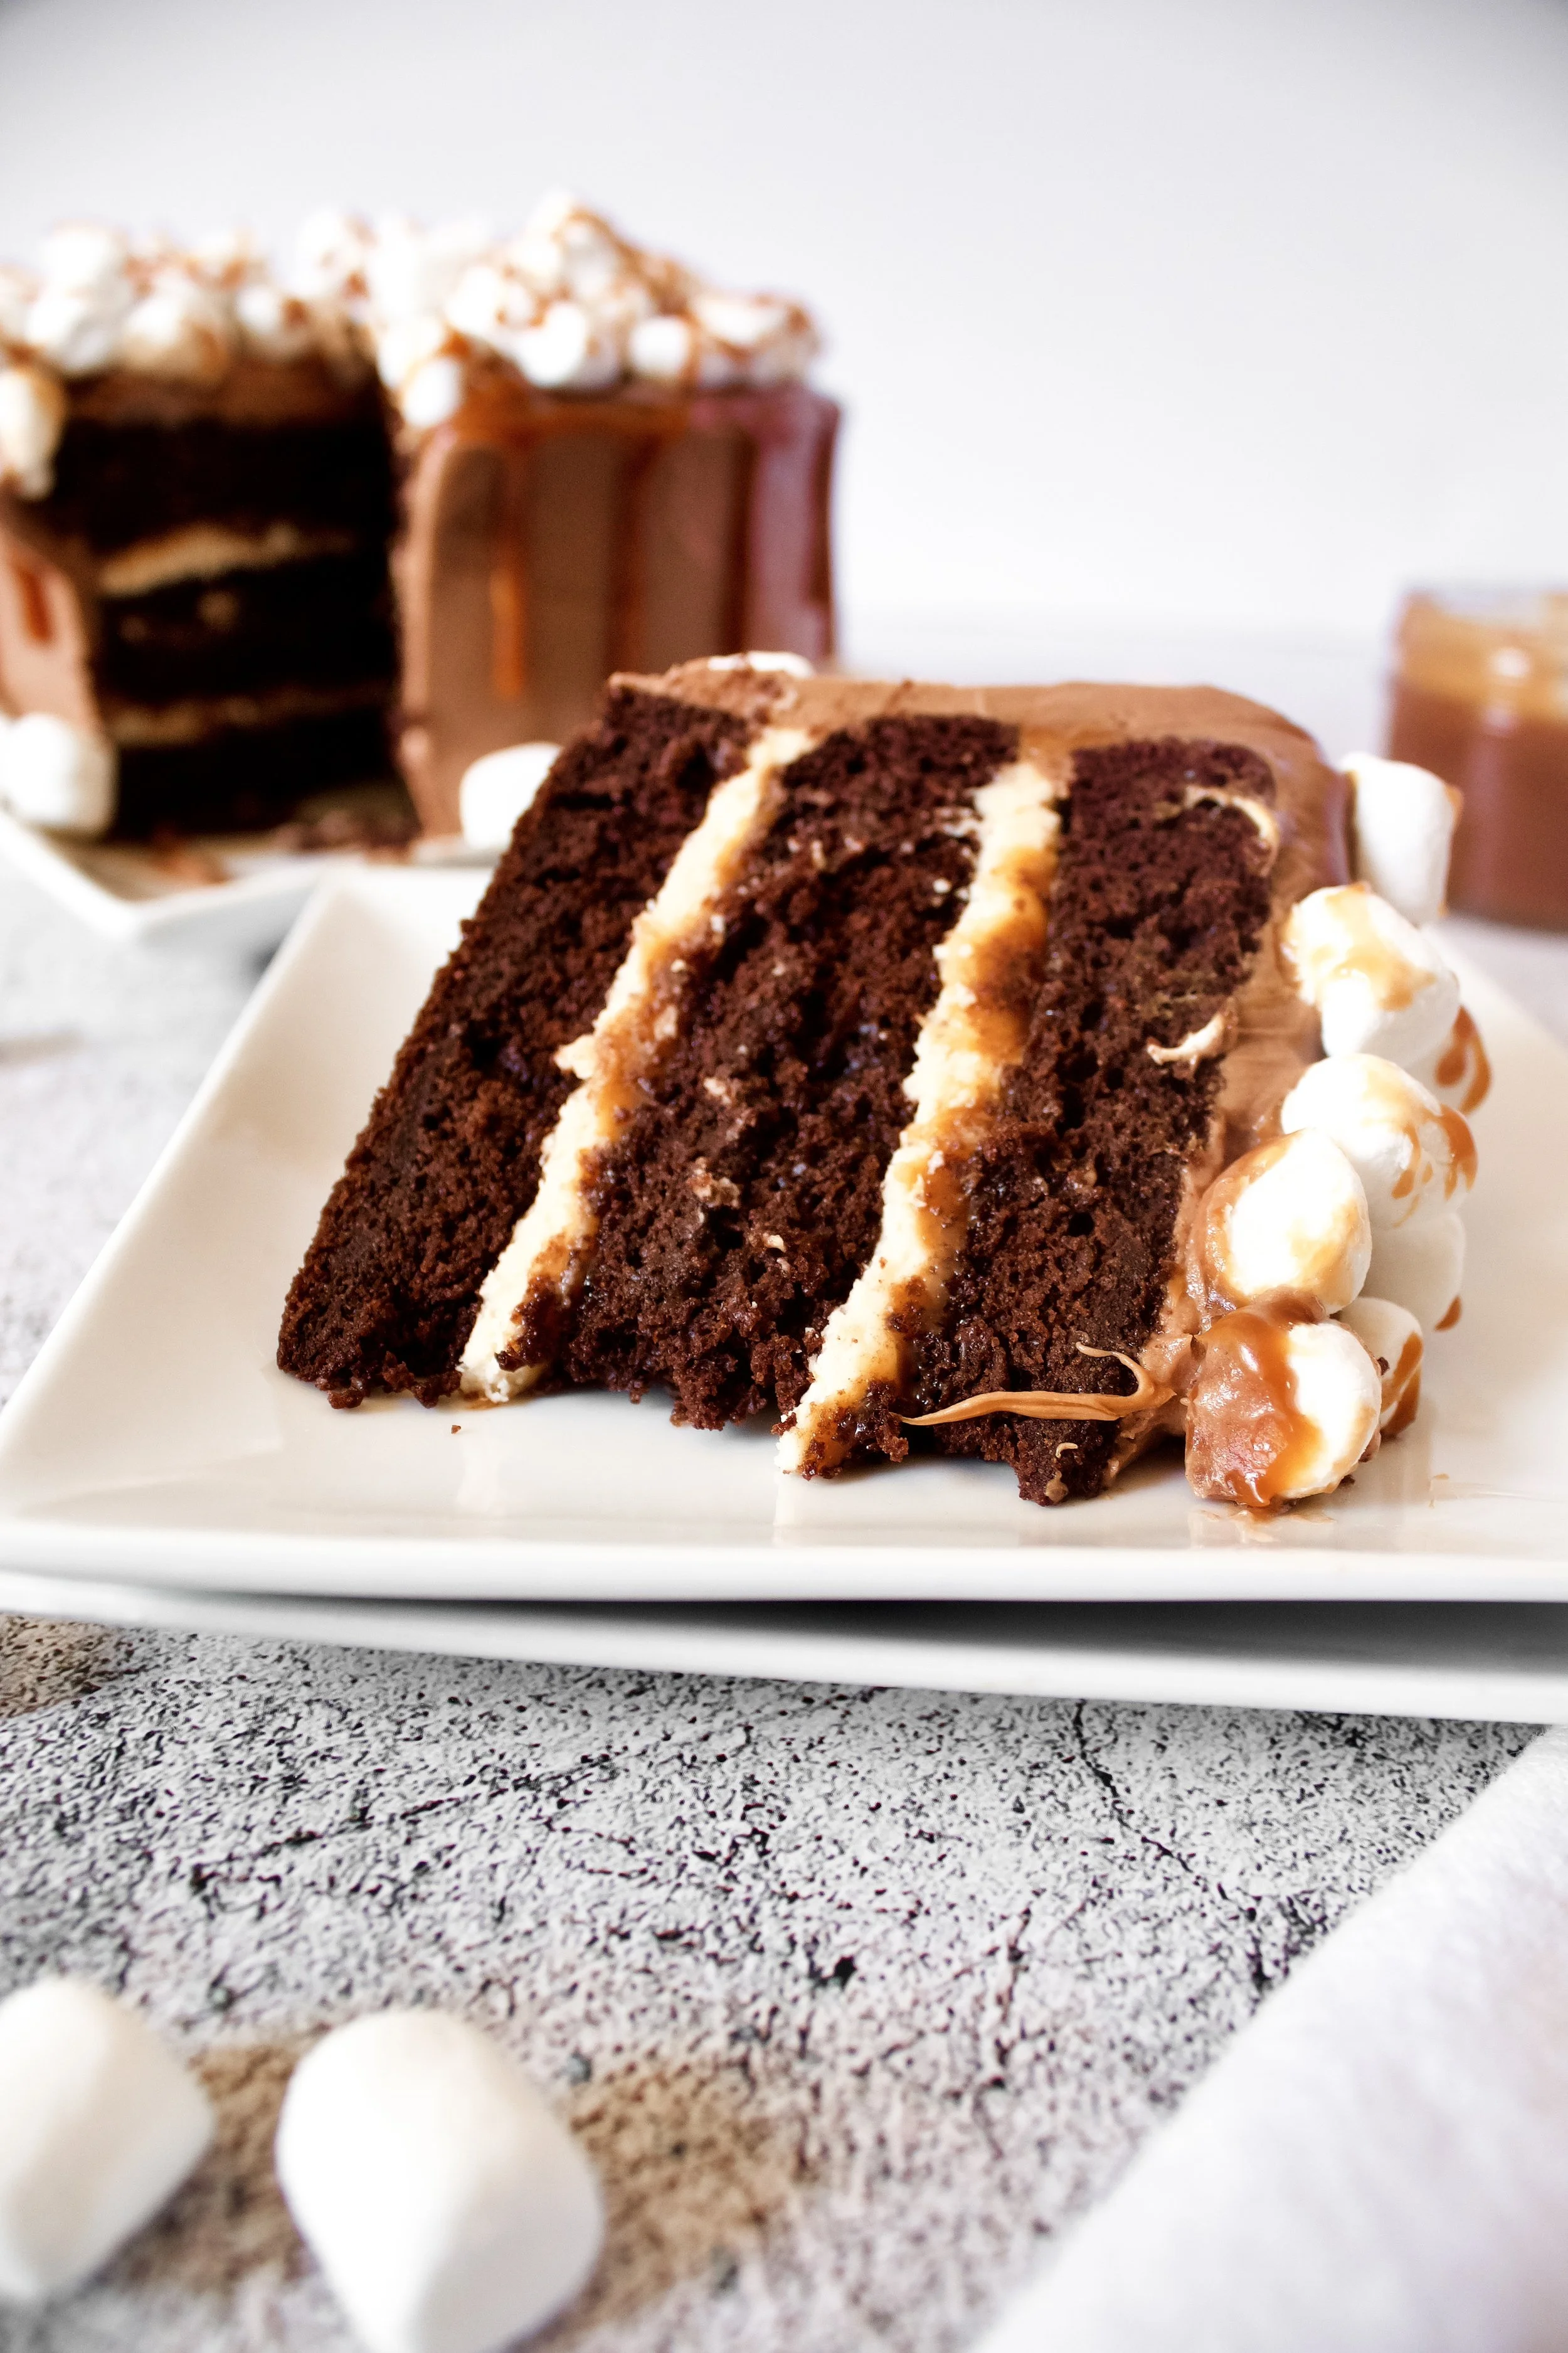
What I love about this cake is the combination of textures and flavors. You have fluffy chocolate cake—one of my signature, most requested recipes—filled with soft marshmallow buttercream and thick homemade caramel sauce. The whole thing is frosted in my chocolate marshmallow buttercream, which simply adds chocolate ganache to the unused marshmallow filling, creating the silkiest texture. Then I added mini marshmallows and more caramel on top to get more of that classic chewy texture. This cake has all the things and is worth every second it takes to make it!

Key ingredients
Flour. Be sure to spoon then level your flour so you don’t pack it in, and always sift with a fine mesh sieve!
Cocoa powder. Sifting this is a must, as it tends to clump. Be sure you use unsweetened cocoa. Regular is preferred, but Dutched will work as well.
Sugar. Obviously! You’ll need this in the cake as well as the caramel sauce.
Baking powder/soda. Both are needed to help the cake rise properly. Be sure they haven’t been open longer than a few months or they do start to lose their umph, regardless of the indicated expiration date. And be sure they’ve been well-sealed! Any moisture getting in will stop them from working properly.
Salt. Again, needed in all elements of this cake. I highly recommend sea salt, as it helps complement the sweetness better.
Buttermilk. I always make my own by adding 1 tablespoon white vinegar to a 1 cup measuring cup. I then fill it the rest of the way with room-temperature whole milk.
Oil. I prefer avocado or grape seed oil, as they are light and tasteless but still heart-healthy. Vegetable or canola oil work, too.
Eggs. Use fresh, large eggs and make sure they have reached room temperature.
Vanilla. Always use pure extract in baking, not imitation.

Hot coffee. Be sure your coffee is piping hot when you use it. You can make it as strong or light as you’d like. I prefer blond coffee in most cakes, but you really can’t taste it if you use a dark roast. It just serves to bring out a more intensely dark chocolate flavor.
Marshmallow fluff. This is needed for the filling and frosting. You can make your own or buy it.
Butter. This is used in the buttercreams as well as the caramel sauce, helping it stay soft. I always use European style buttercream because it has less water and is better for baking—especially in buttercream.
Powdered sugar. Used in the buttercreams. If you live in high humidity or your sugar may have been exposed to air for a while (not sealed fully or in a cardboard container), you’ll need to sift it to remove the clumps.
Chocolate chips. You can actually use any kind of baking chocolate. I just always have a Costco bag of chocolate chips, so that’s what I use. This goes into the remaining marshmallow buttercream to make it chocolate for the outer frosting.
Heavy cream. Used in the caramel sauce and with the chocolate chips to make the chocolate marshmallow buttercream. Make sure it’s heavy cream and not just whipping cream.
Mini marshmallows. Optional, but so cute and fun! Plus, I love the texture they provide.
How to make a chocolate caramel scotchmallow cake
1. Sift and whisk dry ingredients. Don’t skip the sifting! It’s key to making this cake nice and fluffy.
2. Whisk eggs, buttermilk, oil, and vanilla. Whisk very well to fully emulsify (blend) it all, especially the eggs and oil.
3. Slowly whisk hot coffee into wet ingredients. Whisk very quickly and pour slowly to avoid scrambling the eggs. If you do think you scrambled some, you can run it through your fine mesh sieve.
4. Slowly stir wet ingredients into the dry. Do this on low and immediately stop and scrape the bowl once everything is combined.
5. Beat on medium for exactly 2 minutes. Set a timer so you don’t under or over mix.


6. Bake. Bake until a toothpick or cake tester comes out with just some moist crumbs—not fully clean, as this can mean it’s over baked. Remember that it continues to bake a little when you take it out of the oven.
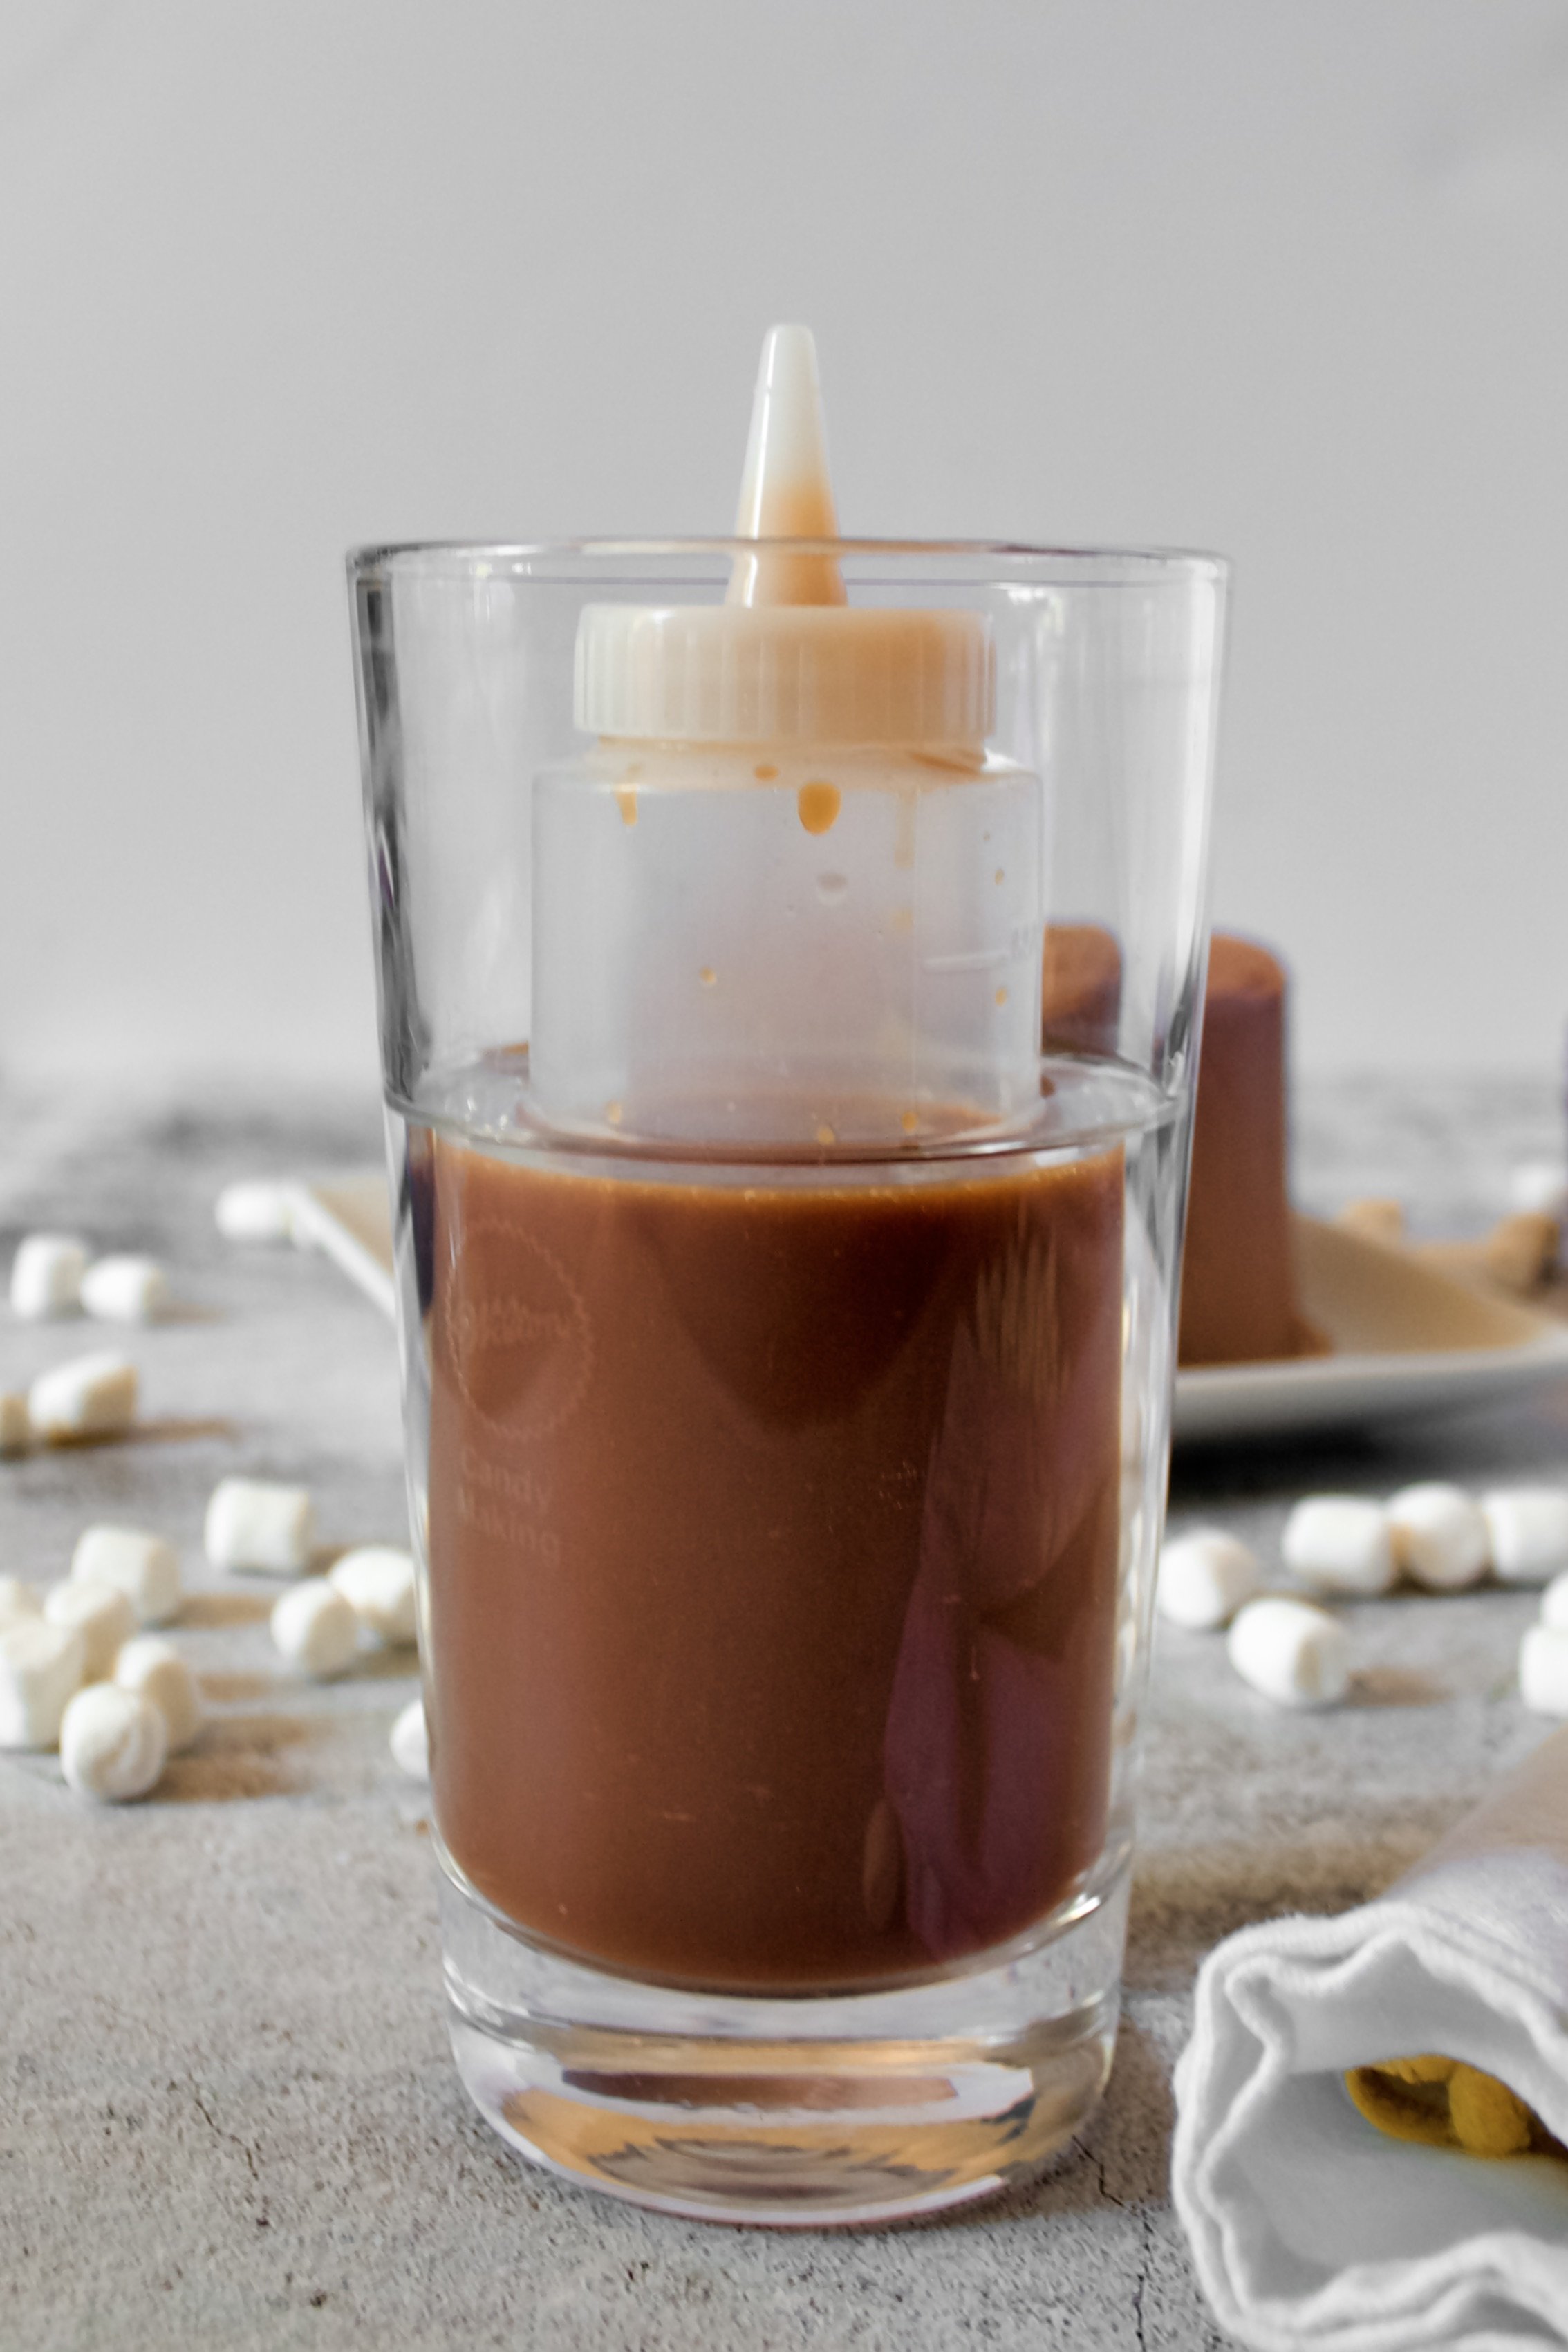
7. Make caramel. You can also make this ahead of time and heat it up in the microwave or a pan of simmering water.
8. Make marshmallow buttercream. This will double as your filling (just marshmallow flavor) and then become your outer frosting after you add ganache to it (chocolate marshmallow buttercream). My recipe calls for either homemade marshmallow fluff or store bought.
9. Prep ganache for chocolate marshmallow buttercream. This will cool while you fill and crumb coat the cake.
10. Fill cake with buttercream and caramel. Drizzle as much or as little caramel as you’d like. Avoid using so much caramel that it starts oozing out the sides—that will cause the cake to split or fall over. Then frost a crumb coat around the cake and chill.


11. Add ganache to remaining buttercream. While the crumb coat chills, stir the ganache again. It should be room temperature but still stir-able. Add half to the remaining marshmallow buttercream and stir well, adding more ganache if desired.
12. Frost cake with chocolate marshmallow buttercream. Have fun with this! I did a somewhat smooth edging to get that lovely caramel drip on the sides, but you can decorate it however you’d like.
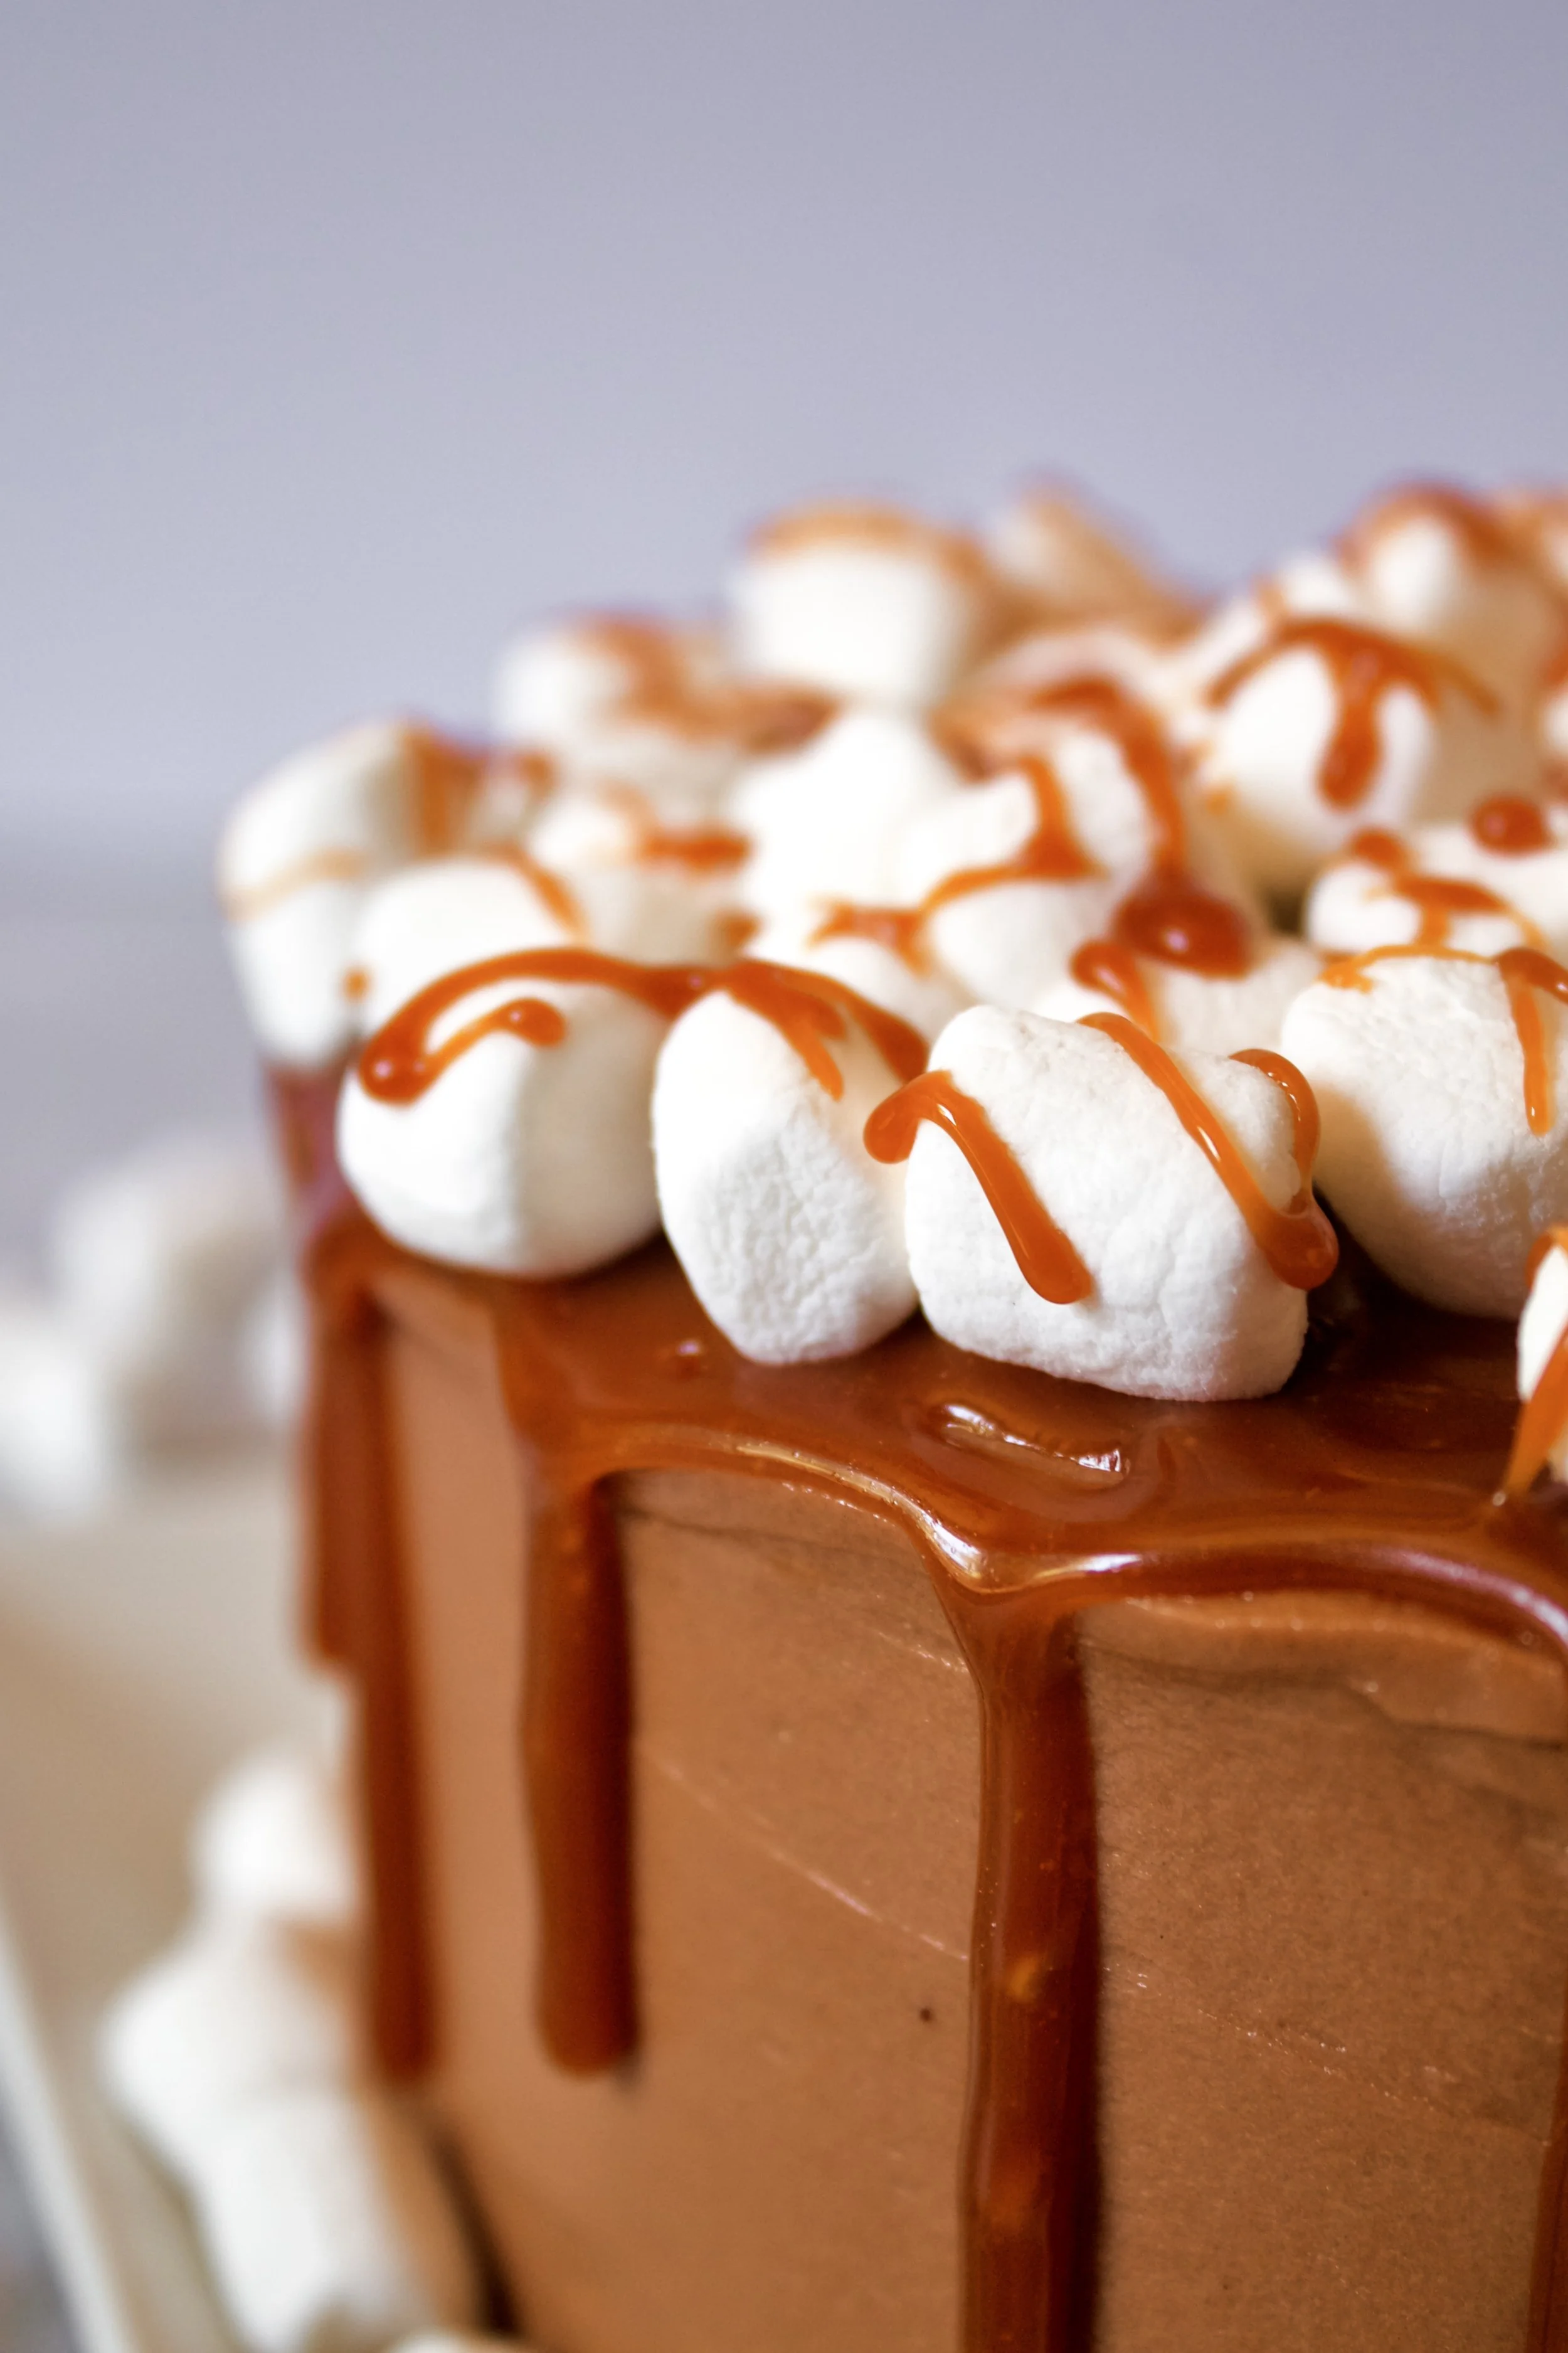
13. Top with caramel drizzle and mini marshmallows. The marshmallows are optional but so cute and they add a lovely texture.
Enjoy!


Tips and FAQ’s for this recipe
Split up your work
I highly suggest making the cake ahead of time. You can wrap the cake layers in a double layer of plastic wrap and leave them on the counter overnight or freeze them up to 2 months. I don’t suggest refrigeration, as this is actually more likely to dry the cake out. You can make the caramel sauce ahead, too, then warm it up by placing it in a cup of hot water (don’t submerge the lid). The frosting can be made the day before, covered tightly, and left on the counter. However, I don’t suggest making it any further in advance. While it technically can be refrigerated or frozen (as most frostings can be), in cooler weather it tends to become difficult to get smooth once it’s been brought back to room temperature and re-whipped (which you have to do with this one to get it nice and soft again). You could make the marshmallow fluff further ahead, as it will keep for up to 2 weeks on the counter.
I don’t recommend making the ganache ahead of time, as you’ll have to heat it up again anyway, so it doesn’t save any time.

Will this cake travel well or stand up to heat or humidity?
Yes and no. If you want to transport this cake or if it will be outside on a hot day or in direct sunlight (even on a cold day), I suggest using unsweetened cocoa powder in the buttercream instead of the ganache. The notes in this recipe here give more information about this substitution. Another option is to reduce the amount of heavy creamy in the ganache or even omit it entirely, but that can sometimes cause the chocolate to seize if you aren’t super experienced with tempering chocolate, so be careful if you want to go this route. It does create a silkier frosting if you use ganache or melted chocolate, so the reduced cream will help make a sturdier frosting, but not as sturdy as using cocoa powder instead of ganache altogether.

Can I use any caramel sauce?
It’s recommended that you use a thicker caramel sauce, which usually means homemade. Most store bought brands are thinner, ideal for ice cream toppings. You could also make my vanilla salted caramel sauce, which uses the traditional method of boiling water and sugar. It’s less prone to burning if you take your eye off it, but it does require you to cook it to a particular temperature and use a candy thermometer, which is why I prefer the simpler method in my easy caramel sauce. Both sauces will be drizzle-able when warm-ish but will harden as they drip down the cake, which is ideal to get that thicker caramel texture that you’re used to in a Scotchmallow.
If you do prefer to go with store bought, you can melt down soft caramels with a tablespoon or two of heavy cream, but be sure to refrigerate the cake as you assemble it to ensure the sauce doesn’t cause sliding or splitting of the cake layers.

Do I have to make two types of buttercream?
It’s entirely up to you. I first invented this cake on a whim and was making it up literally as I made the cake. I realized I may not have enough marshmallow buttercream to properly frost the outside, so I added some ganache to supplement it after I’d filled the cake already. It was kind of perfect. The inside has just marshmallow and caramel, like a Scotchmallow, and the outside has all the flavors. However, if you wanted to just do one type, either one would work perfectly find and still be delicious!

Don’t over mix the frostings
Be sure to follow the directions on how to make the marshmallow buttercream filling and then how to add the ganache to the remainder for the outer frosting. If you mix marshmallow buttercream for too long, it can turn gummy. Once it’s fully mixed and smooth, you don’t need to mix any further. If you do, you’re likely fine until you start mixing for a few minutes past when it’s ready.
Use extra ganache for a more traditional Scotchmallow texture
If you have extra ganache from making the outer frosting (the amount you use depends on how chocolate-y you want it), or if you just want a cake that’s very extra, you can drizzle or drip some ganache on top of the cake in addition to the caramel. Since Scotchmallows are dipped in a chocolate coating, this will give that more traditional texture of smooth, solid chocolate that is so great about the original candy!

My cake tools
Here are my must-have tools I use for making this cake. Affiliate links provided.
Mesh sieve (because sifting is KEY for a fluffy cake)
All-rubber spatula (this makes scraping the bowl easier as the batter and frosting doesn’t get all over a wooden handle!)
Silicone liners for 8” cake (or for 6” cakes)
8” aluminum cake pans or 6” aluminum cake pans (I’ve found nonstick doesn’t bake as evenly)
Offset spatula for frosting the cake

Chocolate Caramel "Scotchmallow" Cake
- prep time: 1 hour, 30 minutes (includes all fillings and frostings)
- bake time: 25-30 minutes
- total time: 2 hours (plus at least 30 minutes for cake to cool)
servings: 12-16
Ingredients:
for the chocolate cake
- 1 ½ cups (350g) granulated sugar
- 1 ⅔ cups (226g) flour, spooned then leveled and sifted
- ¾ cup (75g) unsweetened cocoa powder, spooned then leveled and sifted
- 2 teaspoons (8g) baking powder
- 1 teaspoon (5g) baking soda
- ½ teaspoon (3g) sea salt
- 2 eggs, room temperature
- 1 cup (236g) buttermilk, room temperature*
- ½ cup (112g) avocado oil (can sub vegetable, grape seed, or canola oil)
- 1 tablespoon (13g) pure vanilla extract
- 1 cup (240g) hot, light roast coffee (or hot water)
for the marshmallow buttercream filling
- 2 cups (454g) unsalted European style butter, softened
- 1 batch marshmallow fluff (or two 7oz jars store bought marshmallow cream)
- 4-6 cups (520-780g) powdered sugar
- ¼ teaspoon sea salt
- 1 tablespoon (13g) vanilla extract
for the chocolate marshmallow buttercream
- 4 ounces (113g) baking chocolate, chopped, or chocolate chips (see note)
- 2 ounces (60g) heavy whipping cream
- remainder of marshmallow buttercream from the filling
to assemble
- one batch easy caramel sauce
- mini marshmallows (optional)
Instructions:
- It’s recommended to make the caramel sauce ahead of time to split up your work and give it time to cool. Otherwise, you can make it while the cake layers cool, but be sure to give it time to cool as well so it doesn’t melt the frosting. If making caramel more than a few hours ahead, store the caramel in an airtight container in the fridge until ready to reheat and use.
make the chocolate cake layers
- Preheat the oven to 325F/165C. Grease and flour two or three 8” or 9” cake pans or three to four 6” cake pans (or use baking spray) and line with parchment paper (or use silicone liners). Note: I like to use 3 cake pans to make room for more filling without having to cut the cake in half, which I’m terrible at. If you want to make a 6” cake, you need to use at least 3 pans or they will be overfilled and your cakes won’t bake evenly.
- Whisk together the sugar, flour, cocoa powder, baking powder, baking soda, and salt in the bowl of your stand mixer or a large mixing bowl, sifting everything but the sugar with a fine mesh sieve (unless yours is fine enough to sift--go for it!). Set aside.
- In a separate medium mixing bowl, whisk the eggs, buttermilk, oil, and vanilla together until well-blended and fully emulsified, about 1 minute.
- Make your hot coffee. Very, very slowly stream the hot coffee into the wet ingredients, whisking vigorously and constantly as you pour to avoid scrambling the eggs. Feel free to do this in segments if it’s easier. If you do scramble some of the eggs, you can run the mixture through your fine mesh sieve to remove the cooked egg bits.
- Using the paddle attachment, turn your stand mixer to low (or use a hand mixer) and slowly pour the wet ingredients into the dry. This should take about 30 seconds or so. The batter will clump up then thin out. Once you’ve poured all the wet ingredients, immediately turn off the mixer. Scrape down the bottom and sides. Beat on medium for exactly 2 minutes (set a timer).
- Evenly divide batter between the prepared cake pans.
- Bake for 25-30 minutes, until a toothpick inserted in the middle comes out with just a few moist crumbs (ideally not fully clean, as this could mean they’re over baked). Check early and rotate halfway if not using convection. Be sure to check each pan separately, as one might bake faster than the other.
- Let cool 5-10 minutes in the cake pan then remove to a cooling rack to cool completely.
make the marshmallow buttercream
- While the cake layers cool, make the marshmallow buttercream. If using homemade marshmallow fluff, make that first. You can immediately start on the buttercream once the fluff is done, but remove it to a separate bowl to cream the butter.
- In the bowl of your stand mixer fitted with the paddle attachment or in a large mixing bowl using your hand mixer, cream butter on high until smooth, about 1 minute.
- Scrape bowl with a rubber spatula then add in powdered sugar, 1 cup at a time. Blend on low then slowly increase speed to high and mix until smooth before adding more. After 4 cups, scrape the bowl, then add the marshmallow fluff. Mix on high until well-blended, about 30-60 seconds. Add the salt and vanilla and mix on high for about 30 seconds until blended.
- At this point, taste to see if it needs more sugar. If so, add 1-2 more cups, until the taste is to your liking. If it’s sweet enough but not holding its shape, refrigerate 10-20 minutes.
prep the chocolate marshmallow buttercream (see note below if your cake will be traveling or in high heat)
- While the cake chills, make the ganache for the chocolate marshmallow buttercream. Place the chocolate and heavy cream in a heatproof bowl. Place over a medium saucepan with 1-2” water simmering over low heat. Stir constantly until the chocolate is 75% melted. Remove from heat and keep stirring until smooth. Place back over heat for 30 seconds if it doesn’t become smooth after a minute.
- Let the chocolate cool while you assemble the cake and apply the crumb coat.
assemble the cake
- Take the caramel out of the fridge and reheat. This can be done by heating in the microwave at half power in 10 second increments, stirring in between. You could also bring some water to a simmer in a medium pot, remove from heat, and place your jar of caramel in it (be sure the water is level with the top of the caramel but not high enough to get into the jar itself). Let sit for a few minutes then stir well. Continue heating until the sauce is easily drizzled. It becomes hot to the touch, let cool for a few minutes–you want it right in that sweet spot where it can be drizzled with a spoon or from a drip bottle without melting the frosting.
- Place one layer of cake on a cake board or plate. Cut off any domed tops (I like to save these to eat with leftover frosting!). If desired, you can also cut each layer of cake in half to make room for more filling. Spread a layer of marshmallow buttercream on the cake, as thick as desired (no more than ½ inch thick or the cake may slide around). Drizzle some caramel sauce on top of the buttercream, to desired thickness.
- Continue this process until all layers of cake are stacked. Spread a very thin layer of buttercream around the cake then refrigerate for 10-20 minutes while you make the chocolate marshmallow buttercream.
decorate the cake
- While the cake chills, stir the cooled ganache. Add half of it to the remaining marshmallow buttercream and mix with the paddle attachment until fully blended. Taste, adding more ganache until you’re happy with the flavor. I usually add all of it. :)
- Frost chilled cake to desired thickness and in desired design. Chill for 10-20 minutes. Drizzle with more caramel sauce (you may need to reheat it a bit). Add mini marshmallows, if using, and drizzle some more caramel.
Enjoy!
If not serving right away, store in an airtight container until ready to eat. Cake will last for 3-5 days. Cut cakes will last longer if you place a piece of plastic wrap right along the cut edges and seal it by pressing it into the buttercream along the edge, then store the whole cake in an airtight container.
*You can make your own buttermilk by adding 1 tablespoon white vinegar with enough room temperature whole milk to equal 1 cup total. Stir and let sit 10 minutes while you prep the rest of the ingredients.
Note about the buttercream: this makes a rather soft buttercream, which is only a problem in warm climates/homes or if traveling with the cake. In that event, sub 2-4 tablespoons cocoa powder for the ganache (chocolate chips and whipping cream).
