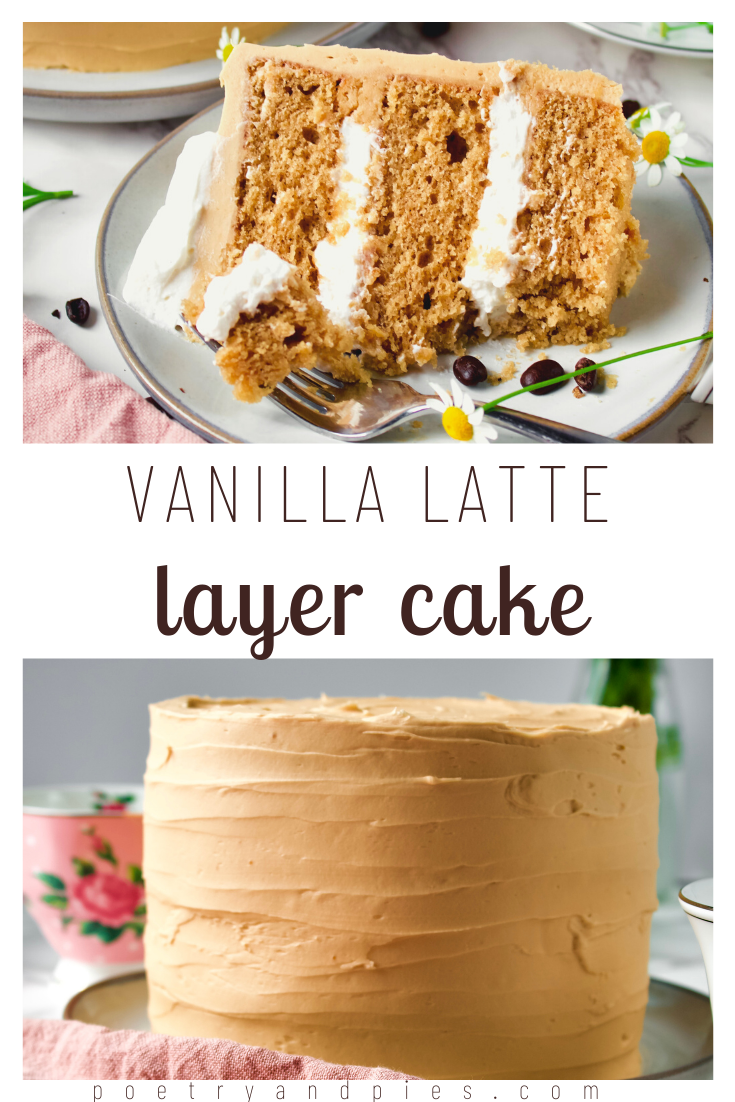
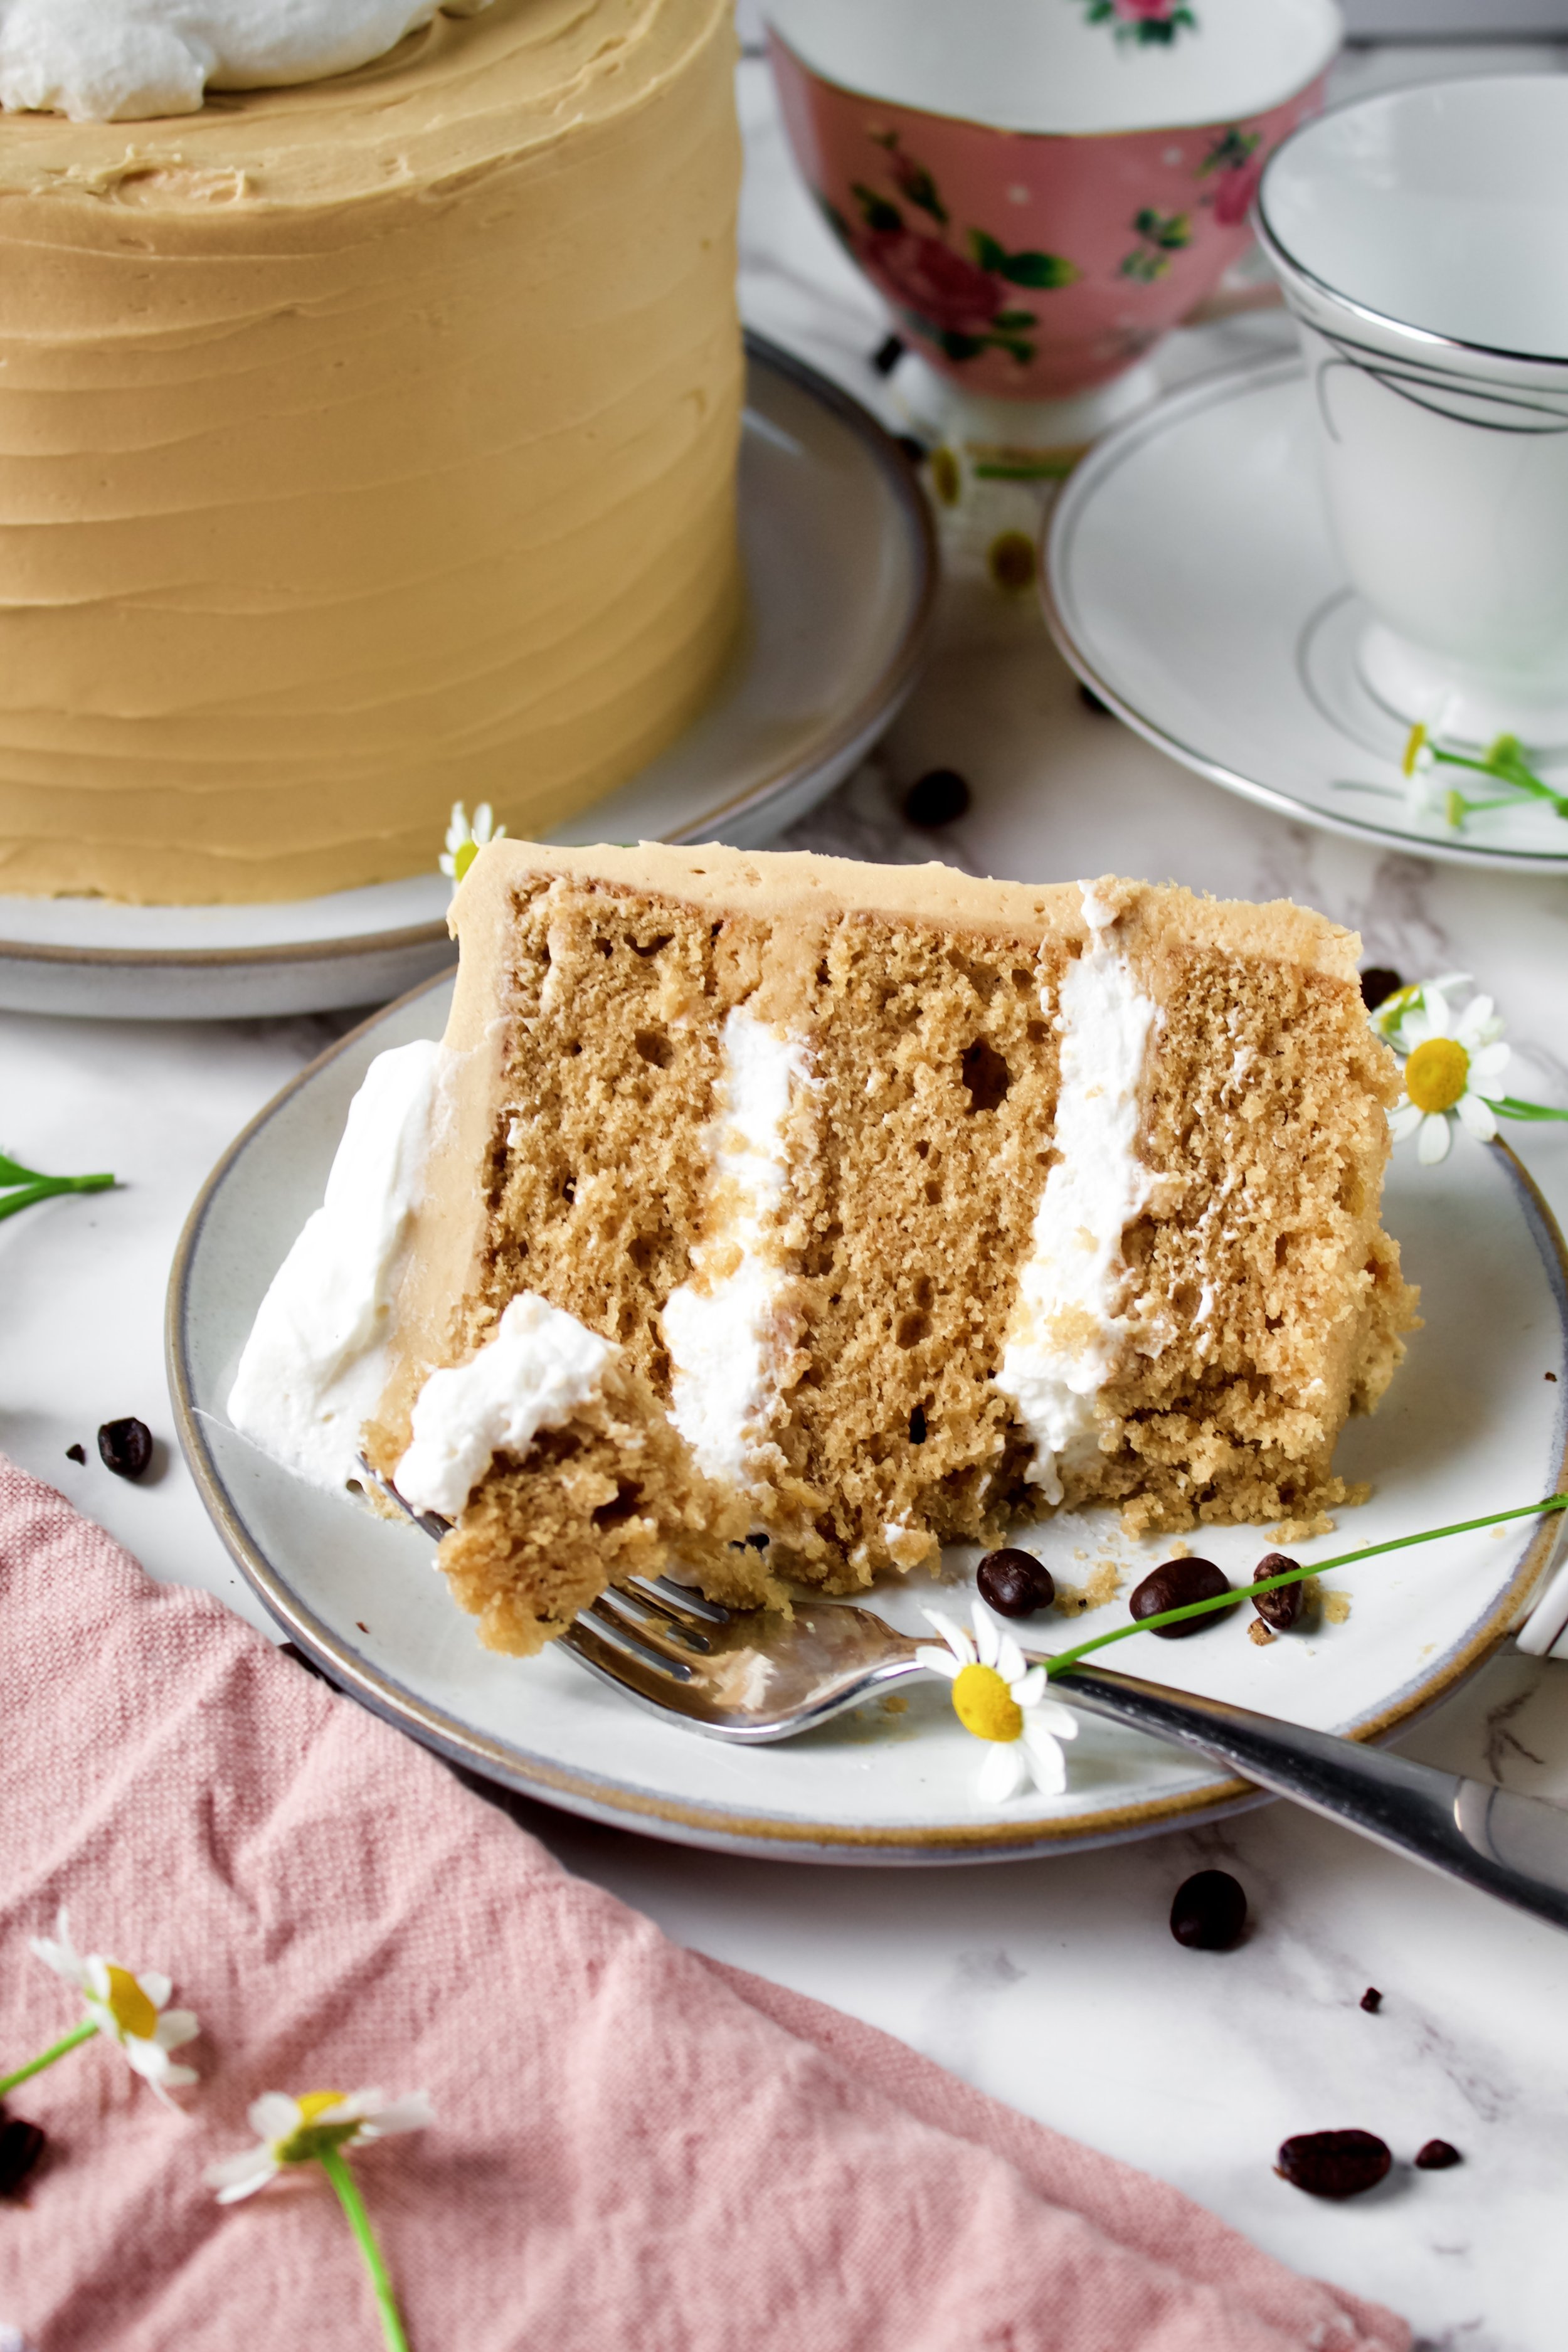
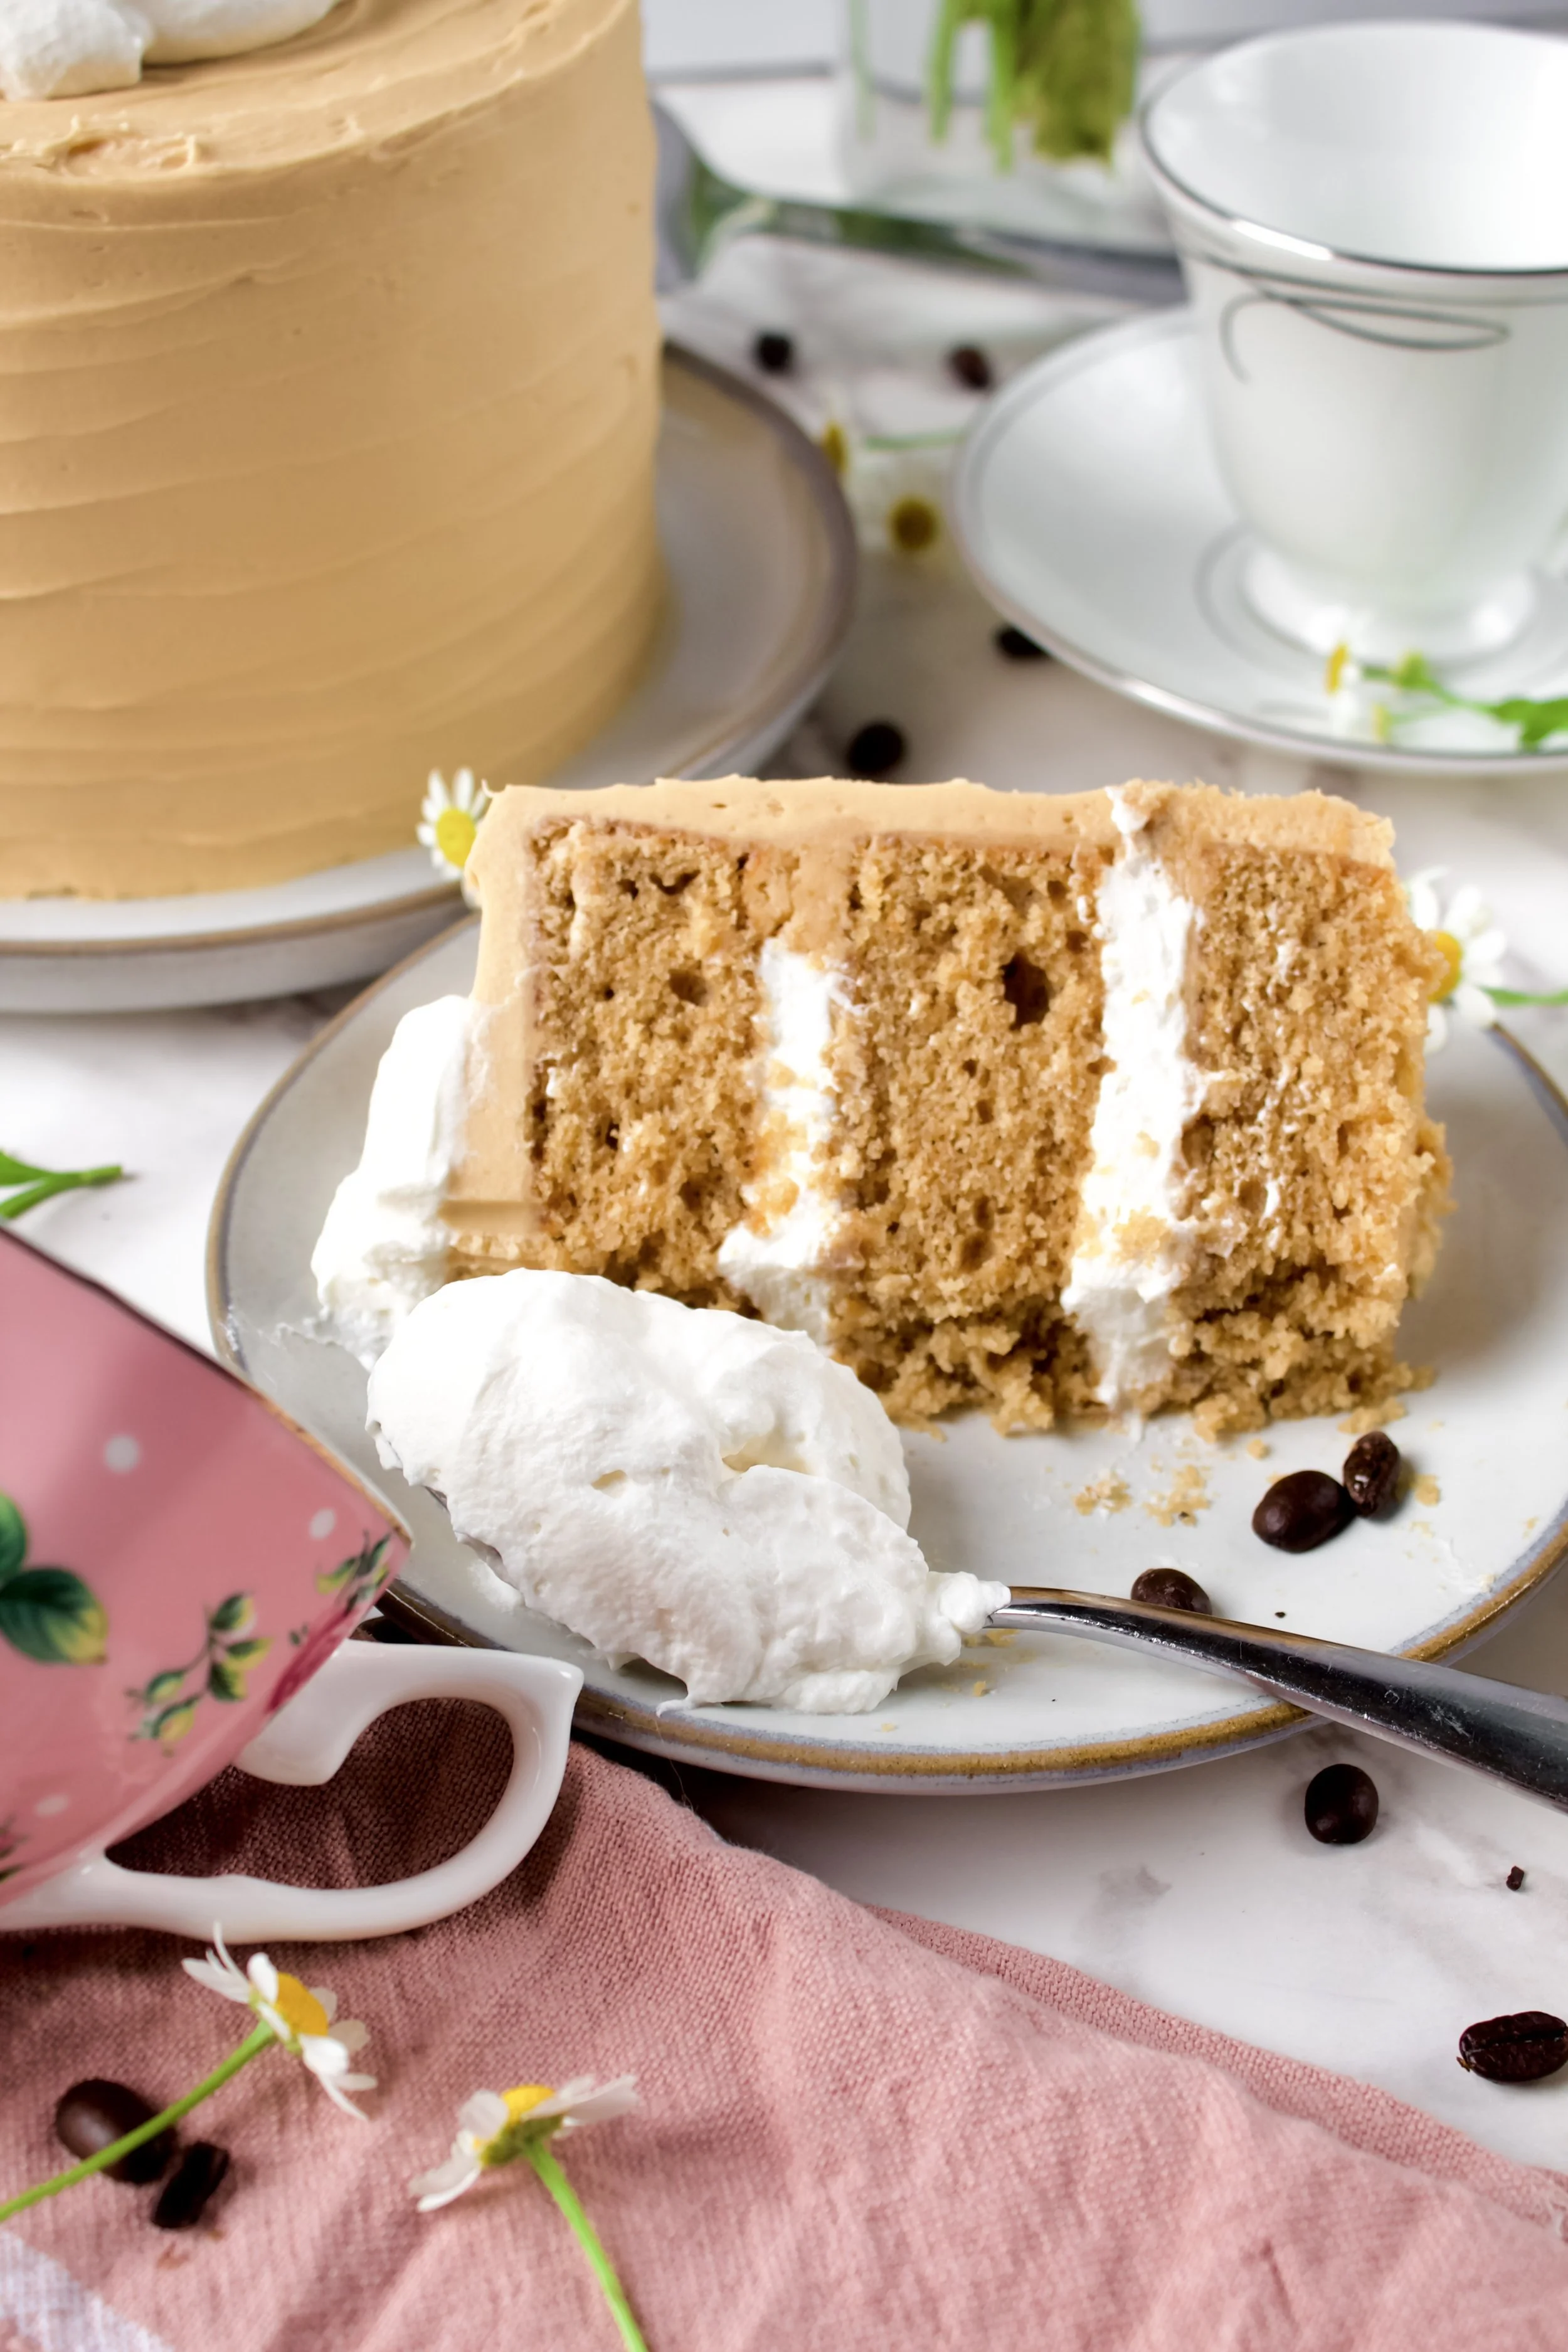
Vanilla Latte Cake
Fluffy, moist, coffee flavored cake filled with vanilla whipped cream and frosted with luscious vanilla coffee buttercream. This cake is a heavenly treat for any coffee lover, but is often loved by everyone!
This post may contain affiliate links from which, at no additional cost to you, I may earn a small commission to keep this site running. Only products I myself would or do use are recommended.
I’m realizing now that I’ve used quite a bit of coffee in my recipes over the past couple years since this little blog began. And I’m 100% okay with that. I love including coffee in my desserts, and I try to find that perfect balance so my non-coffee drinking husband will like them, too. Usually, I’m successful, like with my browned butter espresso chocolate chip cookies. Sometimes, it’s a bit much, like with the opera cake I made once that had even me needing turning down seconds.
This cake is right in that sweet spot. The texture is soft and fluffy and stays moist for days. The flavors have a hint of coffee balanced out by the vanilla and the natural sweetness of the cake. It’s the perfect cake for coffee lovers who never get to have coffee desserts.

Why this recipe works
The combination of granulated and brown sugar in the cake really creates a wonderful flavor. You need a little granulated sugar in most recipes to help them rise better, but I used mostly brown sugar to get that yummy caramelized flavor and moisture retention. The use of either instant coffee or else replacing some of the milk with a strong shot of espresso helps create that lovely coffee flavor without altering the balance of wet and dry ingredients.
To create such a fluffy texture, it’s important to only mix the batter until you don’t see any dry bits of flour. Ignore any lumps—those will bake out. The ensures you aren’t over mixing it. Plus, the addition of just a tiny bit of oil may seem trivial but is actually key in helping the cake retain moisture as it’s refrigerated (since it has whipped cream filling). Butter is ideal for a fluffy cake, but oil retains moisture better, so the inclusion of both is key here!
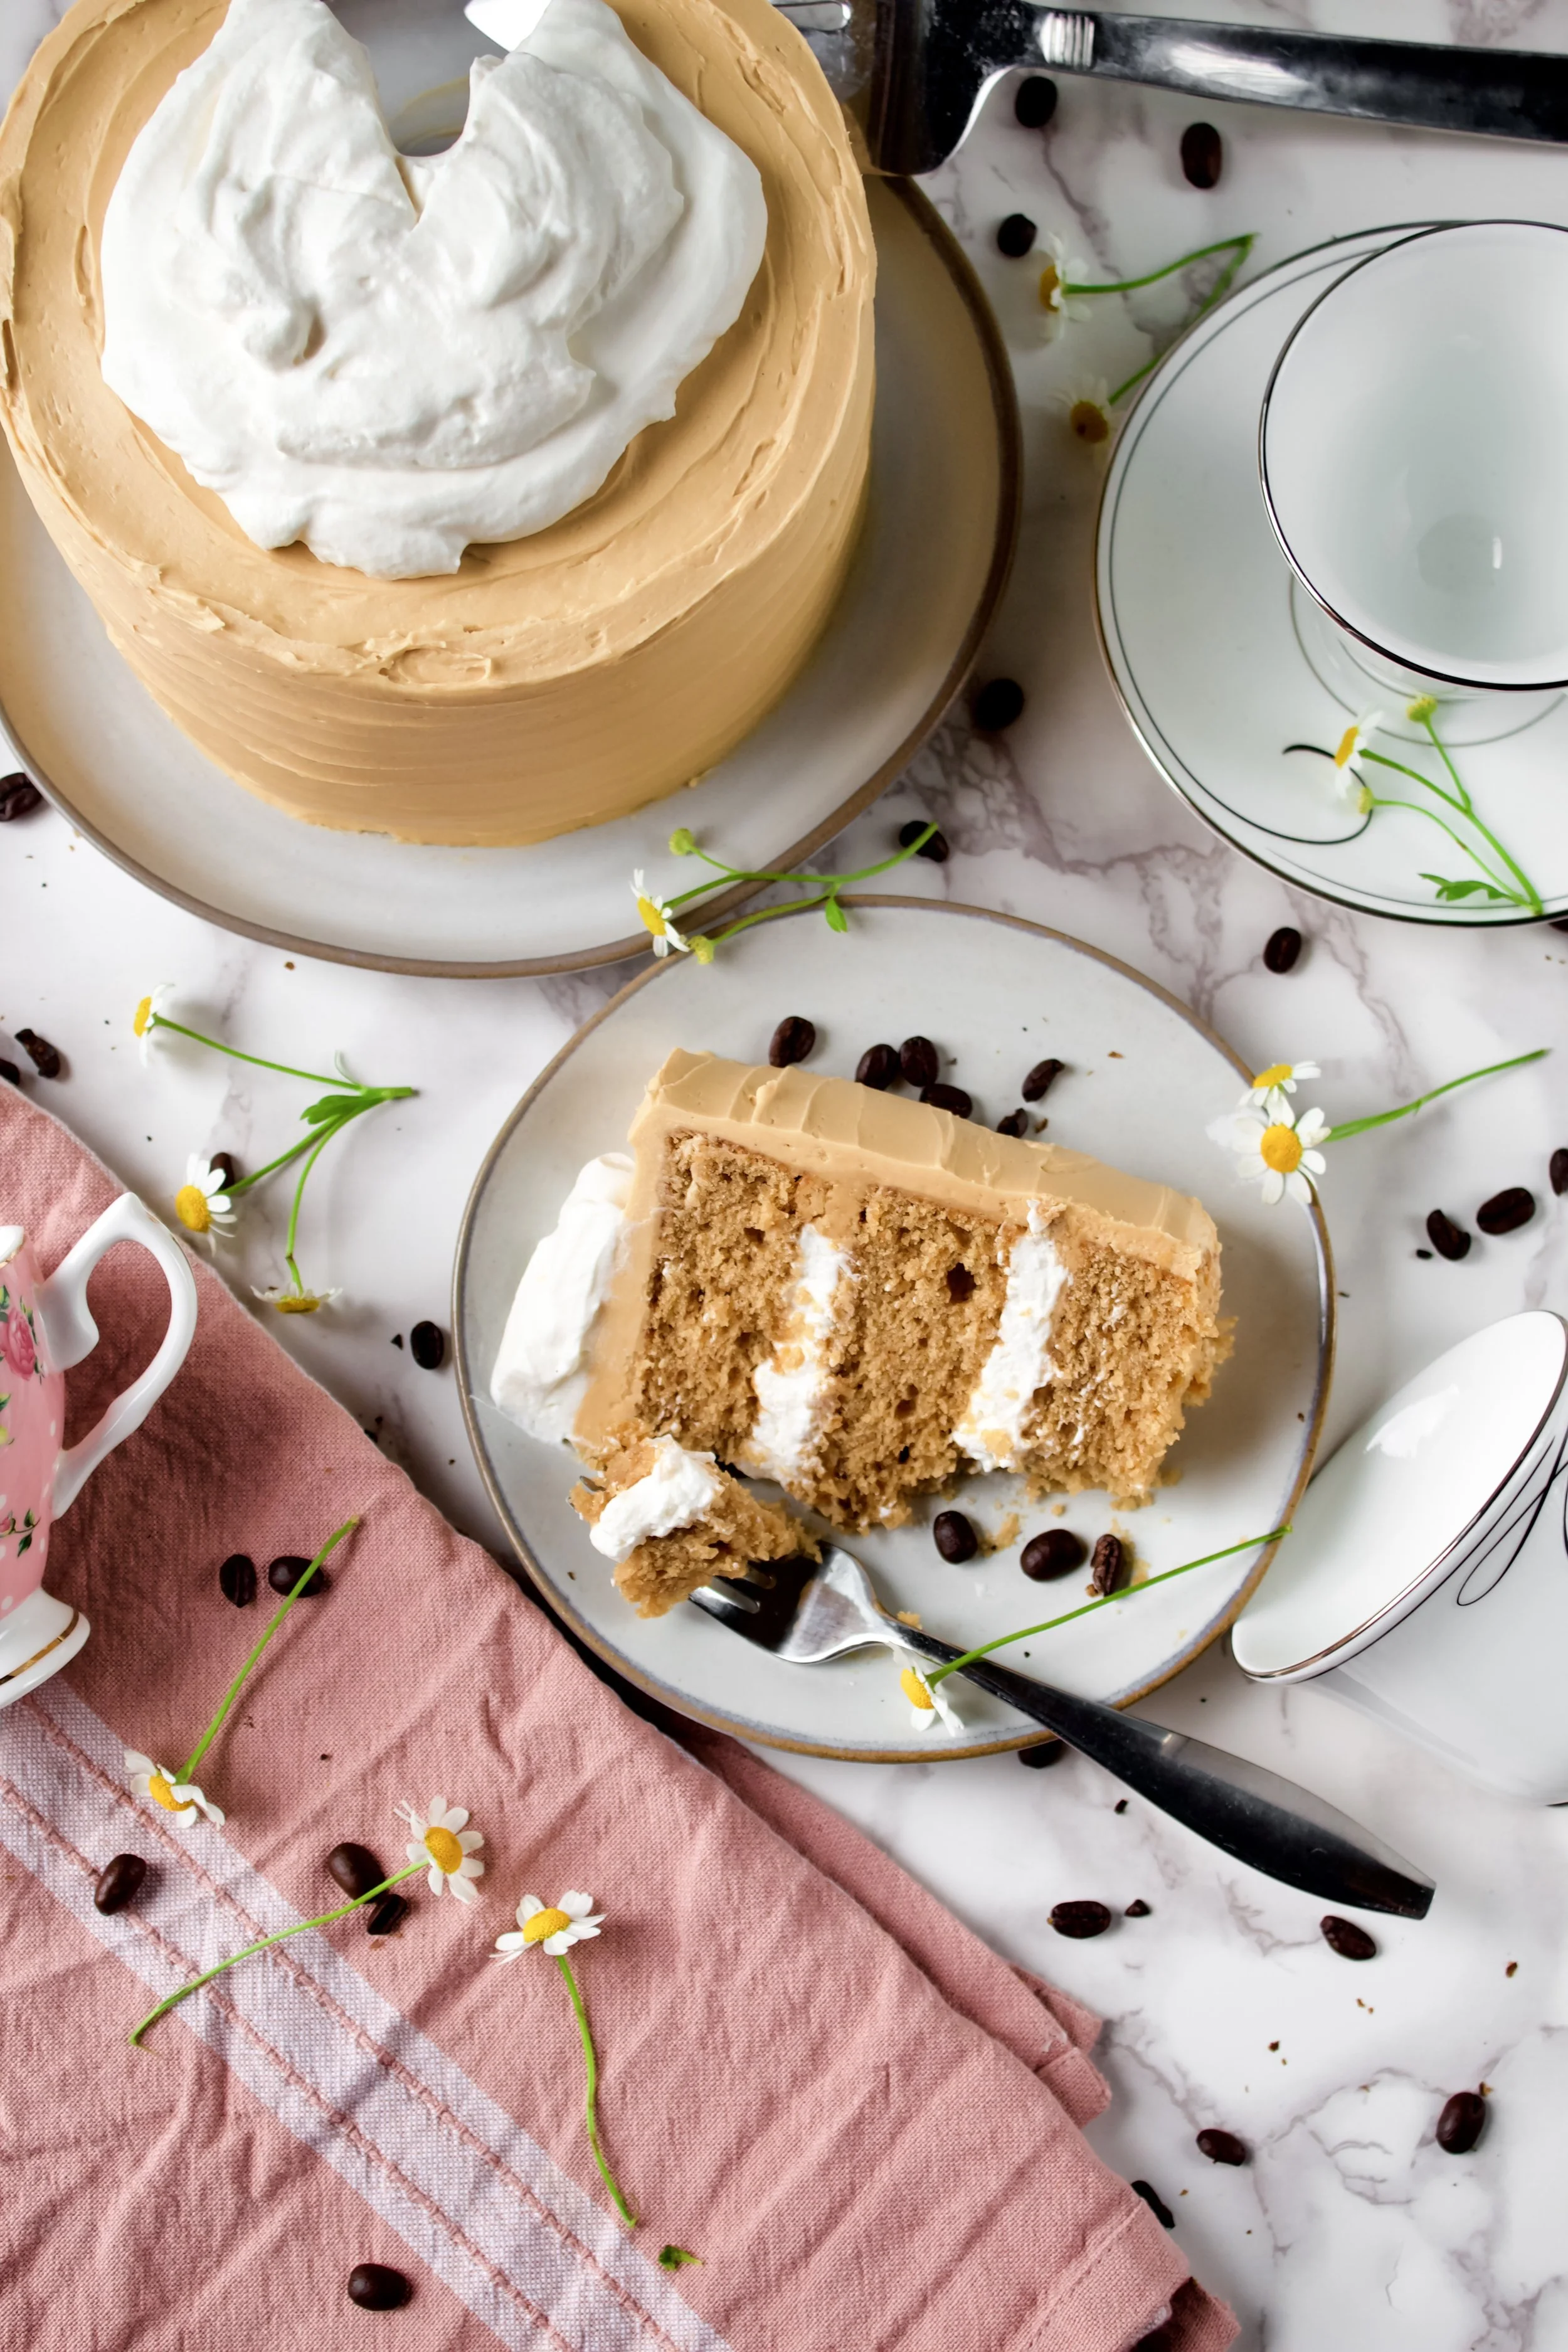
Filling the cake with vanilla whipped cream is key to balancing out the coffee flavor of the cake and coffee buttercream. But don’t dismiss that buttercream! It’s so silky smooth and has the perfect balance of sweet and coffee flavors. It helps round out the balance of flavors in this cake and is one of my favorite elements to it!
Key ingredients
Flour. Be sure to spoon then level your flour so you don’t pack it in, and don’t skip sifting it!
Salt. I prefer sea salt in baking.
Baking powder. Since there is no acid in this recipe to help activate baking soda, baking powder is used to help create rise and give you a perfectly fluffy cake.
Butter. Try to use European style butter, as it has less water and is creamier, making a fluffier cake.
Sugar/brown sugar. Using both helps the cake rise but also gives a perfectly caramelized flavor.
Eggs. Be sure they are fresh and room temperature.
Oil. Just a tiny bit, but it is necessary! It’s not enough to weight the cake down or make it dense, but it will prevent it drying out in the fridge.
Vanilla extract. Needed throughout the cake to make that iconic vanilla latte flavor.
Whole milk. I prefer whole milk for baking, but lighter versions work, too.

Strong espresso (or instant coffee). There is instant coffee used in the buttercream, so it’s perfectly fine to just use that in the cake as well.
Heavy whipping cream. Be sure to use heavy cream, as it is most suited to creating the vanilla whipped cream filling. It helps create that creaminess we all love in a latte.
Powdered sugar. This goes in the whipped cream and buttercream, so make sure you have enough.
Coffee buttercream. Such a rich, creamy frosting with a balance of sweetness, vanilla, and coffee.
How to make a vanilla latte cake
1. Sift and whisk dry ingredients. Don’t skip sifting!
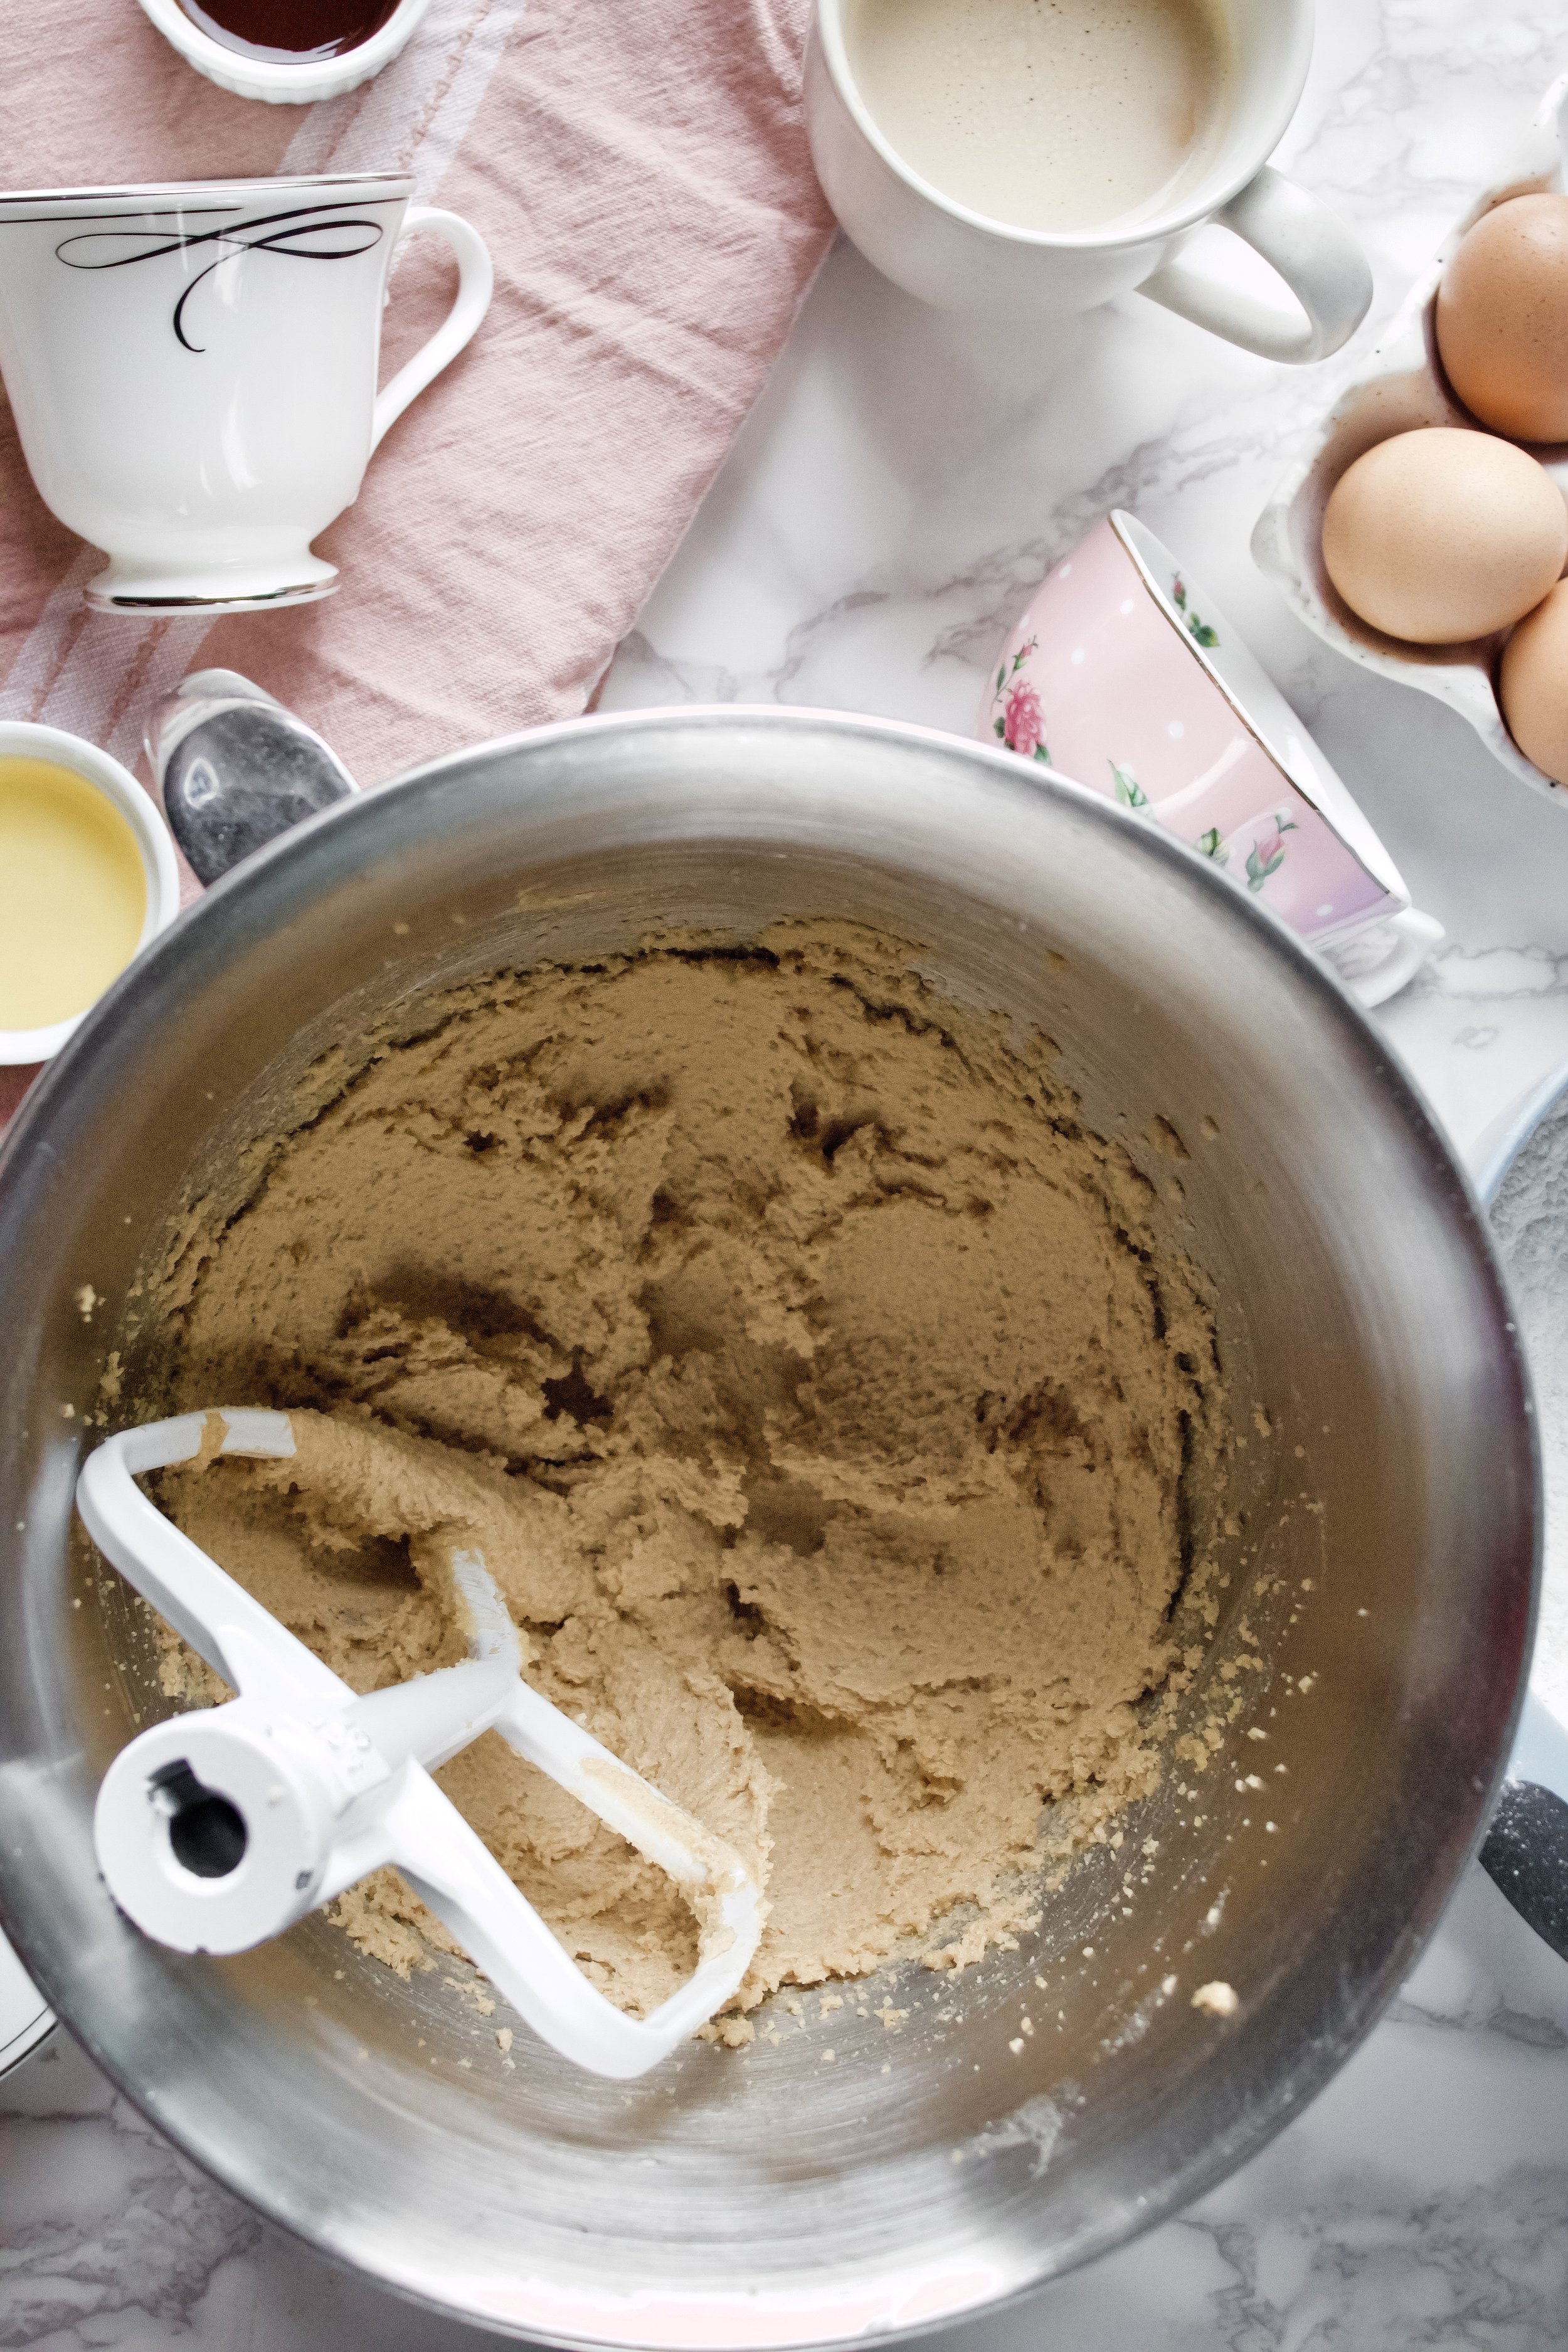
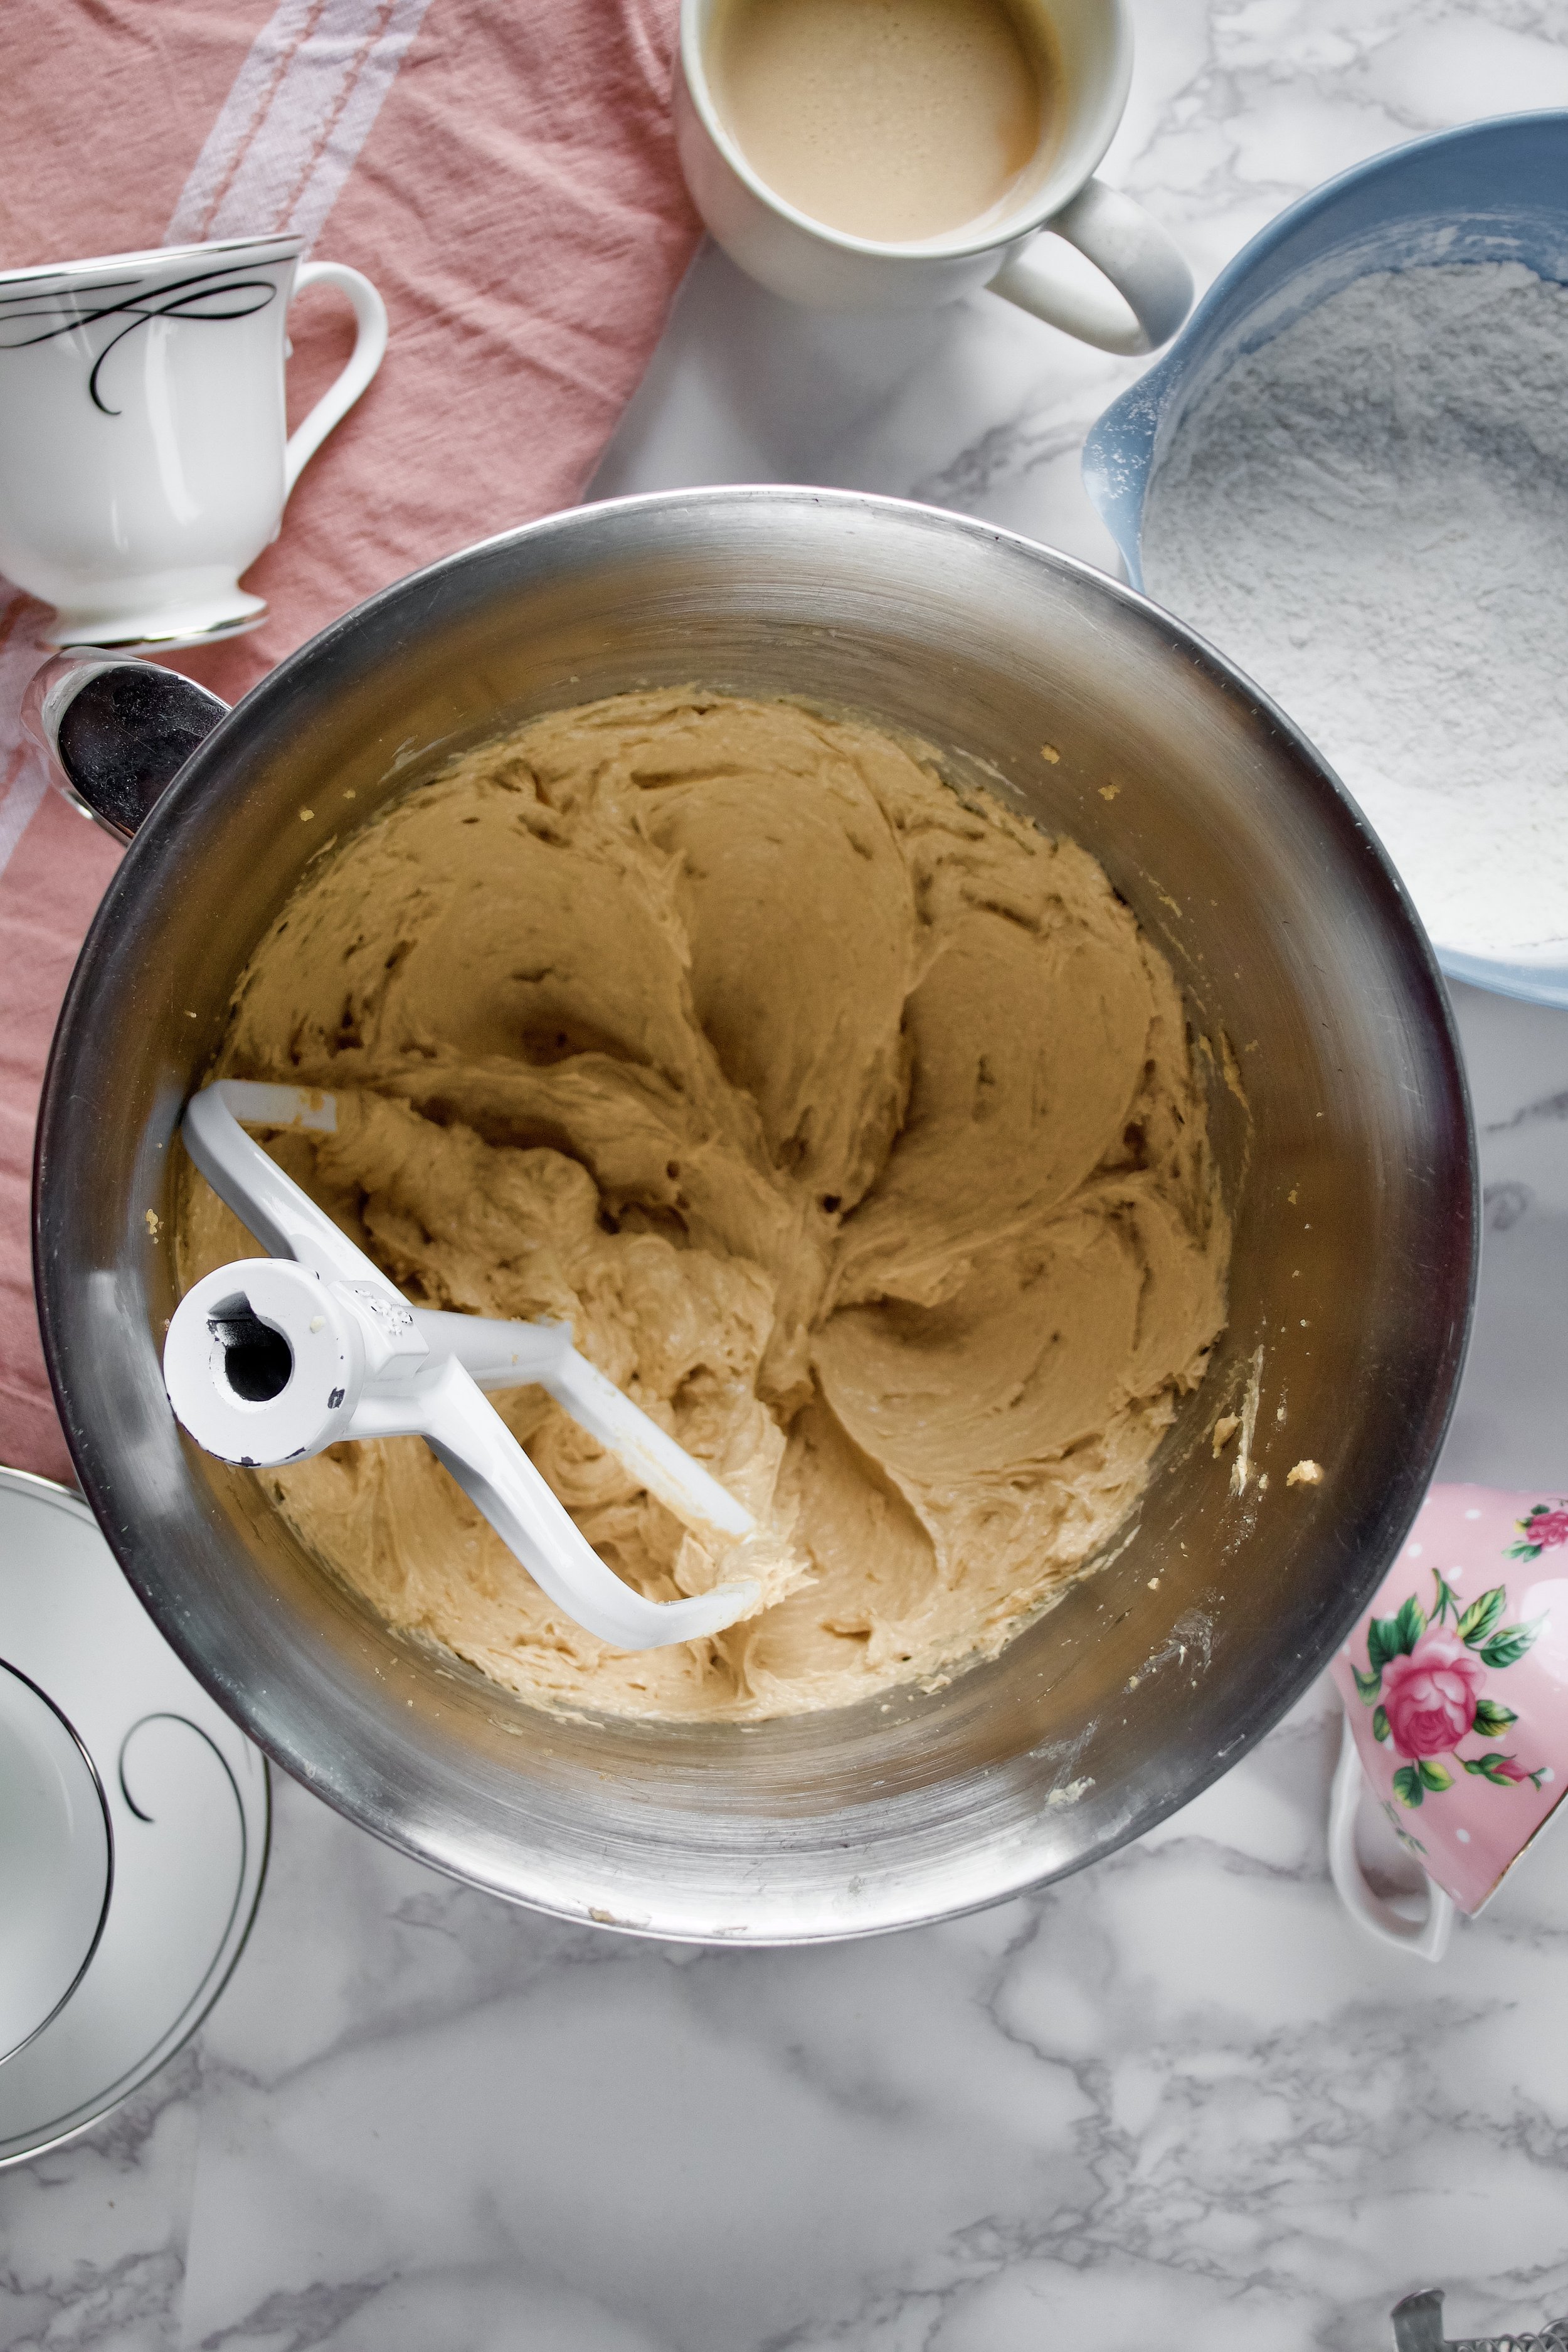
2. Cream butter and sugars. Make sure to beat these for at least 3 minutes, scraping the bowl at least once to ensure it’s nice and fluffy and lightened in color. This makes a dramatic difference in your finished cake.
3. Add eggs, one at a time, then oil and vanilla. Be sure these are room temperature, and mix well after each addition.
4. Alternate dry ingredients and milk/espresso. Add half the flour then mix on low. Add the milk and strong espresso (or milk with instant coffee fully dissolved by now) and mix on low. Then add the rest of the flour and mix on low. Don’t worry if there are some clumps. You just want to ensure there’s not visibly dry flour.
5. Bake. Check early to ensure it doesn’t over bake. When you check it with a toothpick, there should be some moist crumbs but no raw batter.


6. Make coffee buttercream. You can also make this ahead and store it in the fridge, which will help deepen the coffee flavor. Just let it come to room temperature and stir well before using.
7. Make vanilla whipped cream. Save this until you’re ready to assemble the cake or it will deflate.
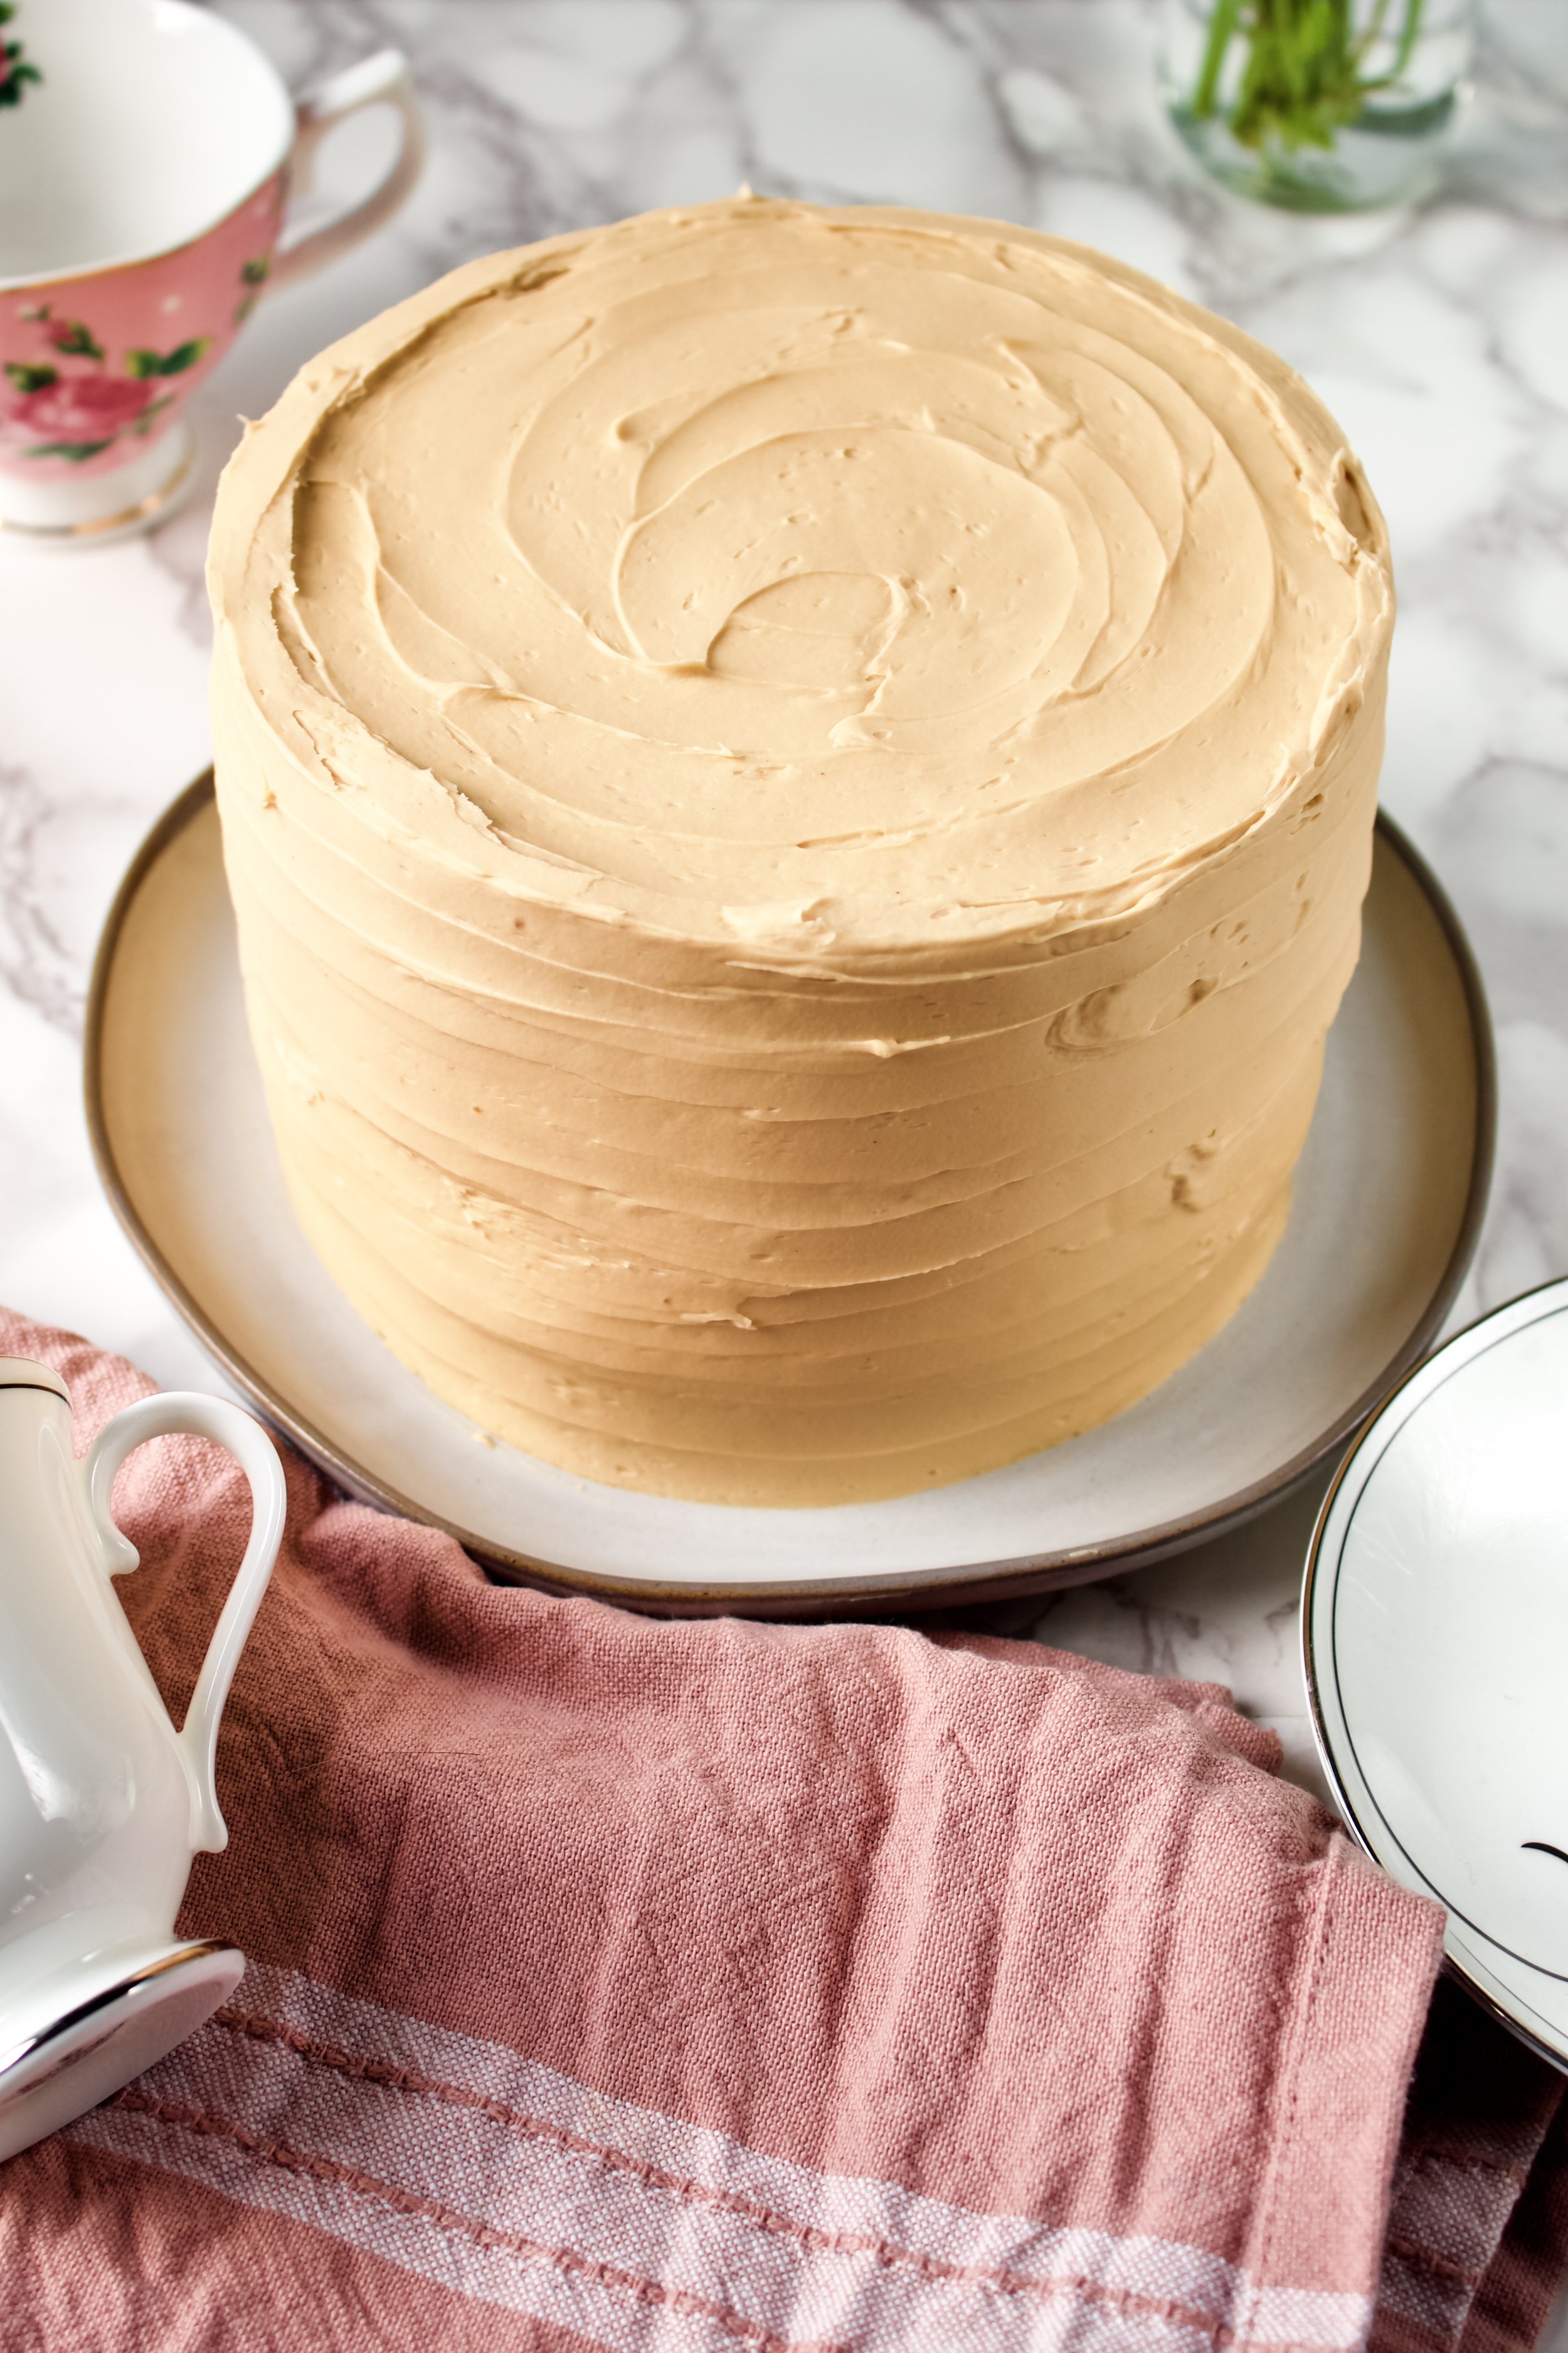
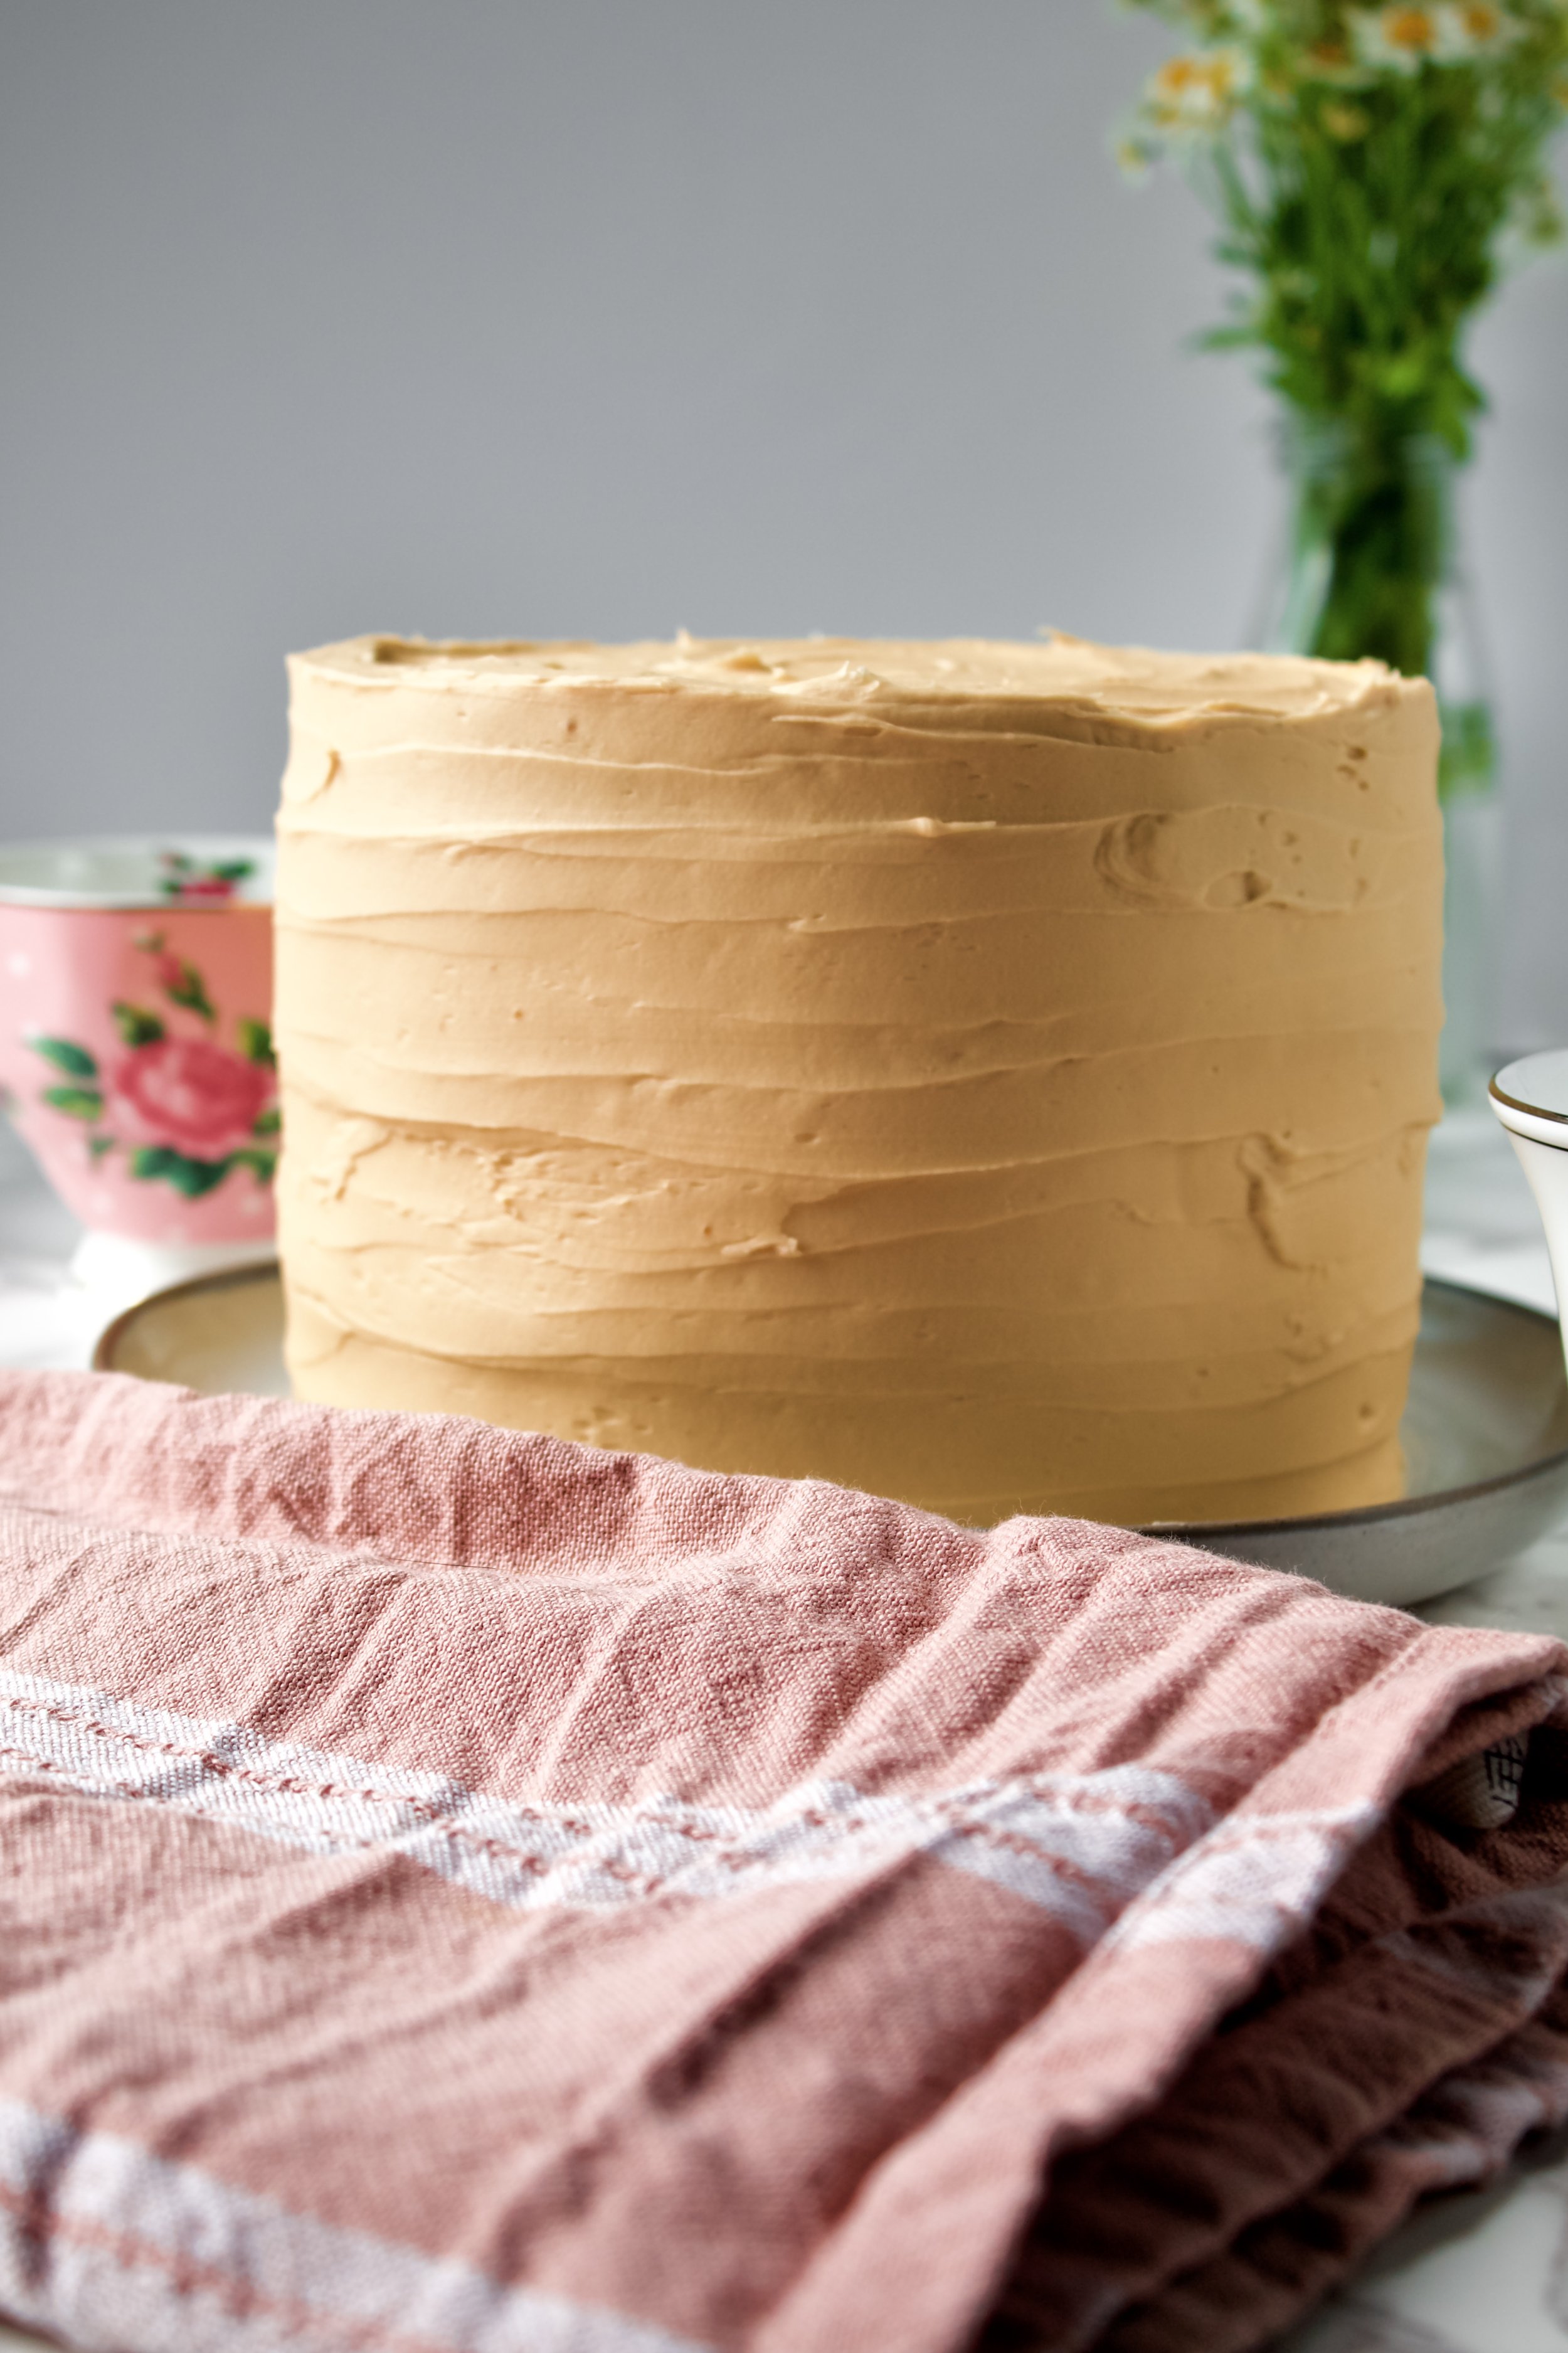
8. Assemble cake. Spread a thin layer of coffee buttercream then pipe a ring of it around the edge of each layer, filling that with whipped cream. Continue until all layers are stacked. Frost the cake thinly with a crumb coat, refrigerate, then frost to desired thickness. Keep refrigerated until ready to serve.
Enjoy!


Tips and FAQ’s for this recipe
Frost layers separately
This is one of those weird tricks that I love but not everyone might want to use. The cake can sometimes slide around as you frost it, so I like to spread that thin layer of frosting onto each layer before I stack them, so that spreading that thin layer doesn’t cause the cake to slide around or split.

Refrigerate until 10 minutes before serving
The whipped cream filling really shouldn’t be left out for long periods of time. Of course, it can stay at room temperature up to 2 hours before it is considered spoiled by restaurant standards. However, the longer it’s out, the more likely it is to deflate and cause the cake to collapse or split. So, avoid cutting the cake too warm, and keep it refrigerated until 10-30 minutes before you plan to serve it.
If you plan to have this cake at an outdoor event or travel long distances with it, omit the vanilla whipped cream filling and consider reserving some buttercream (about 1 cup) before you add the instant coffee to add vanilla bean paste to (about 1 teaspoon or 4g), so you have something vanilla for the filling that helps break up the coffee flavors in this cake.

Do I really need 2 tablespoons oil?
I get it. I used to feel this way about a measly 2 tablespoons of something like oil, too. I often omitted it or just used a little more butter. But the thing is, butter is great for creating fluffy cake layers but not so great for retaining moisture in a cake that must be refrigerated. So, adding just a tiny bit of oil is the key to helping the cake stay moist while in the fridge! It’s just enough to retain moisture without weighing it down or making it dense.
Split up your work
I try to spit up my bakes whenever possible. I made the buttercream a couple days in advance, which had the added benefit of making a richer coffee flavor. The cake can also be made ahead, but the ideal way to store it is actually in the freezer. Double wrap it in plastic wrap and freeze for up to 1-2 months. You could also make it the night before and keep it on the counter, double wrapped. But it’s best to frost it within about 12 hours or so. You can refrigerate the assembled cake overnight as well, so it’s ready to go for your celebration!
*Can I sub espresso powder?
You can create your 1 cup of milk and coffee by combining one cup of whole milk with 1 tablespoon instant coffee or espresso (use high quality!). Do this when you take the milk out to warm up (same time as the eggs and butter). It might clump up a bit, so you may need to let it rest then whisk again later until it’s blended. I used up the last of my espresso powder in my coffee buttercream, so I had to go the strong espresso shot route, which still worked perfectly.

Use quality coffee
Please, for the love of all that is coffee, don’t use Nescafe. For the instant coffee route, I like Starbucks Via Pike Place, because I found a good deal on Amazon when the whole dalgona coffee craze was dominating our pandemic life. For fresh coffee, I tend to buy local in a roast I prefer (usually with notes of chocolate, nuts, and caramel). But there are some really great brands out there, so go searching! I like to keep instant coffee on hand for baking, as you only need about 1 packet per recipe. And of course I always have a variety of coffee beans—regular and decaf—on hand.

My cake tools
Here are my must-have tools I use for making this cake. Affiliate links provided.
Mesh sieve (because sifting is KEY for a fluffy cake)
All-rubber spatula (this makes scraping the bowl easier as the batter and frosting doesn’t get all over a wooden handle!)
Silicone liners for 8” cake (or for 6” cakes)
8” aluminum cake pans or 6” aluminum cake pans (I’ve found nonstick doesn’t bake as evenly)
Offset spatula for frosting the cake

Vanilla Latte Cake
- prep time: 40-45 minutes
- bake time: 25-30 minutes
- total time: 1 hour, 15 minutes (plus about 1 hour cooling time)
servings: 12-16
Ingredients:
for the coffee cake layers
- 2 cups plus 2 tablespoons (289g) flour, spooned and leveled then sifted
- 2 teaspoons (8g) baking powder, sifted
- ½ teaspoon (3g) ground sea salt
- ¾ cup (170g or 12 tablespoons) unsalted European style butter, room temperature
- 1 cup (200g) packed light brown sugar
- ½ cup (100g) granulated sugar
- 3 large eggs, room temperature
- 2 tablespoons ( neutral oil (avocado is best, vegetable or canola will do)
- 1 tablespoon pure vanilla extract
- ¾ cup whole milk, room temperature
- ¼ cup very, very strong coffee or double shot of espresso (see note above if subbing instant coffee)
for the coffee buttercream
- 1 ½ cups (340g) unsalted butter*, softened
- 4-5 cups (520-650g) powdered sugar
- ¼ teaspoon (2g) finely ground sea salt (or to taste)
- 1 tablespoon (13g) pure vanilla extract
- ½ tablespoon (3g) instant coffee or espresso (or to taste)
- 2 tablespoons (28g) boiling water
- up to 4 tablespoons (56g) heavy whipping cream, optional (use only as needed)
for the vanilla whipped cream
- 1 cup heavy whipping cream
- ¼ cup (32g) powdered sugar
- 1 tablespoon (13g) pure vanilla extract
Instructions:
make the coffee cake layers
- Preheat the oven to 325F/165C. Grease and flour two or three 8” or 9” cake pans or three to four 6” cake pans (or use baking spray) and line with parchment paper (or use silicone liners).
- In a medium mixing bowl, use a large fine mesh sieve to sift then whisk together the flour, baking powder, and salt. Don’t skip sifting the flour and baking powder, as that will drastically affect the texture of the cake. As well, be sure to spoon then level your flour so you don’t pack it in. Set aside.
- In the bowl of your stand mixer fitted with the paddle attachment (or in a large mixing bowl and using hand beaters), beat the butter until smooth. Add the sugars and beat on high until light and fluffy, about 3 minutes, scraping the bowl as needed.
- Add the eggs one at a time, beating on medium until well blended and scraping the bowl after each egg. Add the oil and vanilla extract and beat on medium until well blended, about 1 minute.
- Make your strong espresso shot or coffee (see note for using instant coffee or espresso)*. Add to the milk. You want 1 cup total of coffee/milk, so if you end up with extra, be sure to set that aside for a miniature pick-me-up and don’t add it to the batter.
- Add half of the flour to the butter/egg mixture and beat on low until just barely combined. Add the milk/coffee and beat on low until just barely combined. Then add the rest of the flour and beat on low until just barely combined. Scrape down the bowl then mix on low for 2-3 seconds just to combine all batter.
- Divide evenly between prepared pans and spread evenly. Bake for 25-30 minutes (less if using 3 or more pans), until a toothpick inserted in the middle comes out with a few moist crumbs. Begin checking cake around 15 minutes, and rotate at this time if not using convection. You want to catch it at the sweet spot between raw batter and no crumbs (which means it’s overbaked).
- Let cakes cool in the pan 5-10 minutes then remove to a cooling rack until completely cooled.
make the coffee buttercream (if not made in advance)
- In a small bowl, combine instant coffee or espresso with the boiling water. Stir until dissolved and smooth. Set aside to cool.
- Either in the bowl of your stand mixer, fitted with a paddle attachment, or in a large mixing bowl and using a hand mixer, beat butter on high until very smooth, about 30 seconds. Be sure the butter is soft but still matte looking. If it’s shiny, it’s over-softened and needs to go back in the fridge for a few minutes.
- Add powdered sugar, one cup at a time, beating on low then increasing to high until smooth, about 1 minute. Stop after you’ve added 4 cups. You can add more at the end, if needed. Scrape the bowl.
- Add the vanilla, salt, and half of the cooled coffee. Beat on low until somewhat combined then on high until smooth and fully combined.
- Taste buttercream. If you’d like a stronger coffee taste, stir a little more of the coffee, until you’re happy with the taste. At the sametime, add up to 1 more cup of powdered sugar if it needs more sweetness. If you don’t want any more of a coffee taste but need to smooth out the frosting, you can add some heavy whipping cream, one tablespoon at a time, until smooth and nicely spreadable.
- Once the flavor and texture are to our liking, beat on high for about a minute, to fluff up the frosting. Then stir vigorously with a wooden spoon or rubber spatula for another minute to release the air bubbles.
make the vanilla whipped cream
- Combine the heavy cream, powdered sugar, and vanilla in a large, chilled mixing bowl. Whisk gently to combine. Taste, adjusting sugar or vanilla until desired taste is reached (only add more vanilla in small amounts, about ½ teaspoon at a time, to avoid it overpowering the flavor).
- Whisk vigorously (or use a hand/stand mixer with the whisk attachment) until stiff peaks begin to form.
assemble your cake
- If you made the buttercream ahead of time, you may need to stir or beat it for a minute to make it pliable. Fill the cake by spreading a thin layer of buttercream on the bottom cake layer. Build a ring of buttercream around the edge using a piping bag or plastic baggie with a corner cut off. Fill with vanilla whipped cream.
- If your house is warm, it may be easiest to frost the top of the next layer of cake while it’s on the cooling rack then transfer it with a large spatula or cake lifter. That way you don’t cause the layers to separate as you spread buttercream on the upper layers.
- Once all layers are added, frost a thin crumb coat of buttercream then chill for at least 20 minutes to set. Frost with desired amount of buttercream (I used almost all of it--so good!). Chill until set.
Enjoy!
Keep cake refrigerated until 10-30 minutes before serving. Alternatively, I found it easiest to cut it while chilled then let each slice warm up for 10 minutes on the counter. Store leftovers in the fridge, placing a piece of plastic directly against any cut edges then covering the whole thing with plastic wrap or storing in an airtight cake holder. Leftovers will last 3-5 days in the fridge.