
Dark Chocolate Raspberry Tart
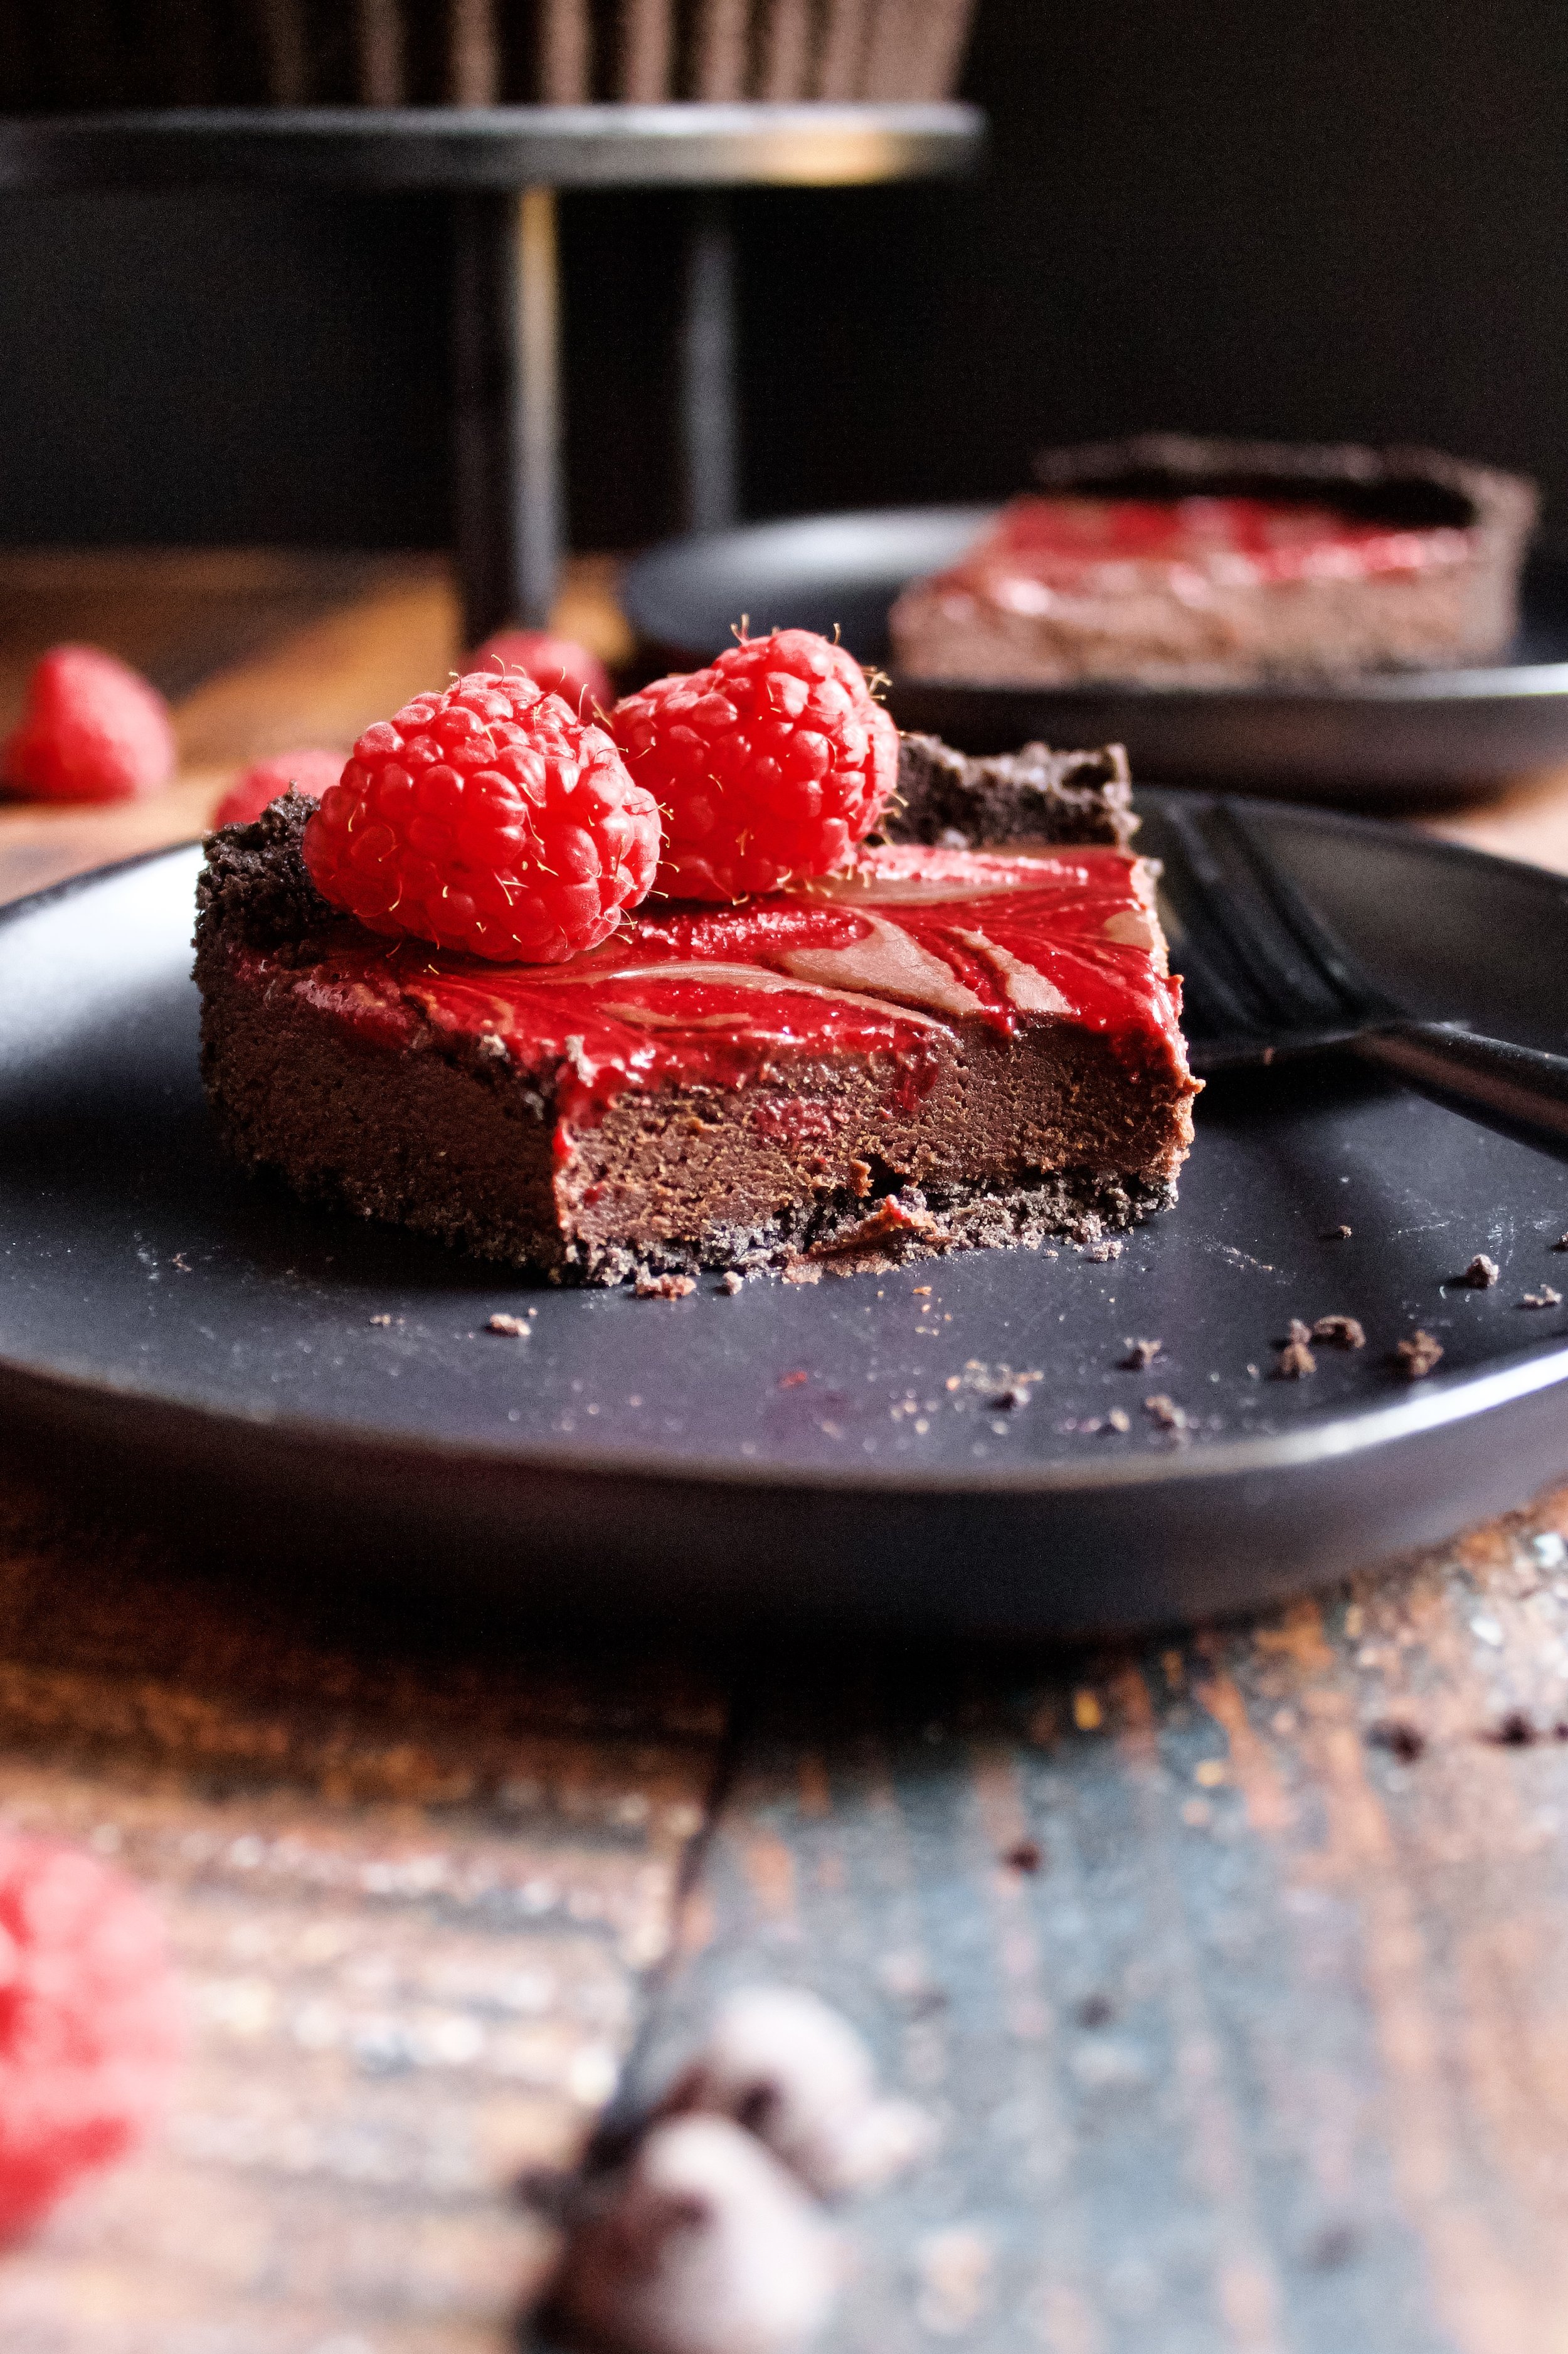
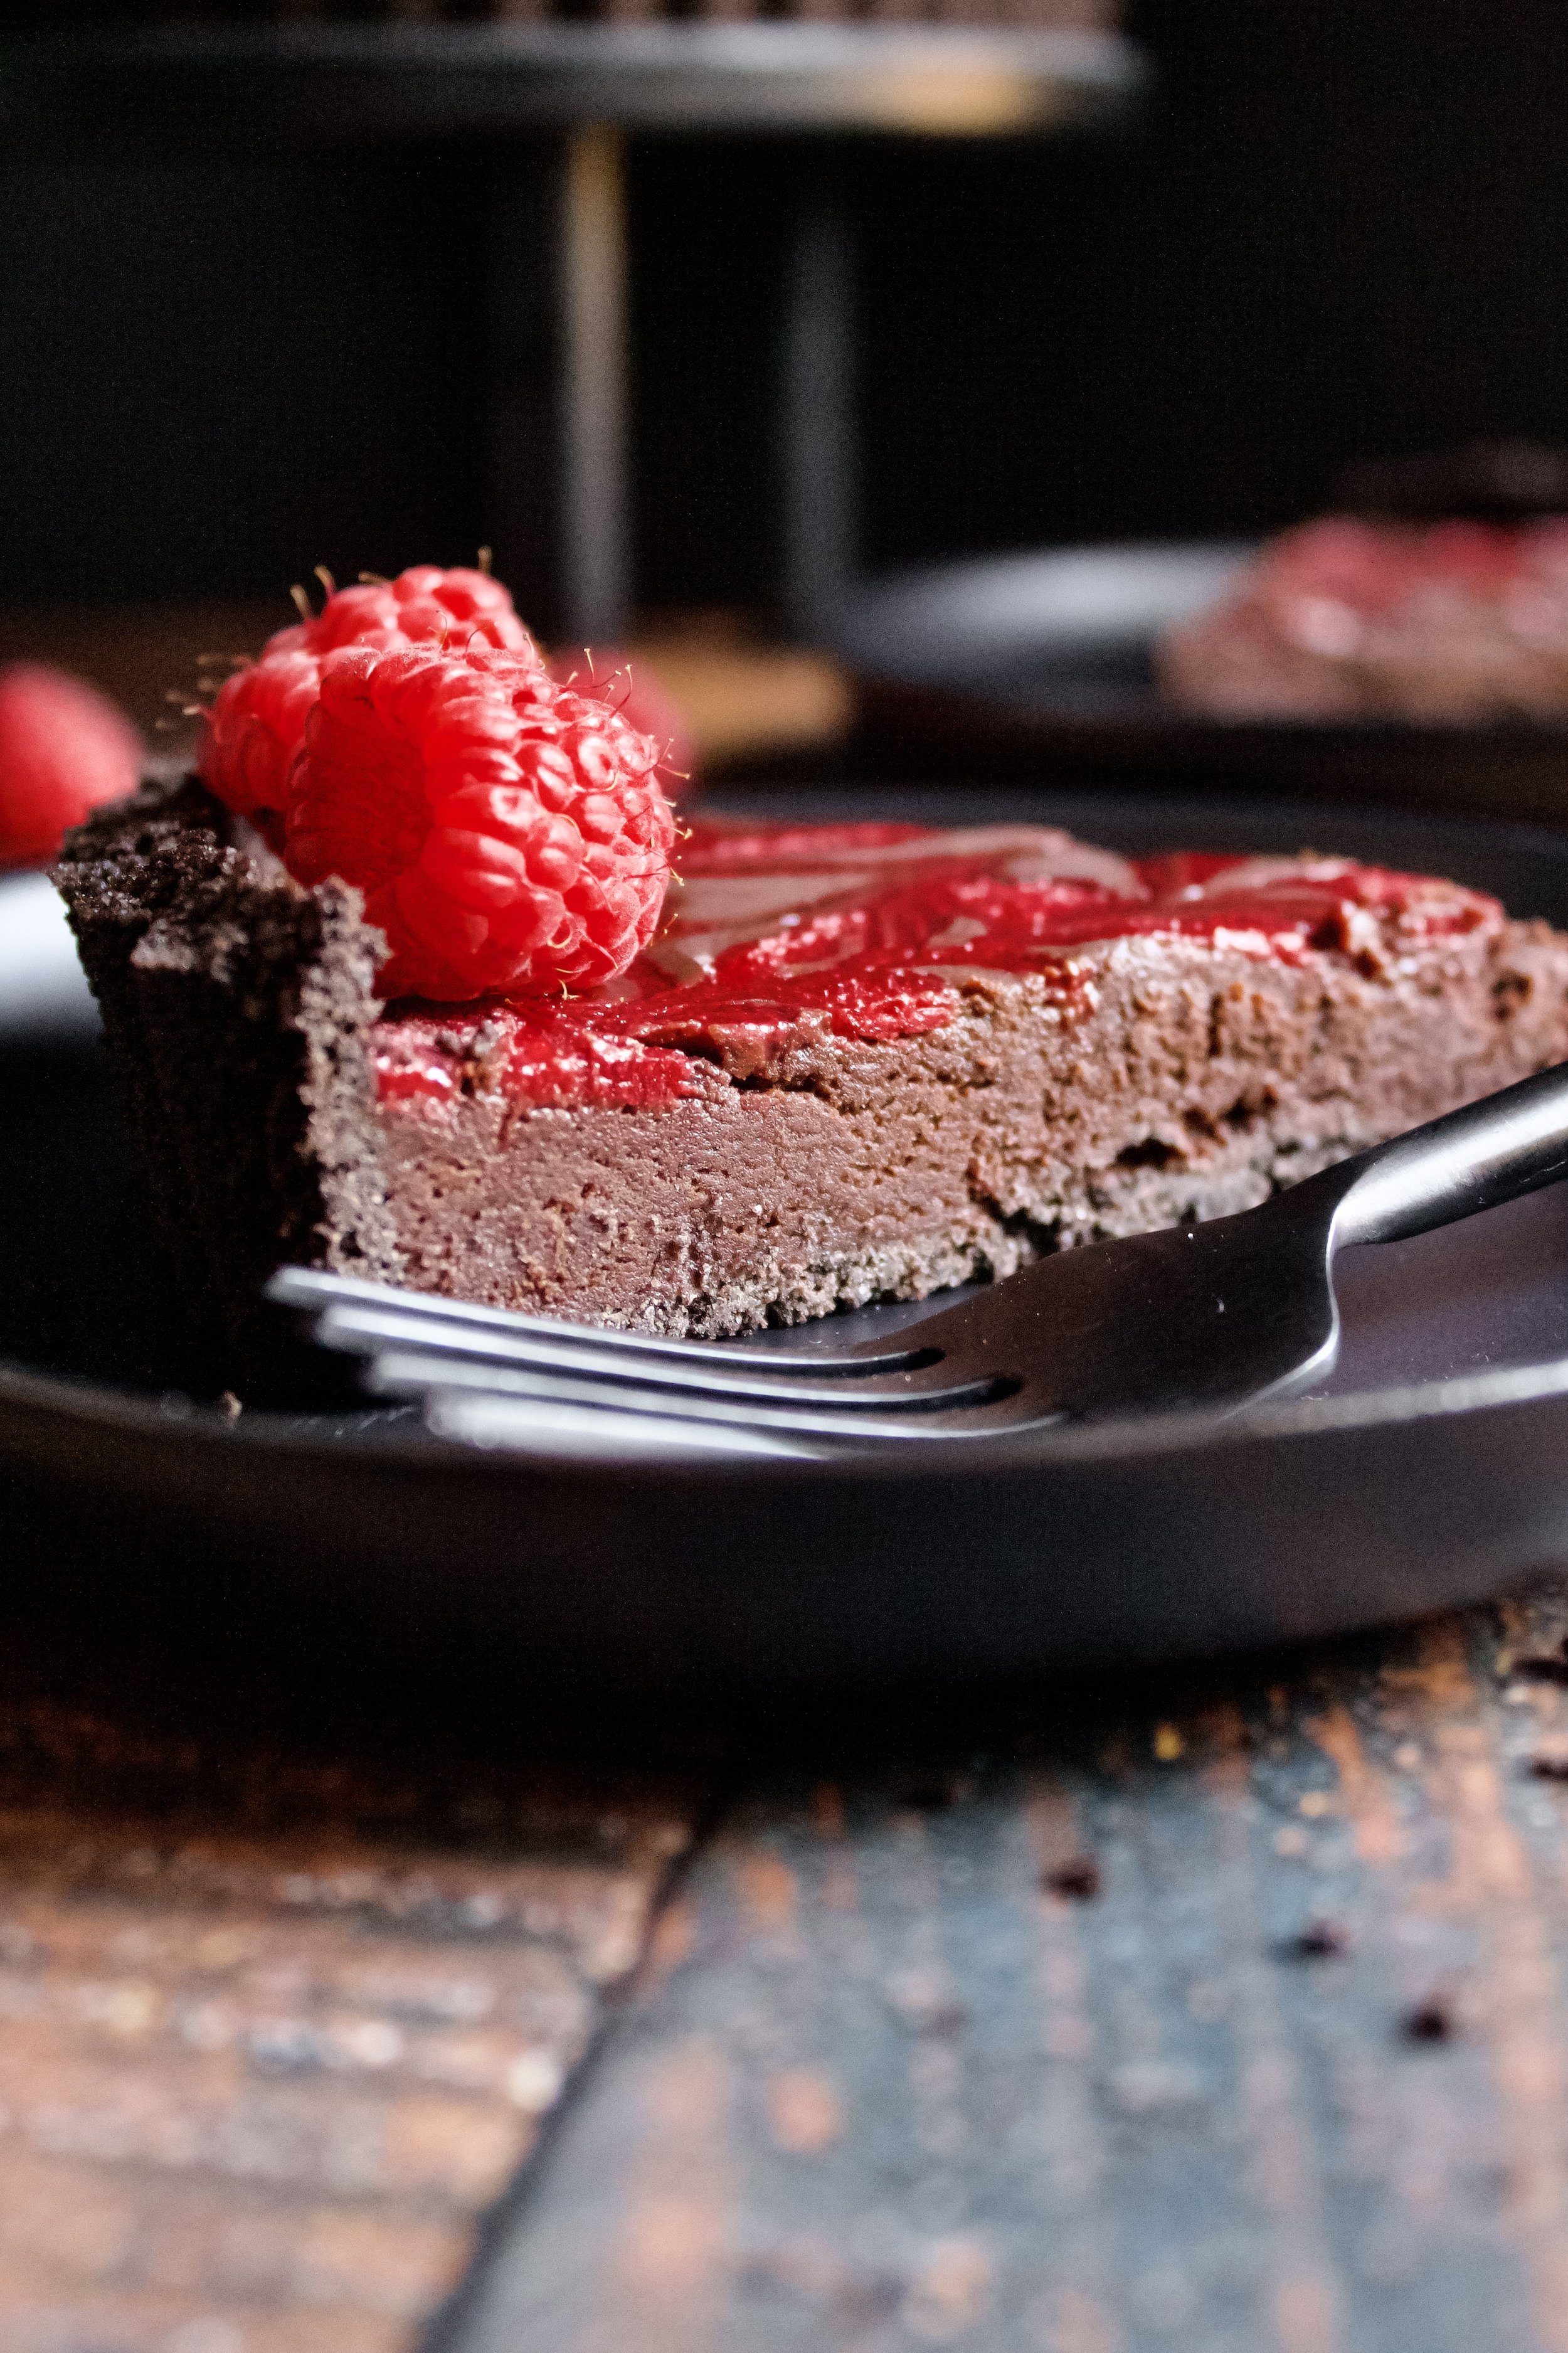
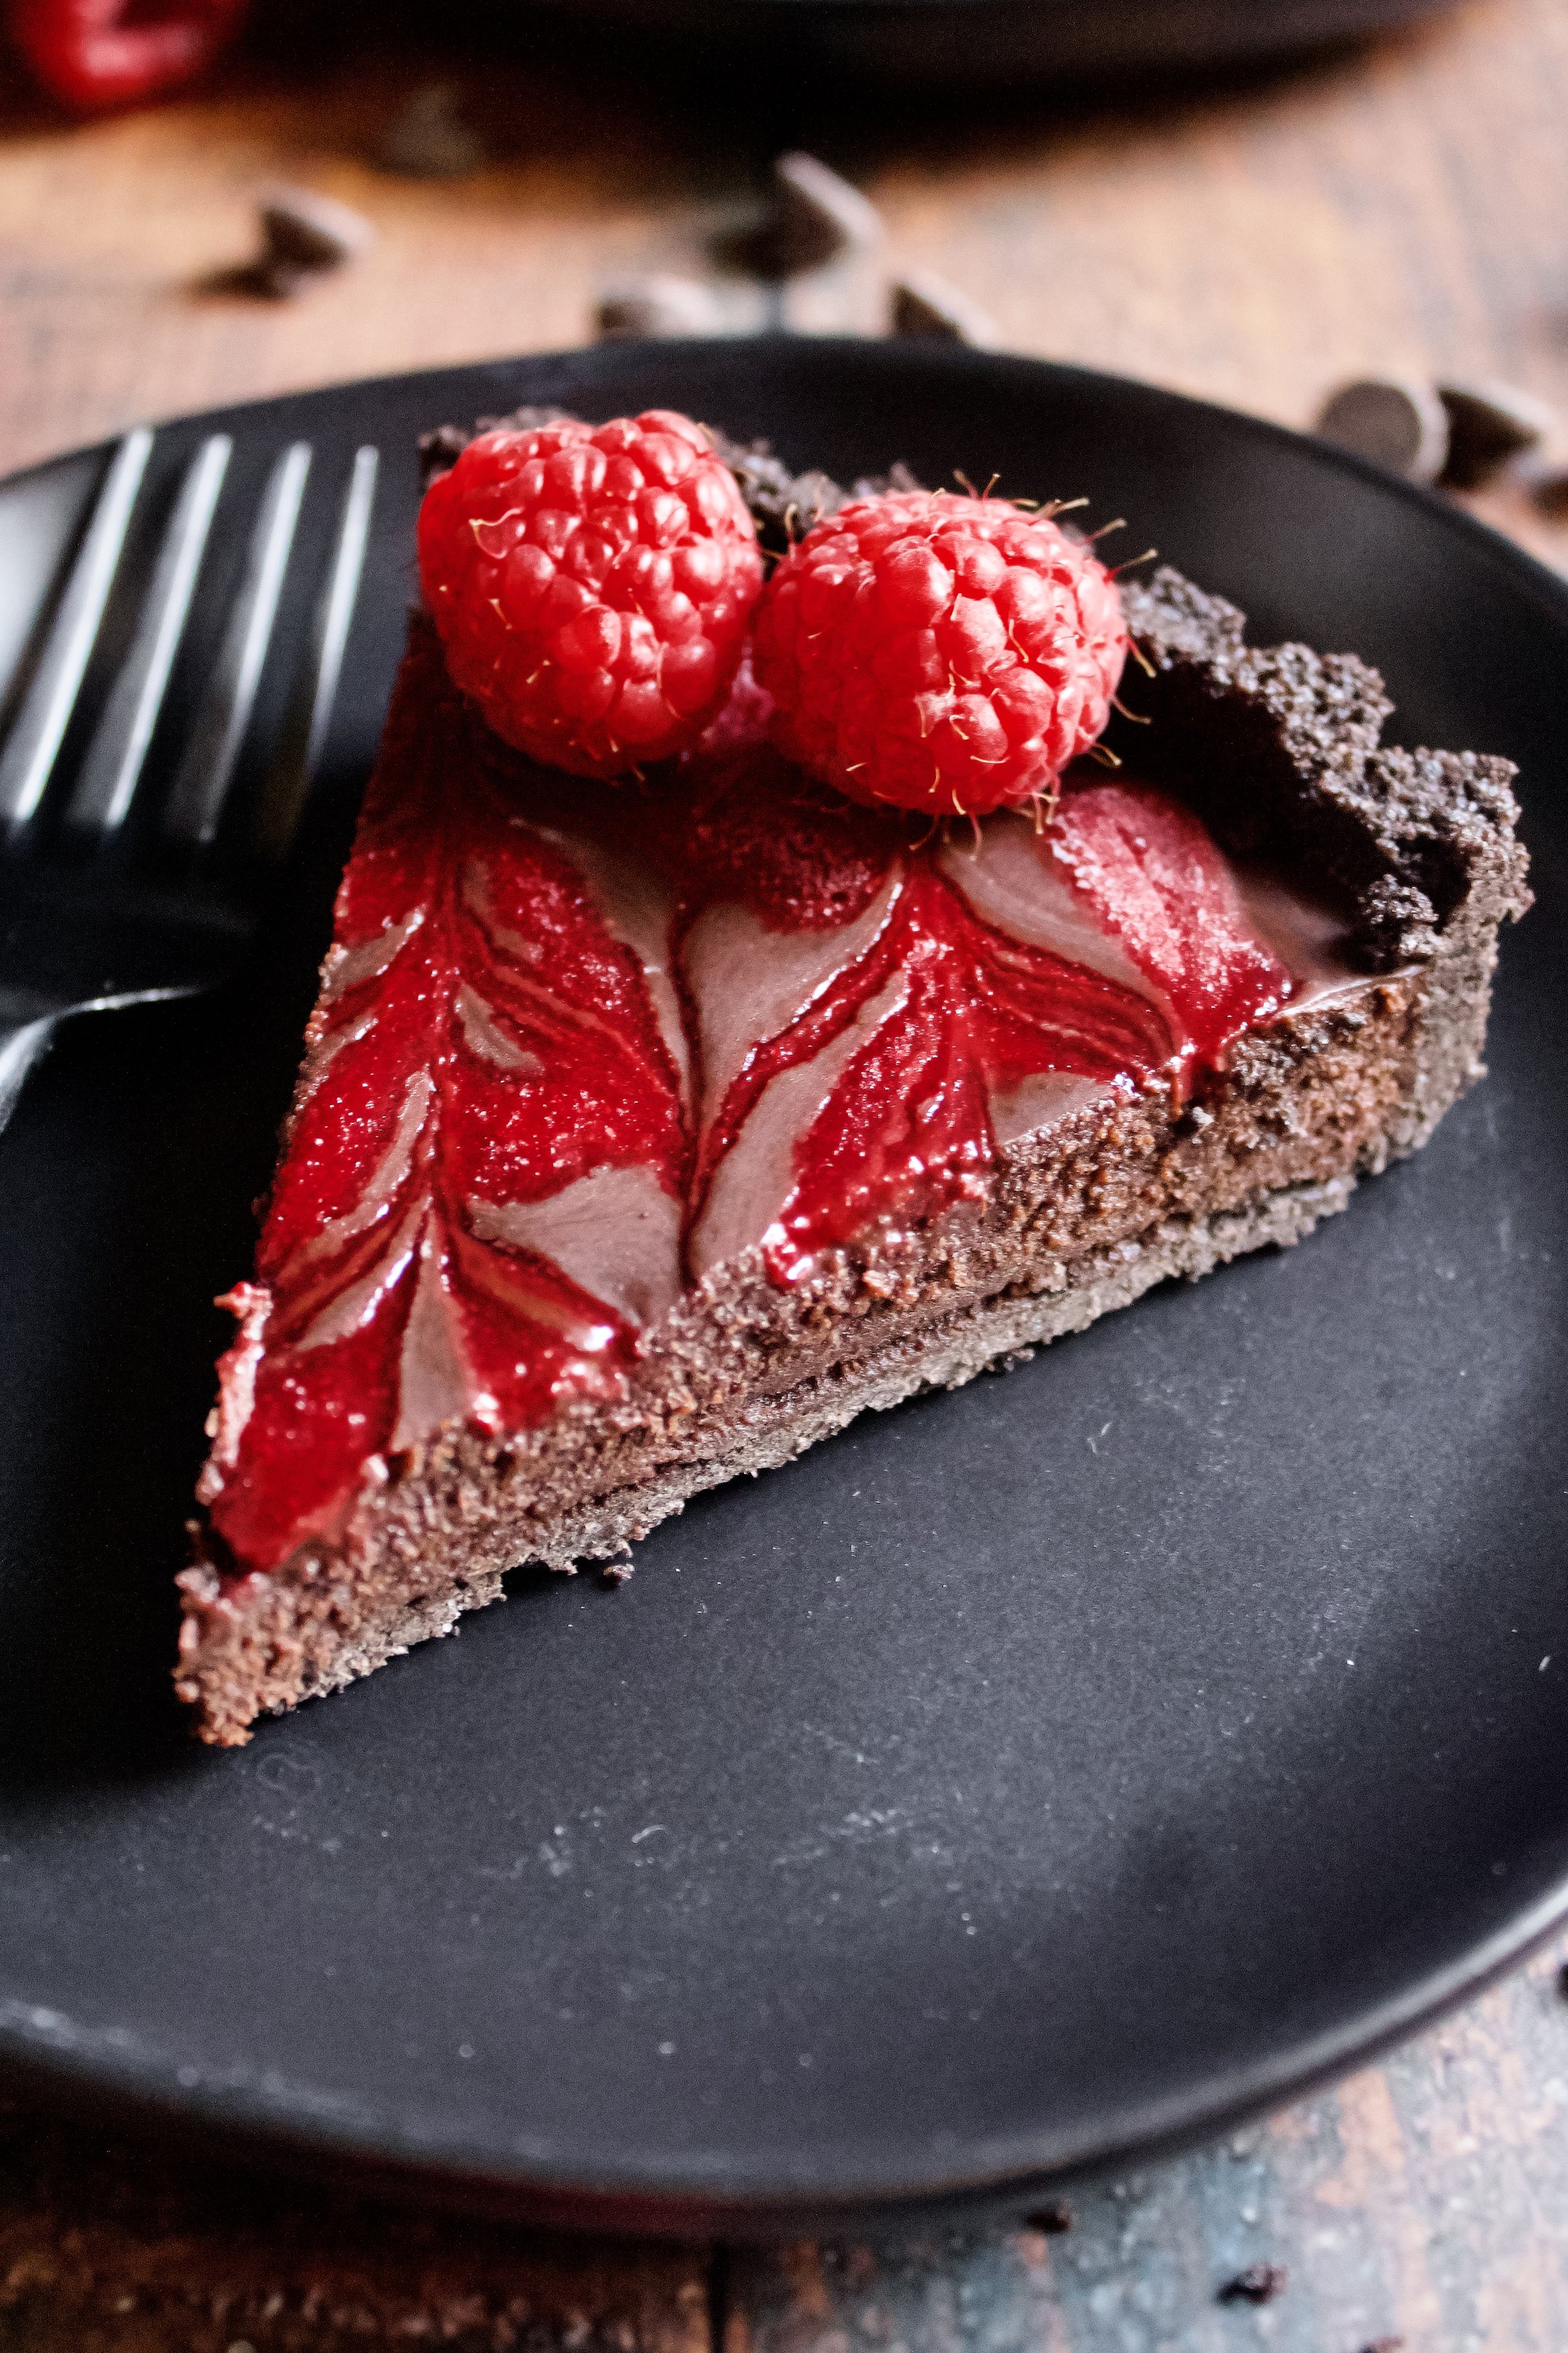
Silky dark chocolate raspberry ganache swirled with a raspberry reduction, all in a crunchy cookie crust. This tart is both rich yet bright and fruity, with a balance of flavors from chocolate and raspberries.
This post may contain affiliate links from which, at no additional cost to you, I may earn a small commission to keep this site running. Only products I myself would or do use are recommended.

Okay, full disclosure: this recipe is easy. Like, really easy. It just looks fancy. And trust me—it tastes fancy, too. But it’s in no way complicated or difficult.
It just has lovely little swirls of raspberry making it look oh-so-pretty. And they pack a lovely sweet-yet-tart punch of flavor.
This was one of those tarts that I couldn’t get enough of.
Why this recipe works
The biggest appeal is how simple this recipe is. For the crust, you just grind up Oreos then stir in some melted butter and voila! You have a crust you can easily press into your pan. The key is stirring the butter in, not pulsing it in the food processor. I used to just toss it all in there to avoid making more dishes, but the Oreo’s usually turn gummy if you do this. Instead, stir it all quickly and you’ll get a perfectly crunchy crust.

Then the filling. Wow. I’ve shared the vegan version and salted caramel version before. Adding raspberry reduction not only brings in an addicting flavor but also helps make the filling sturdy-yet-sliceable. Together, it’s silky smooth, which complements the texture of the crust beautifully. Be sure to strain the raspberry reduction to get the right texture and flavor.

And finally, that raspberry swirl! It’s so simple—you just drizzle it on the still-liquid chocolate then take a knife and run it up and down in strips across the tart in opposite directions. I went over my lines a few times to make them more pronounced and to get the raspberry more settled into the ganache, but that’s not necessary. You’ll still get a lovely, delicious tart either way!
Key ingredients
Butter. As mentioned above, always use European style butter in shortbread. It’s creamier and has less water.
Oreo cookies. I suggest regular, as they have the right balance of cookie and filling to create the correct texture of crust.
Dark chocolate chips. Any brand will do, and you can also use chopped up baking chocolate. Semi-sweet also works, but won’t be as rich.
Heavy cream. Be sure you have heavy cream or heavy whipping cream, also known as double cream. Using just whipping cream or cream won’t yield the right texture, as that has less fat.
Raspberries. I used frozen, but fresh works fine, too. You’ll want to start with plain raspberries instead of jam, as we’re not thickening it at all but simply cooking them down to a sauce then straining them.

How to make dark chocolate raspberry tart
1. Reduce and strain the raspberry. You’ll cook it over medium heat until the raspberries break down into a sauce and there is no intact raspberry left (other than the seeds). Strain well with a fine mesh sieve.
2. Crush the cookies. I use my food processor, but a blender would work, too.
3. Stir in the melted butter. Stirring it in a separate bowl rather than blending it keeps the crust crunchy.
4. Press crust into pan and freeze. I use my hands until it’s mostly in place then use a cup to get it nice and firm.


5. Melt chocolate, cream, and some of the raspberry. Just a little raspberry is necessary to help the tart be sliceable and also give it that pop of raspberry flavor.
6. Pour into crust and swirl the raspberry. Once the filling is smooth, simply pour it into the frozen crust. Drizzle the raspberry reduction over the ganache. I just made zigzags until it looked like enough raspberry was on the tart. I also didn’t use all of the raspberry, but you’re welcome to if you’d like.
7. Make swirls with a knife. I just went in lines, going up then down on every other line I made. You could also drizzle the raspberry in circles then draw lines toward and away from the center of the tart. But I felt like my method was much simpler, haha.
8. Refrigerate until set. Refrigerate for at least 1 hour (or freeze 30 minutes then transfer to the fridge). Don’t serve until the tart is fully set and no longer jiggly or shiny.
Enjoy!


Tips and FAQ’s for this recipe
Can I make this tart in advance?
You can make this up to a week in advance. Make the crust and fill it with the ganache. After it’s set, cover well and freeze. Refrigerate for a few hours or overnight before serving.

Can I make this gluten free?
Yes! The only gluten in this recipe is the cookies, so just use gluten free chocolate sandwich cookies and you’re good to go! It will be a one-to-one substitution and works just fine.

Can I make this dairy free?
Yes! Use vegan butter in the crust (one-to-one substitution). For the filling, use 18 ounces dairy free chocolate and 1 can (14oz) full fat coconut cream (not milk). To make it fully vegan, you will need either vegan cookies (do those exist?) or use your own preferred vegan chocolate crust.

Can I use any crust?
Yes! I really liked the ease of a no-bake crust and the taste of this particular Oreo crust, as it complements the richness of the filling. The taste and texture paired beautifully with the filling. However, any tart crust would work just fine. In fact, I’ve made this tart with a shortbread crust before (details on how to pre-bake it can be found here—but you’d use regular shortbread instead of peanut butter).

My tart tools
Here are my must-have tools I use for making this tart. Affiliate links provided.
Heavy medium pot (ideal for making a double boiler)
Mesh sieve (to strain the raspberry seeds)

Dark Chocolate Raspberry Tart
- prep time: 20-25 minutes
- chill time: 1 hour, 30 minutes
- total time: 1 hour, 55 minutes
servings: 10-12
Ingredients:
- 18-24 chocolate sandwich cookies (such as Oreos)
- 3-4 tablespoons (42-56g) melted butter
- 18 ounces (510g or 3 cups) dark chocolate chips (or chopped baking chocolate)
- 1 cup (240g) heavy whipping cream
- 2 cups (about 250g) raspberries, fresh or frozen
Instructions:
- Reduce the raspberries. Place raspberries in a medium, heavy bottomed saucepan. Add a small splash of water to prevent burning. Cook over medium heat, stirring frequently, until the raspberries completely break down and create a sauce, about 10 minutes There should be no intact pieces of raspberry (other than the seeds).
- Strain the raspberry reduction through a fine mesh sieve. Be sure to remove all seeds. Set reduction aside and let cool.
- Make the crust. Crush the cookies in a food processor then pulse in the butter (or stir in a separate bowl). If using a 10” pan, you’ll need the full 24 cookies and 4 tablespoons butter. If using an 8” or 9” pan, you’ll need 18 cookies and only 3 tablespoons butter. More information about the crust can be found here.
- Gently distribute crust mixture around your tart pan, spreading an even layer across the bottom and a little up the sides. Using a flat-bottomed cup or measuring cup, firmly press the crust in, going in concentric circles to slowly apply pressure across the tart. If you press too firmly at the beginning, it’ll just make a hole in the crust, so go in circles until it starts to stick in place.
- Freeze for 10 minutes, or chill in the refrigerator for 20-30 minutes, until firm.
- While the crust sets, make the filling. You need a small-ish, heatproof bowl and a small-ish saucepan that the bowl can sit on top of and be about halfway submerged in. Fill the bowl with the chocolate, heavy cream, and 2 tablespoons of the raspberry reduction. Fill the saucepan with one to two inches of water and bring that to a boil. Once it is boiling, turn the burner to medium-low and set the bowl of chocolate over it.
- Stir the chocolate mixture frequently, adjusting the temperature as needed to keep the water at a steady simmer. Once the chocolate is mostly melted, remove the bowl from the saucepan and stir until the chocolate is fully melted. If it doesn't fully melt, you can always return the bowl to the saucepan as needed.
- Pour the chocolate into the hardened crust.
- Drizzle the remaining raspberry sauce (or as much as you want of it) in zigzags or circles/a circular swirl. Don’t cover the chocolate entirely. Use a knife to create swirls. I chose to do a zigzag of raspberry then run my knife in parallel lines about ½ inch apart, going up then down each time.
- Chill for about 1 hour, until the filling is set and matte in appearance. Alternatively, you can freeze the pie to set the filling faster, but it will need to go into the fridge as soon as it’s set to make it slice-able.
- Decorate with fresh raspberries before serving, if desired.
Enjoy! Keep tart refrigerated until serving.