
No Fuss Sour Cream Pie Crust
A nearly foolproof crust that is easy to roll out and always turns out flakey. No more guessing how much water you need or ending up with a soggy or crumbling crust. Only five ingredients and a few simple steps to a delicious, reliable pie crust.
This post may contain affiliate links from which, at no additional cost to you, I may earn a small commission to keep this site running. Only products I myself would or do use are recommended.

Anyone else a Stranger Things fan? I’m trying to write this while also watching the newest season, so forgive me for any typos or ramblings that don’t make sense. My attention is clearly very divided, but I only have now to both write and watch. And I ain’t waiting longer to watch this!
Okay, so pie crust. I really feel guilty that I’m not a pie master. In fact, pies frustrate me quite often. I love me a good no-bake pie, and I can rock those quite easily. But classic pie crust isn’t always easy to do. The only one I’ve truly never struggled with is my foolproof classic pie crust. It’s flakey and amazing and I’ve never had it turn out poorly before.
But it has shortening, and I prefer to avoid that. Just a personal choice.
So, I’ve been on a years long hunt for a reliable crust that uses ingredients I can feel good about. (This is also what led me to finding a no-churn ice cream that doesn’t use sweetened condensed milk.) I’ve lucked out with classic all-butter recipes, but I really don’t like grating butter if I can help it. It always melts onto my hands, and if I grate it frozen, it’s really hard to do.
Now, I’ve finally, finally done it. I found the perfect pie crust that doesn’t require special equipment or pie-whisperer skills. It’s actually quite simple and quick and doesn’t make me crazy or leave me swearing off pies. And it’s buttery and flakey and just so delicious.
I dare say this will be my new go-to pie crust. Why mess with perfection?

Why this recipe works
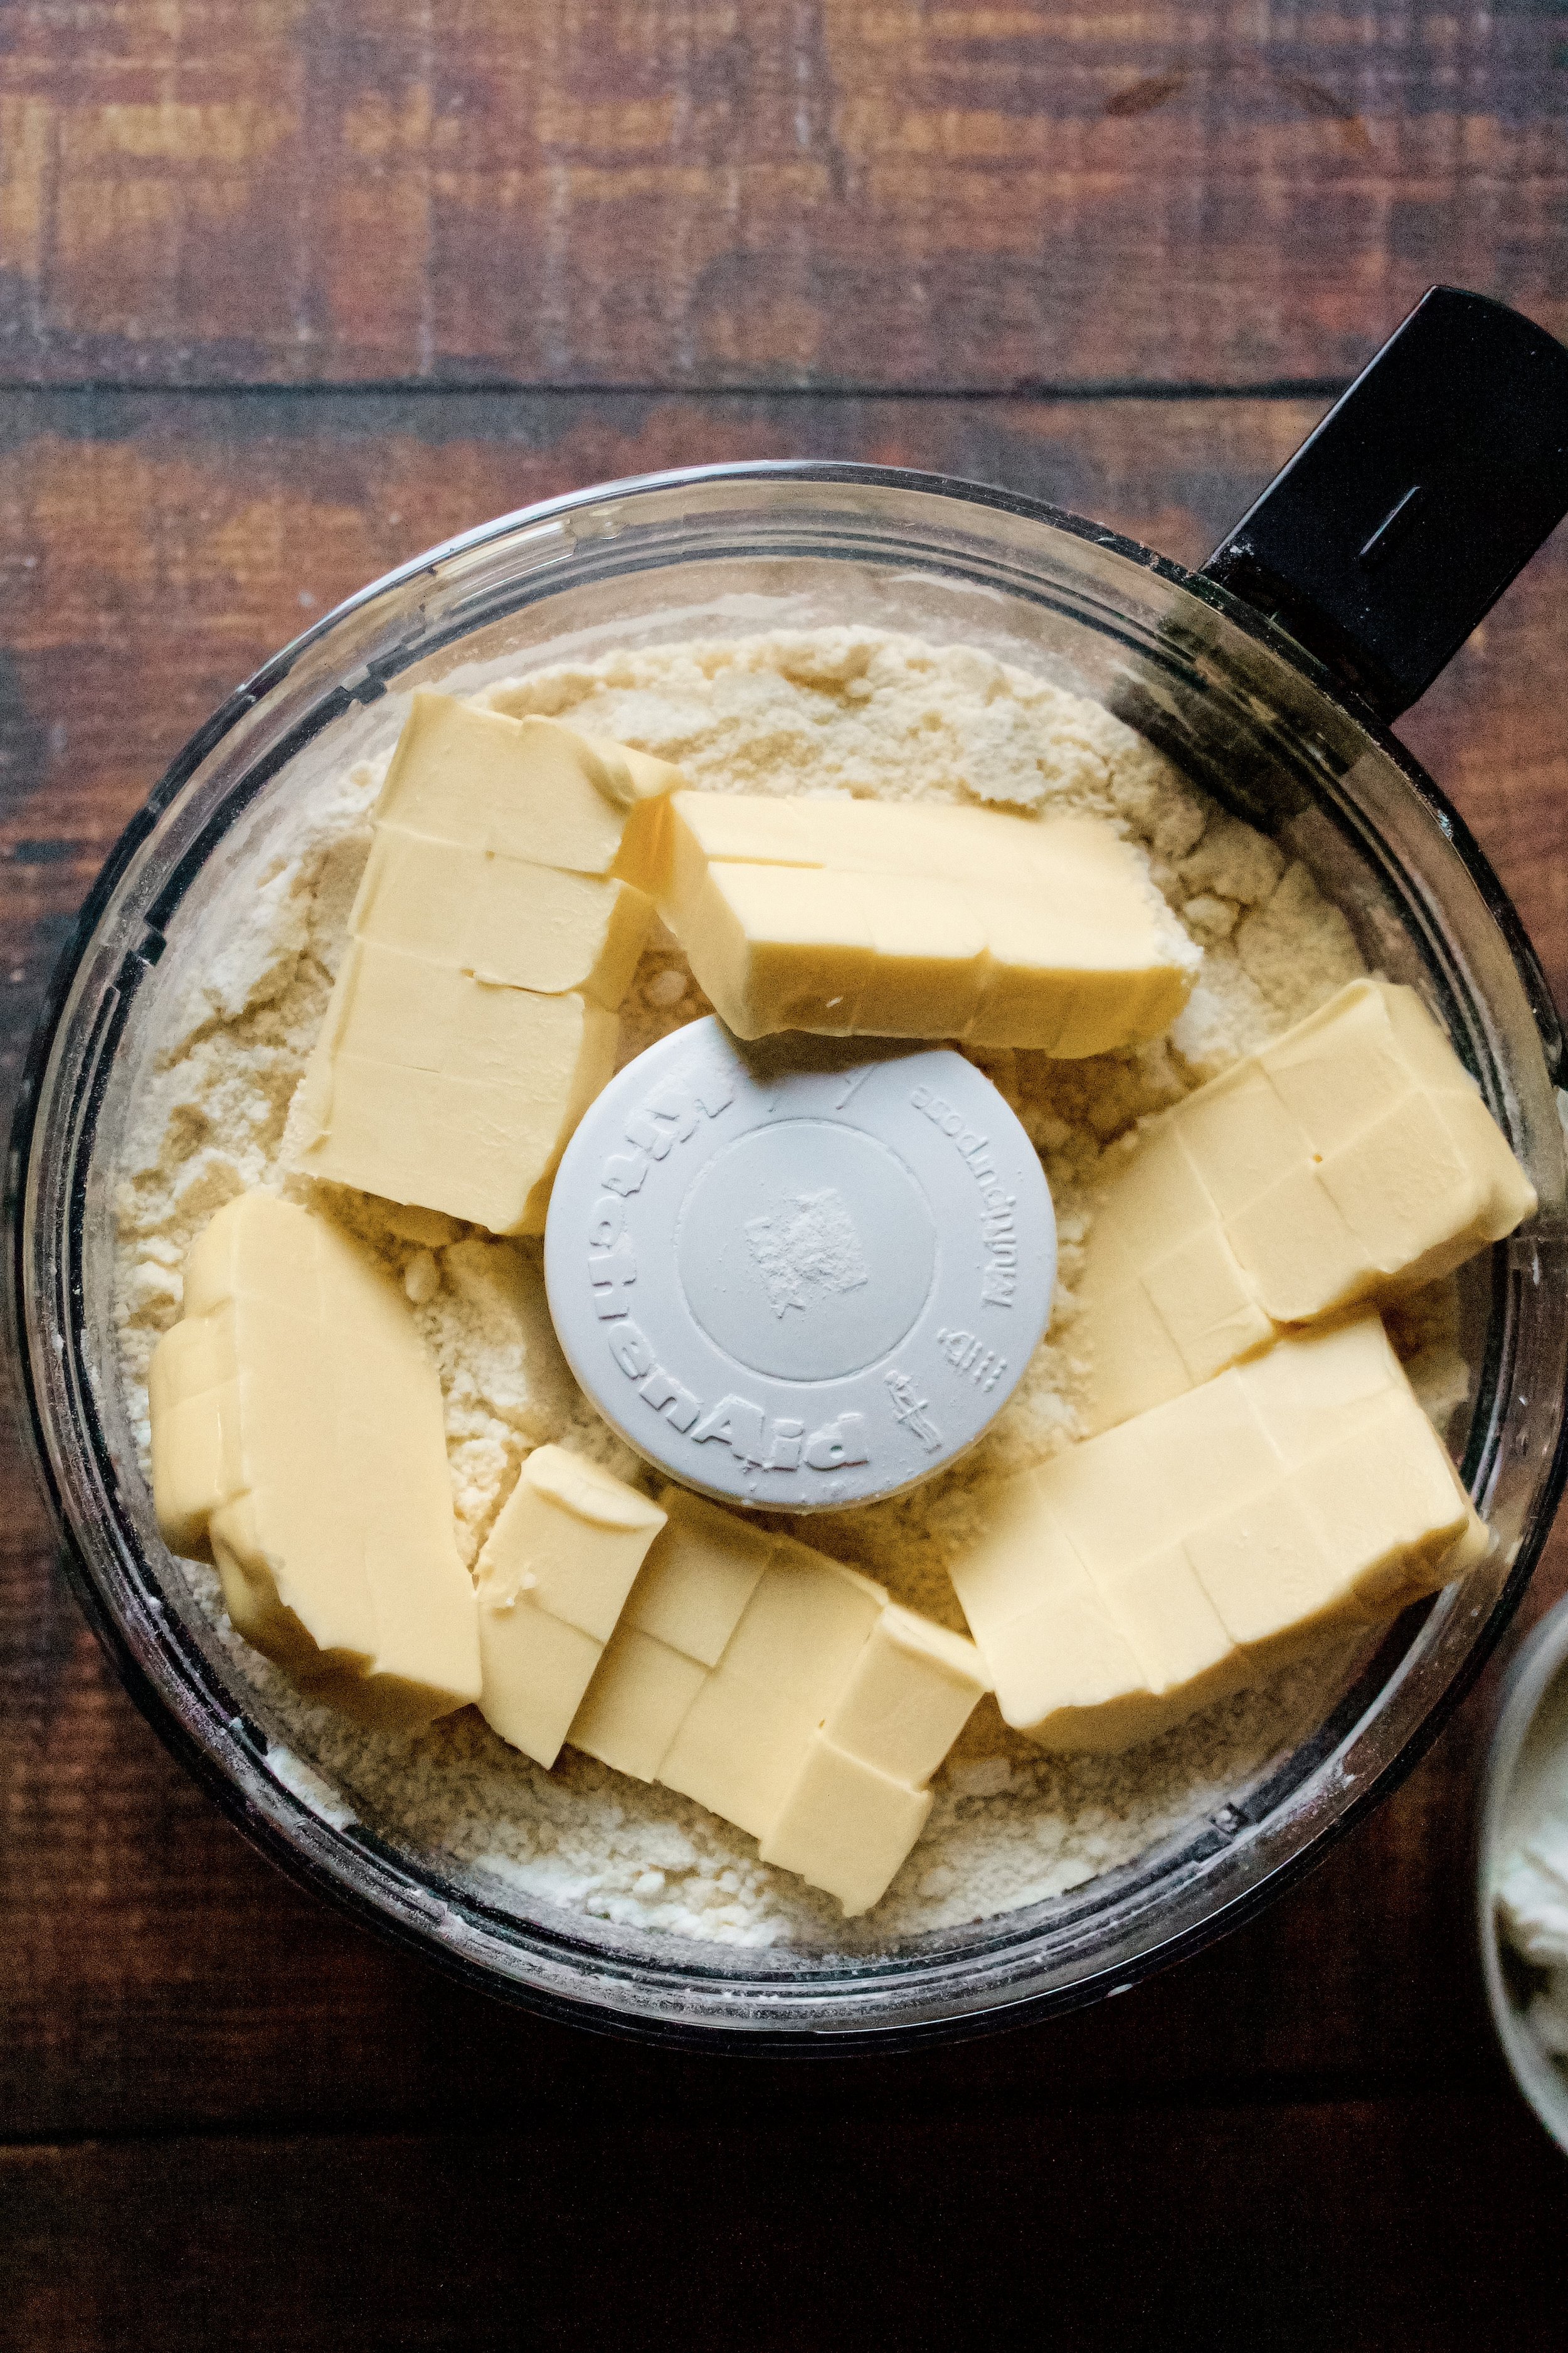
Blending the butter in two batches is key to getting the flour coated in butter yet still retaining some larger pieces. It’s part of why my classic pie crust works so well. Blending the first half until a sandy texture means that the flour is now bonded to the fat, preventing it from developing gluten when you add the sour cream. And while you are welcome to grate or peel the remaining butter, I find it’s just as effective (and much easier) to simply blend it in with a pastry blender, food processor, or my hands. This second half is only blended until the size of peas, typical of most crusts. But doing it in two batches ensures the proper amount stays pea-sized.
The use of sour cream instead of water surprised me. Its creaminess adds a delicious texture and subtle tang to the crust. It has a low water content, meaning your crust won’t turn gummy or chewy. You’re also less likely to overwork the dough when using sour cream. First, because you can knead it a bit to bind it together without overworking it (kneading a water-based dough turns it chewy very quickly). Second, because here’s much less guesswork with how much you need—that’s pretty consistent. The result is a buttery, flakey crust that doesn’t stress you out!
Key ingredients
Flour. Obviously. Be sure to spoon then level your flour so you don’t add too much.
Sugar. I like to process this with the flour so it’s a fine texture. Omit of making a savory pie.
Salt. Omit this is you only have salted butter.
Butter. Use European style butter for a flakier crust, as it has less water (the downfall of many a pie crust!).
Sour cream. Use full fat.

How to make sour cream pie crust
1. Pulse flour, sugar, and salt in a food processor. You can also use a pastry blender, but be sure your sugar is finer grain (mine is organic and thus larger crystals and requires a food processor).
2. Add half the butter (diced) and pulse/blend until a sandy texture.
3. Add the remaining butter (diced) and pulse/blend until pea-sized.
4. Stir in sour cream. It should come together into a ball when pressed. If it’s not coming together, add more sour cream one tablespoon at a time.
5. Shape into a disc, cover, and refrigerate. Be sure to smooth out the edges before refrigerating. Use the warmth of your hands, if needed, so it’s perfectly smooth.
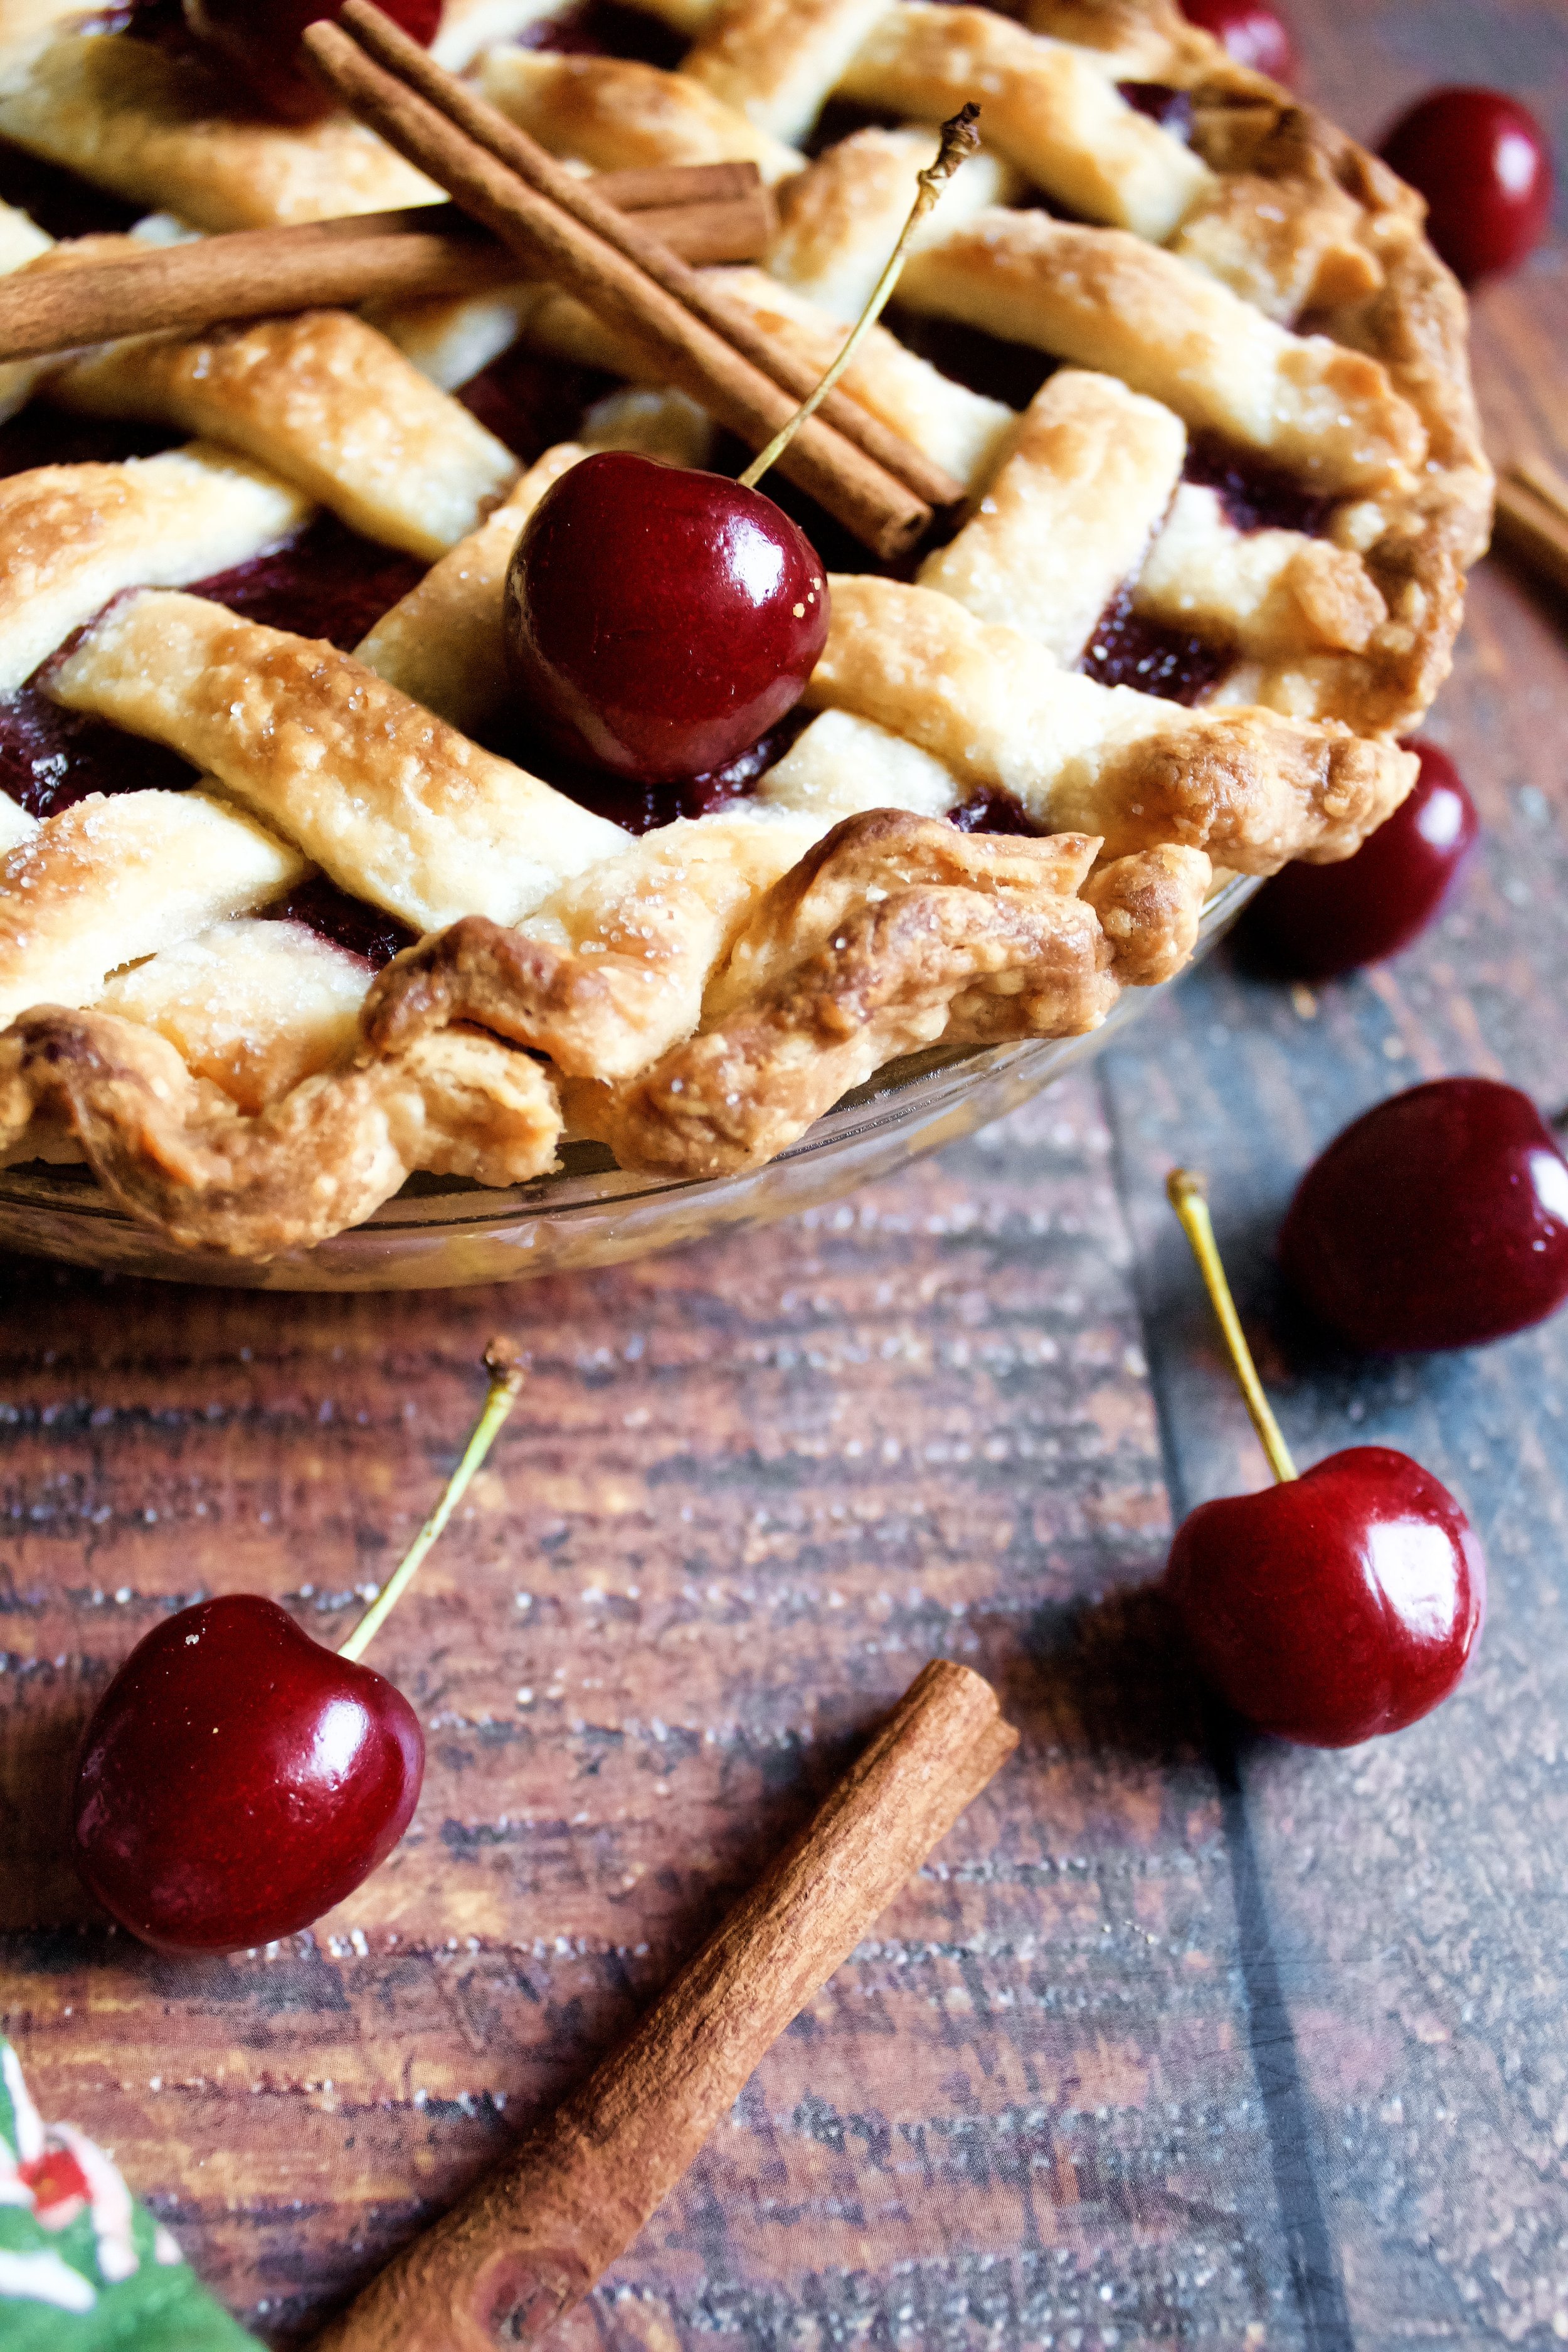
6. Roll out and use as directed by your recipe. If doing a lattice or double crust or if making hand pies, double the recipe. Always leave a 1/2 inch edge over the pie pan then fold it under until flush with the pan’s edge and crimp/shape as desired.
Enjoy!


Tips and FAQ’s for this recipe
FREEZE BEFORE BAKING
This is one of my foolproof tricks. Always freeze your pie crust/filled pie before baking. If par- or pre-baking, freeze it before filling it with foil and pie weights. If making a fruit by or even a double or lattice crust pie, still freeze the whole thing—filling and top crust and all—before baking. I’m not a scientist, but there is some kind of pie magic in doing this which prevents the crust falling and sinking and making a generally giant mess.

What if it’s not coming together?
You may need to add a bit more sour cream (one tablespoon at a time) if you can’t get it to stick together into a ball-ish shape. Your climate plays a big role in this, which is why pie crust recipes always call for a range of water. The great thing about this recipe, though, is that adding in more sour cream a bit at a time won’t cause the dough to become over mixed.

What if it sticks to my mat?
Be sure to sprinkle your mat with flour before you begin. As you roll out your crust, flip and rotate the disc continually, adding a tiny bit more flour as needed. You don’t want to dry out the crust, but you also don’t want it sticking. So, listen to the crust as you roll it to know when it needs more flour and when it’s doing just fine. This process of flipping and rotating not only ensures you roll it evenly (because only professional pastry chefs can roll with perfectly even pressure) but also ensures you don’t find out after you’ve rolled the whole thing out that part of it is stuck to the mat.
What do I do if the edges begin to crack?
Ugh. Story of my life (literally and figuratively). I have never had a problem just using my hands to press these cracks back together. Sometimes you need to press pretty firmly, but the warmth of your hand should help bring it together. Just keep pressing it back together as you roll and it will be just fine.

How do I shape the edges?
You can do whatever you’d like! I typically do what’s pretty classic. I use the knuckle of my forefinger on my dominant hand along the outside and my forefinger and thumb on the other hand along the inside. When you fold the crust under itself, don’t flatten it out but let it create a bit of a mound. Then, use those fingers to crimp a wave shape all around the edge. My other go-to is much easier but less fancy—just using a fork to gently press lines into the edge all around the crust. This is especially helpful if making a lattice or double crust, as it seals the top to the bottom well.
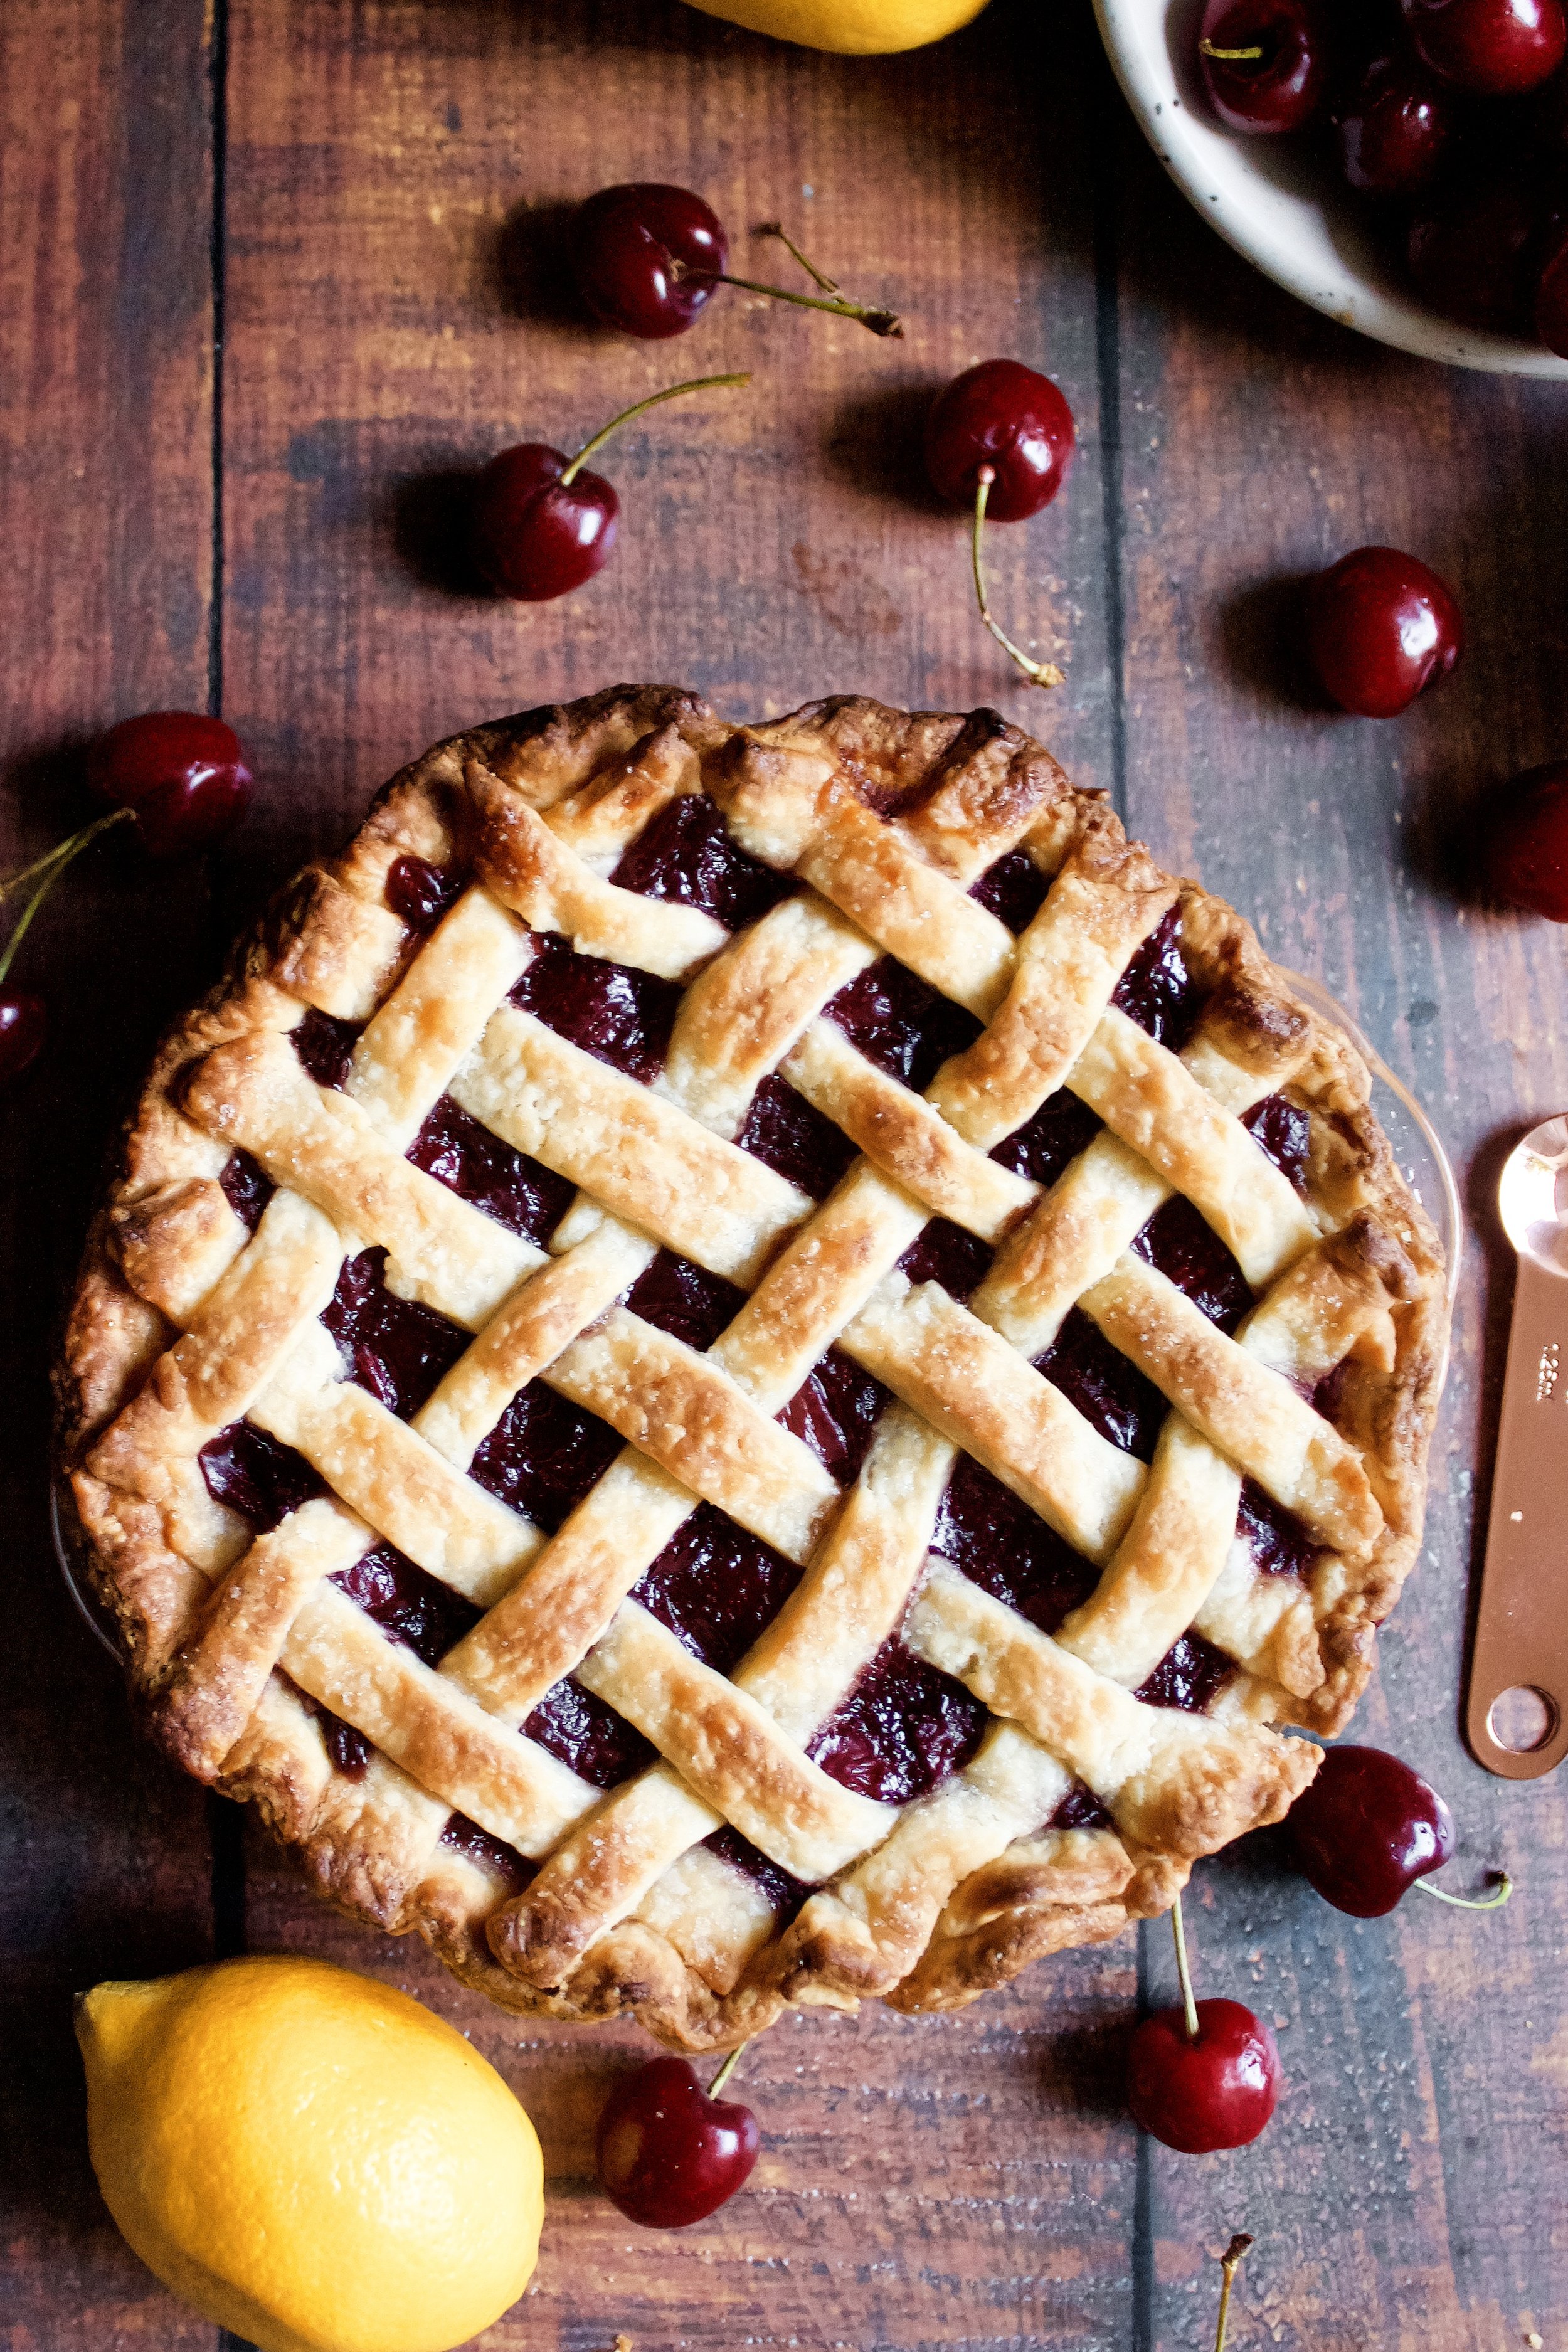
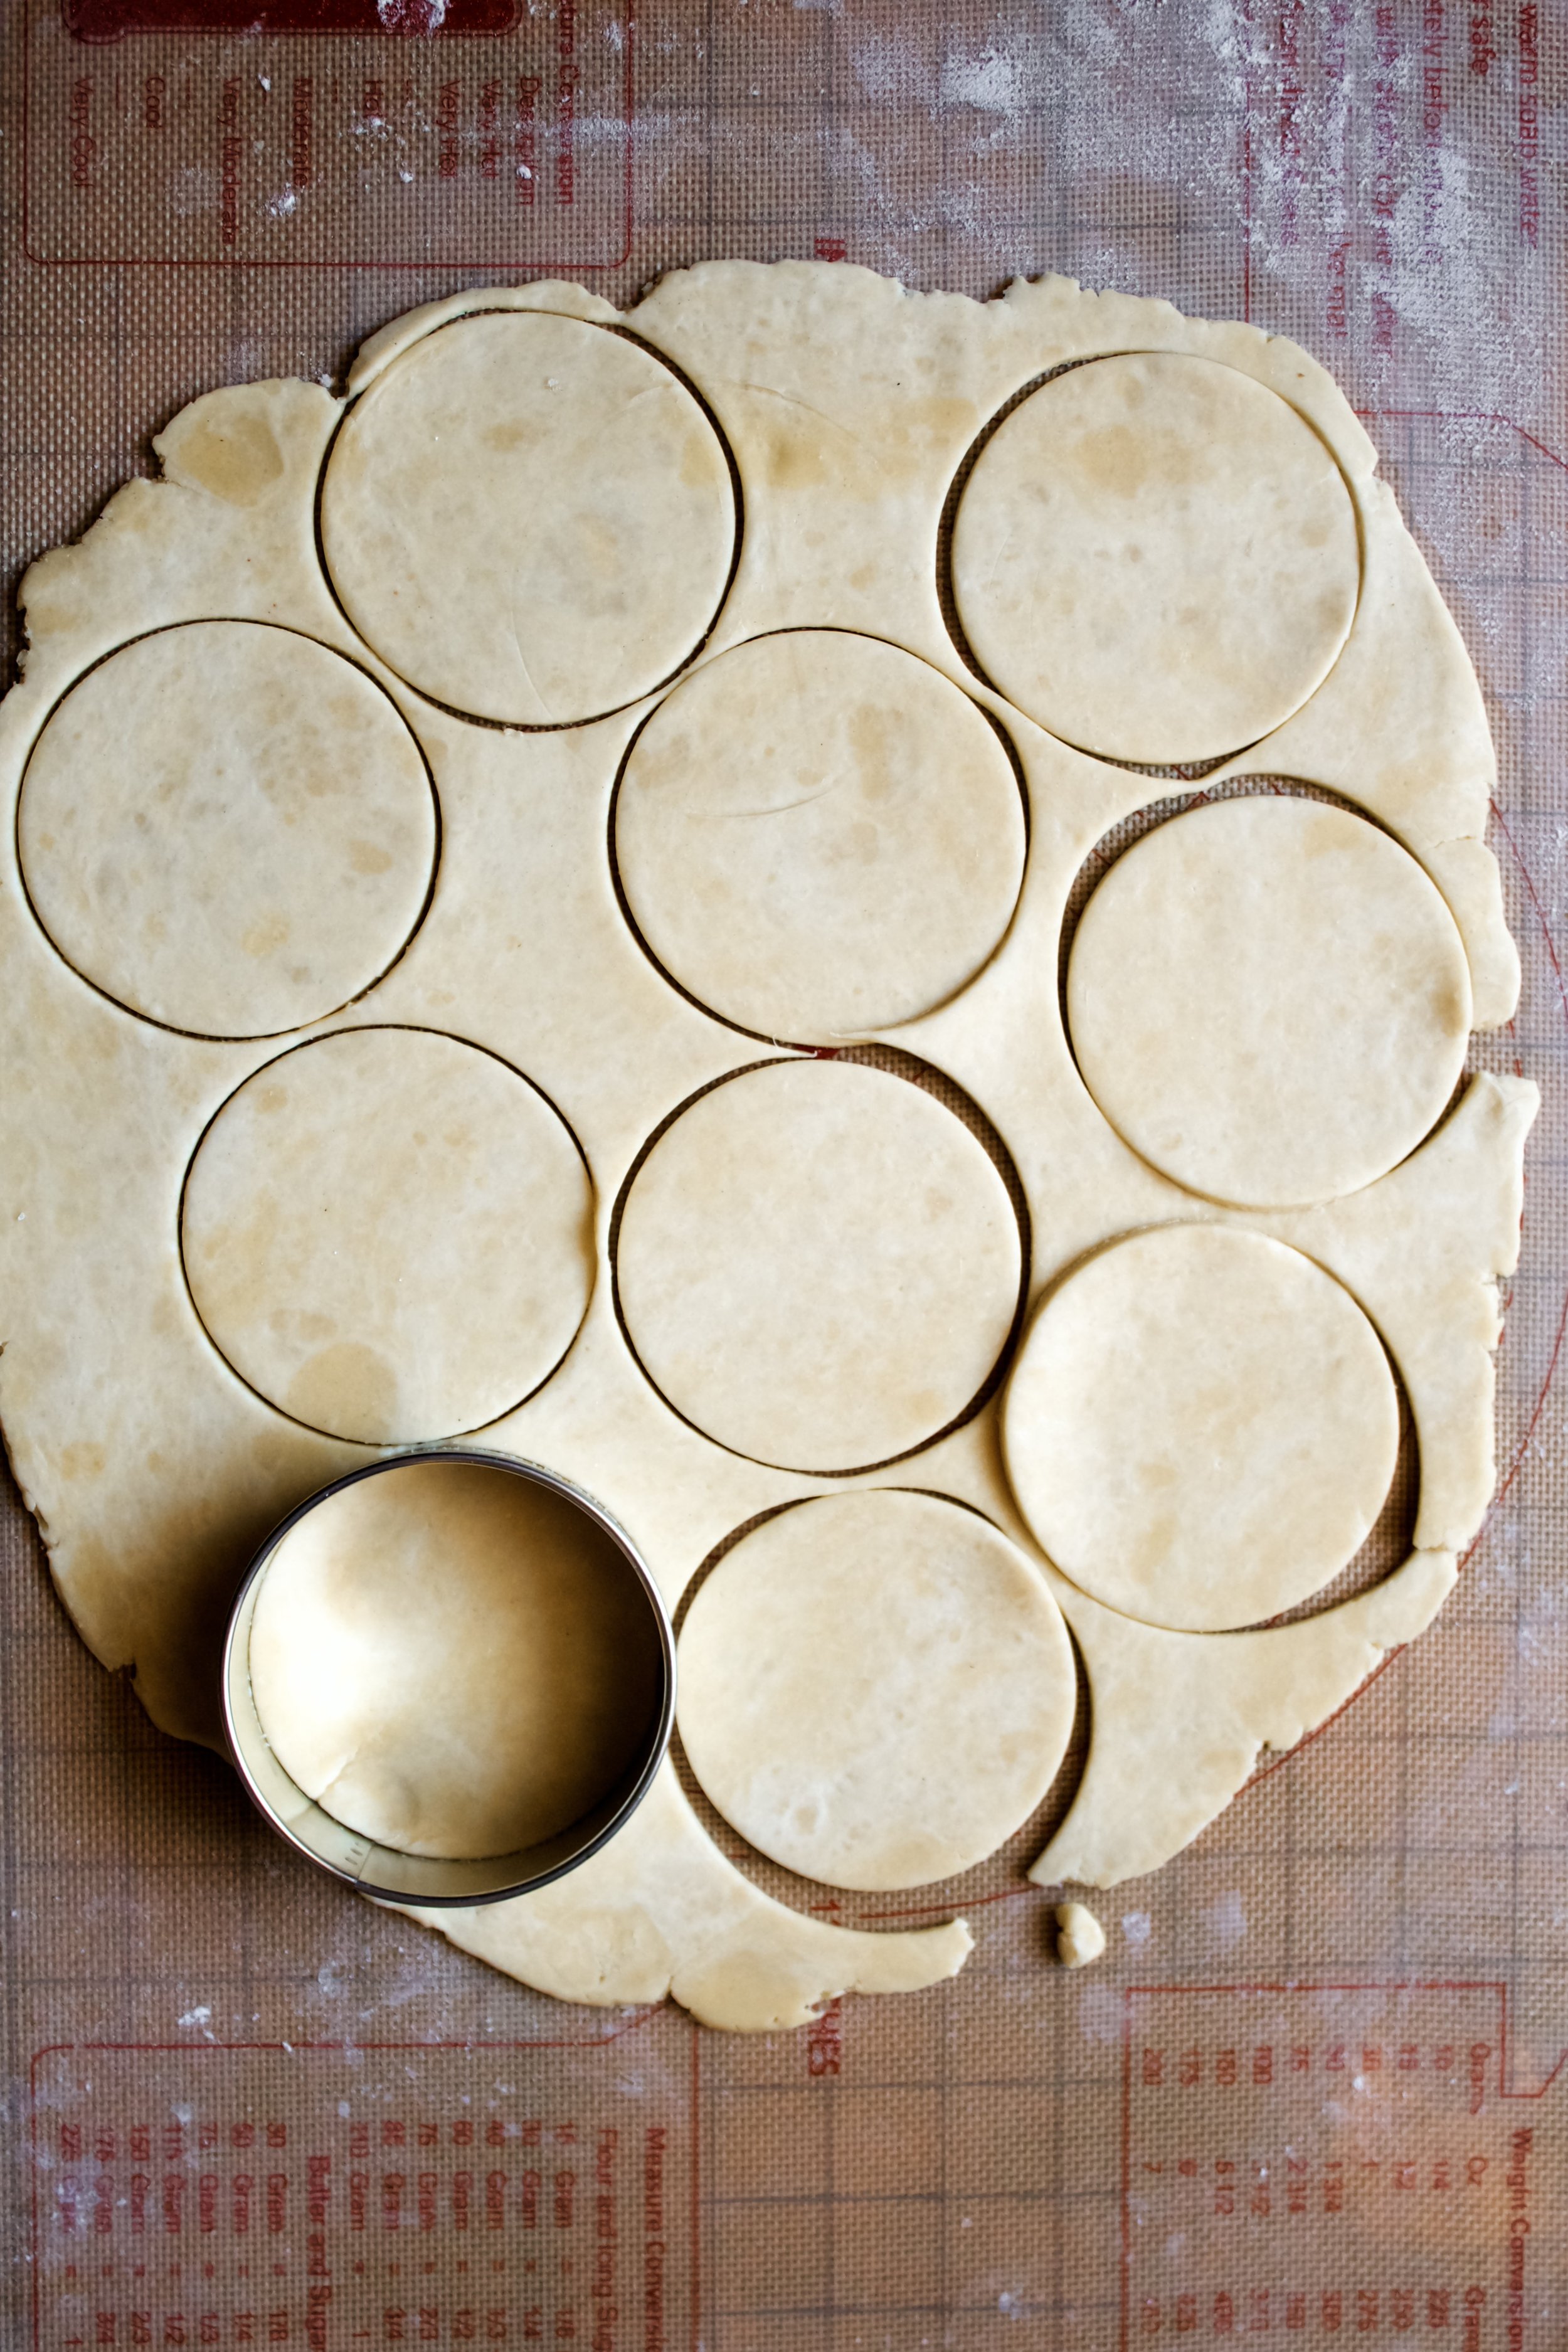
How do I make a lattice top?
Close your eyes and hope for the best? Okay, not really. It’s not too difficult, but I’m not exactly a pro. You want to cut strips of equal width (usually about 1/2”). You’ll layer half of these parallel on top of the pie, using longer pieces in the middle and shorter toward the edge and leaving a gap about the same size as the strip (or smaller—it’s all a stylistic choice) in between each piece. Fold back every other strip to the middle of the pie and lay a long strip across this. Replace those folded back pieces and then fold back the opposite pieces that you left down in the last step, laying another strip along those. Continue folding back every other strip, layering, then replacing until one side is latticed, then repeat on the other side. It’s basically a weaving game, and there are so many variations you can try!

Try different flavors!
This is one of my favorite things to do. You can add a teaspoon of cinnamon or a tablespoon of lemon zest to make this a warm or summery crust. You can also add something fun like a tablespoon of thyme or rosemary, but those need to be finely chopped or pulsed in a food processor (can be done along with the flour and sugar). I also sometimes use brown sugar instead of granulated, especially if I’m adding cinnamon to my crust! It’s such a great holiday combo.

My tools
Here are my must-have tools I use for making pie crusts. Affiliate links provided.
Pastry blender or food processor
Pie pan (Emile Henry has become my favorite!)


Sour Cream Pie Crust
- prep time: 10-15 minutes
- chill time: 1 hour, 30 minutes
- total time: 1 hour, 45 minutes (plus bake time, varies by recipe)
yields: one single crust (double recipe for a lattice or double crust)
Ingredients*:
- 1 ¼ cups (170g) flour, plus more as needed for rolling out
- 1-2 tablespoons (13-26g) granulated sugar (omit for a savory pie)
- ¼ teaspoon (2) finely ground sea salt (or ½ teaspoon table salt)
- 10 tablespoons (147g) unsalted European butter, diced and chilled
- ⅓ cup (80g) full fat sour cream (can sub ¼ to ⅓ cup buttermilk)
- optional mix-ins: 1 tablespoon lemon zest, 1 teaspoon cinnamon, or 1 tablespoon fresh herbs
- optional: 1 egg and/or 1 tablespoon milk, to finish the crust
- optional: 1 tablespoon sugar, for lattice or double crust
Instructions:
- First, dice your butter into small cubes (smaller than a sugar cube). Place it in the fridge to keep it very cold until ready to use.
- Blend your flour, sugar, salt, and mix-ins (if using) in a large mixing bowl. If your sugar is raw or large-grain (such as organic sugar), you may want to pulse it a few times in a food processor.
- Add about half of the chilled butter to the flour. Using a pastry blender (or your hands or a food processor), cut/blend in the butter until it is a sandy texture.
- Add the remaining butter. Again, using a pastry blender, hands, or a food processor, cut/blend in the butter until only pea-sized pieces remain. Avoid blending the butter too small–you want some bigger bits to create that flakey crust. If using your hands, squeeze between your thumb and fingers to create long, flat pieces–those are ideal for a flakey crust.
- Add the sour cream and stir until thoroughly mixed and you can form it into a cohesive ball with your hands (it generally won’t just come together on its own from stirring). If it won’t come together, add another tablespoon of sour cream.
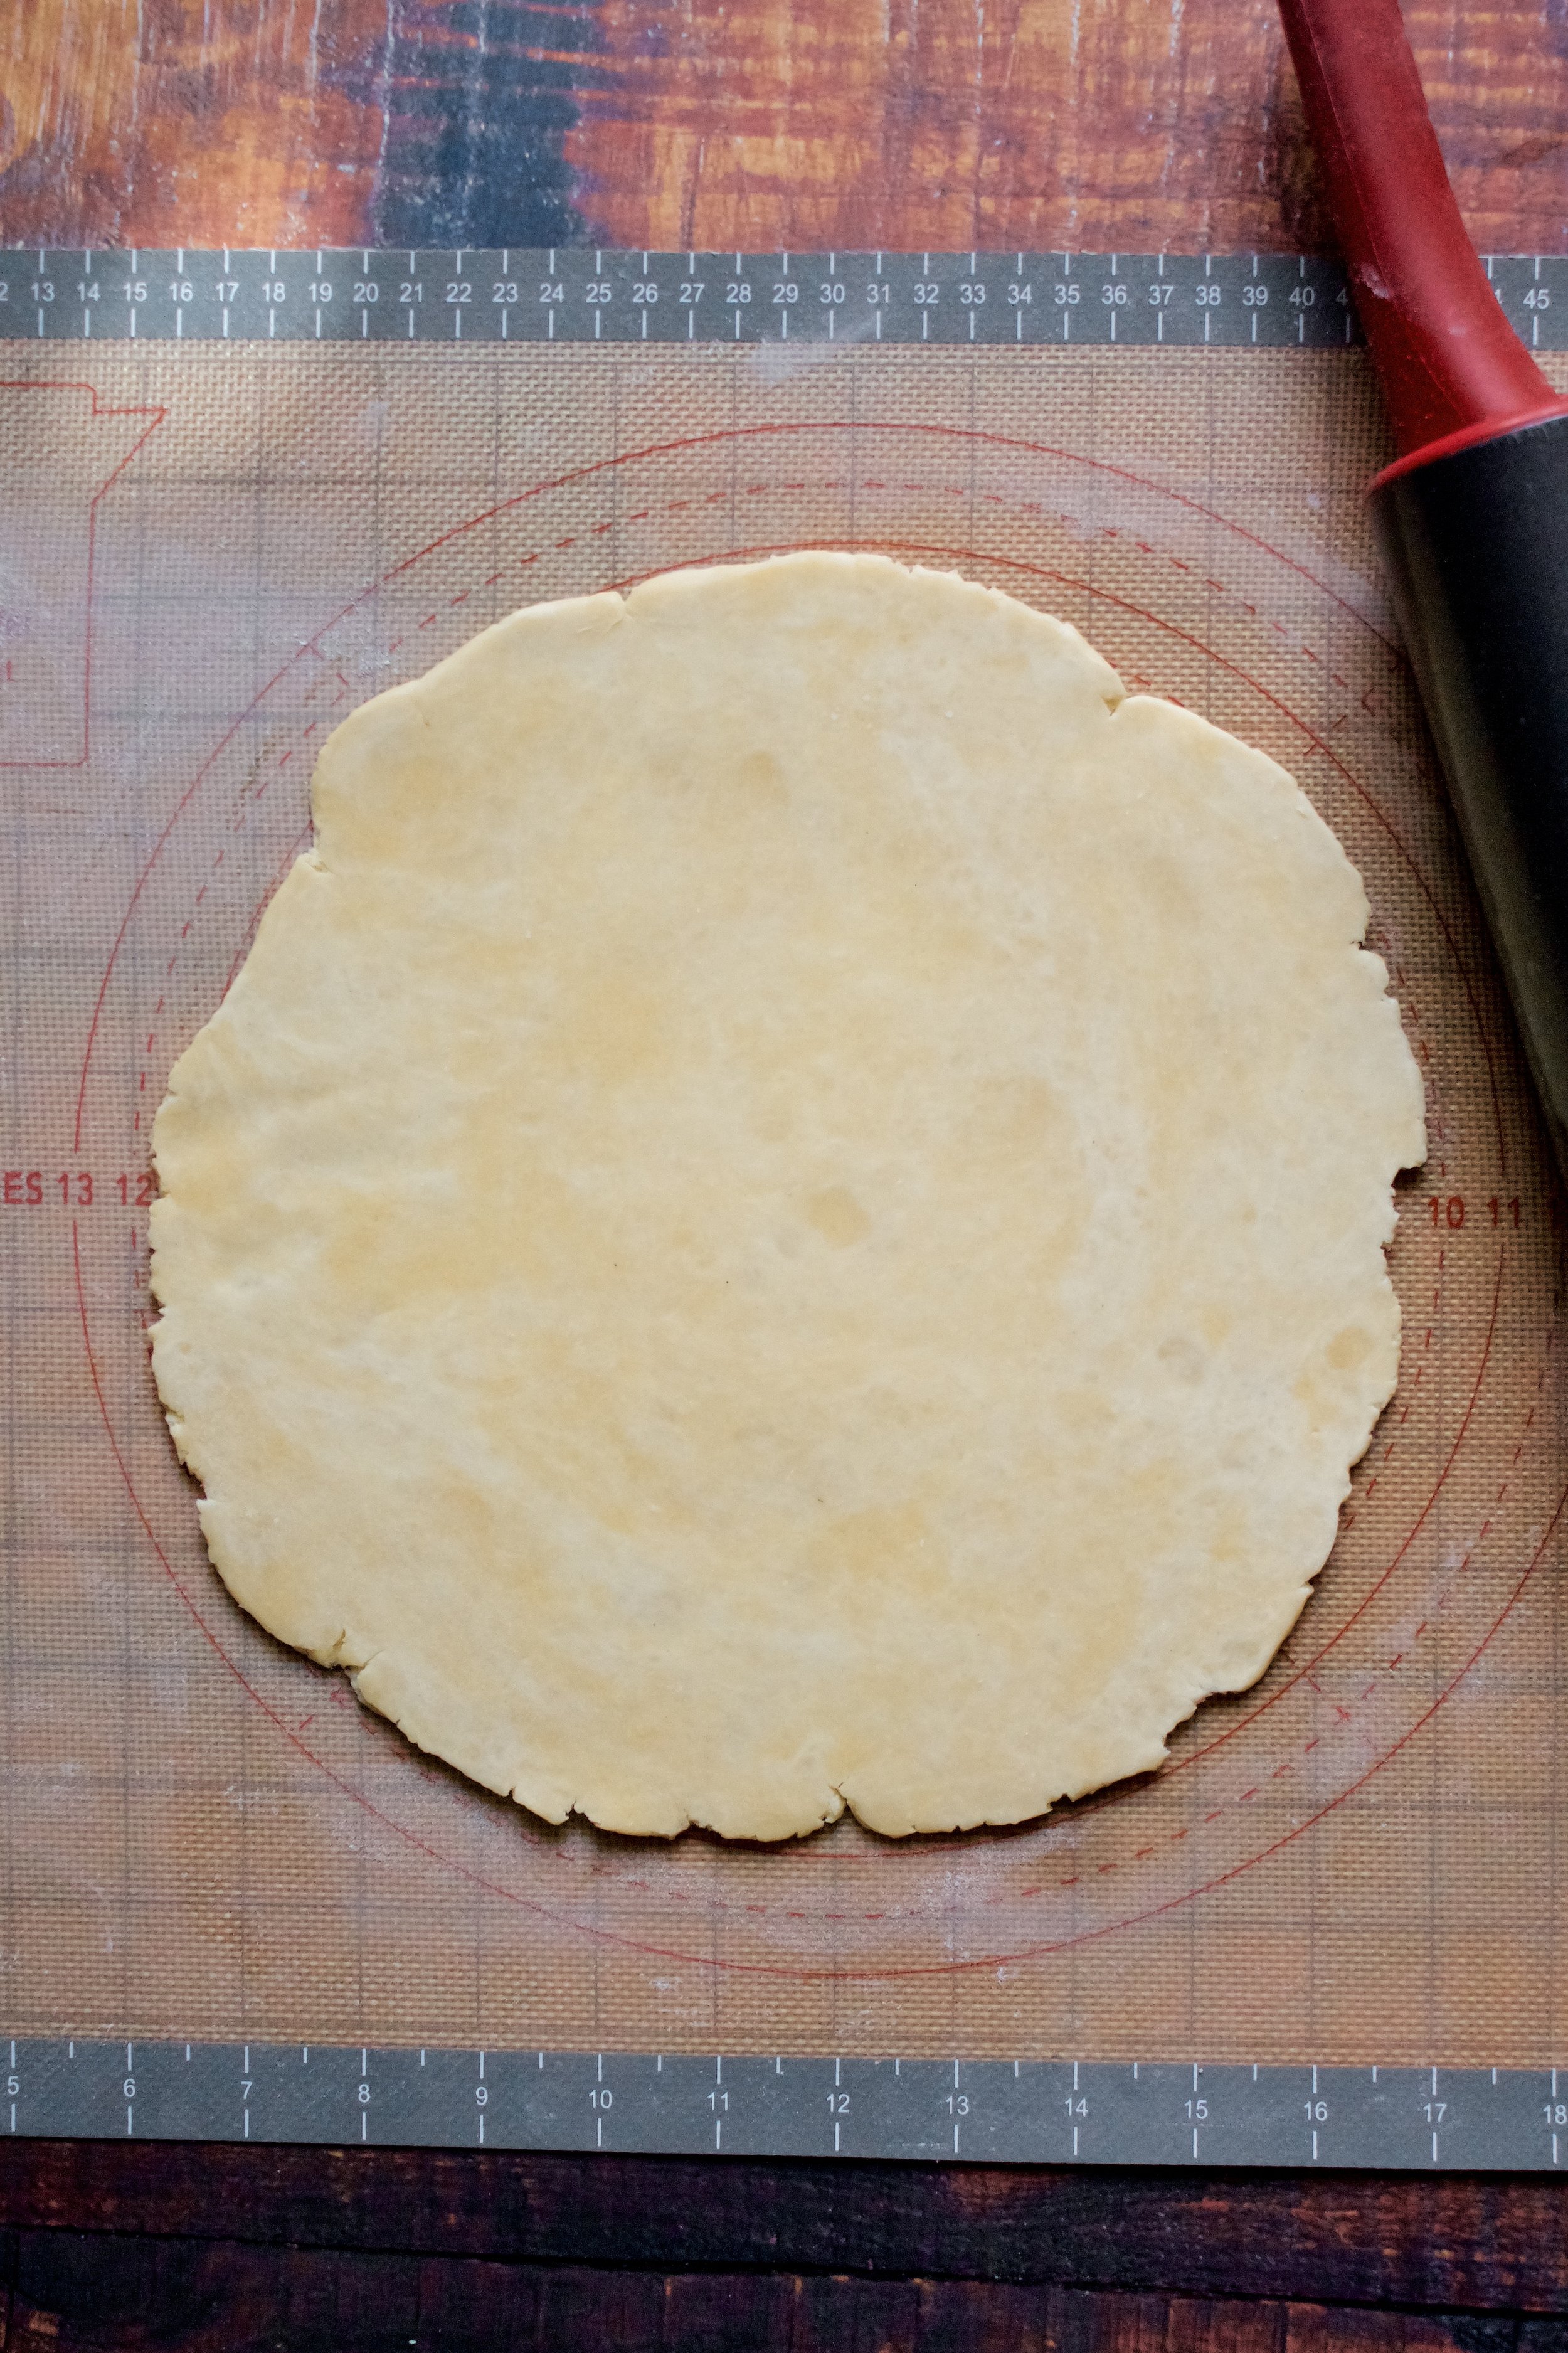
- Once the dough can stick together, pour out onto a clean surface and gently shape into a 6” disc. Use the edge of your hand to get smooth sides. Wrap well in plastic wrap and chill at least 1 hour, or up to 2 days. (You can also freeze it up to 1-2 months, depending on your freezer.) *Note: if making a lattice or double crust, make two discs, one slightly larger than the other.
- When ready to use, place the crust on a lightly floured, clean work surface or rolling mat. Sprinkle a little more flour over the top. Begin rolling out the dough, rotating the rolling pin as you go. I like to imagine it’s a clock and I need to roll it over every hour—so top down is 12 and 6, left right is 3 and 9, etc. Roll it out to be about 3 inches bigger in diameter than your pie pan (e.g. 12” for a 9” pan).
- Be sure to flip and rotate the dough every so often, sprinkling a tiny bit more flour as needed to 1) keep it from sticking and 2) ensure you’re rolling evenly. I tend to roll the bottom left too thin and the top right too thick. Rotating balances this out.
- If any bits of the edge crack or break, gently press them back together with your hands. Roll about half of the crust onto the rolling pin then gently slide it over the pie pan until centered. Gently lift the edges of the crust and press it into the pan. You want about ½ inch of overhang, so trim anything beyond that. Tuck the overhang under so that the edge is flush with the pie pan. Shape the edges as desired.
- If making a lattice or double crust, roll the smaller disc out to just slightly larger than the pie pan. For lattice, cut into 1” strips. Once the pie is filled, weave as desired then crimp the edges together with the bottom crust and shape the edges. For a double crust, gently place over slightly mounded filling, crimping with the bottom crust and shaping the edges. Cut at least 4 slits in a concentric pattern. For both options, brush with a wash of 1 egg whisked with 1 tablespoon of milk or even just milk and sprinkle with sugar (optional). Do this before freezing in the next step.
- Freeze crust (empty if pre-baking or filled if doing a baked filling) for 30 minutes.
- If pre-baking or par-baking the crust, line with a double layer of foil (criss cross each layer so there’s enough to cover all edges). Loosely fold it over the edge of the pan without sealing it in. Fill the pan with rice or beans or pie weights. Rice is my favorite. Bake on a parchment lined cookie sheet for 25-30 minutes at 400 (or as directed by your recipe). If par-baking, you can fill it at this point then finish baking. If fully pre-baking, remove the rice and foil and bake another 10-15 minutes, until the bottom begins to look golden. Let cool before filling, unless otherwise noted by your recipe.
- If baking with the filling (such as a fruit-filled pie), bake at 400 on a foil lined baking sheet for 20 minutes then turn oven down to 375 until crust is golden brown and the filling bubbles (or as directed by your recipe). Watch carefully and tent loosely with foil or use a pie crust shield if the edges begin to brown too quickly.
- Let cool completely (usually 2-3 hours minimum) before cutting.
Enjoy!
*For a lattice or double crust, double this recipe.
