
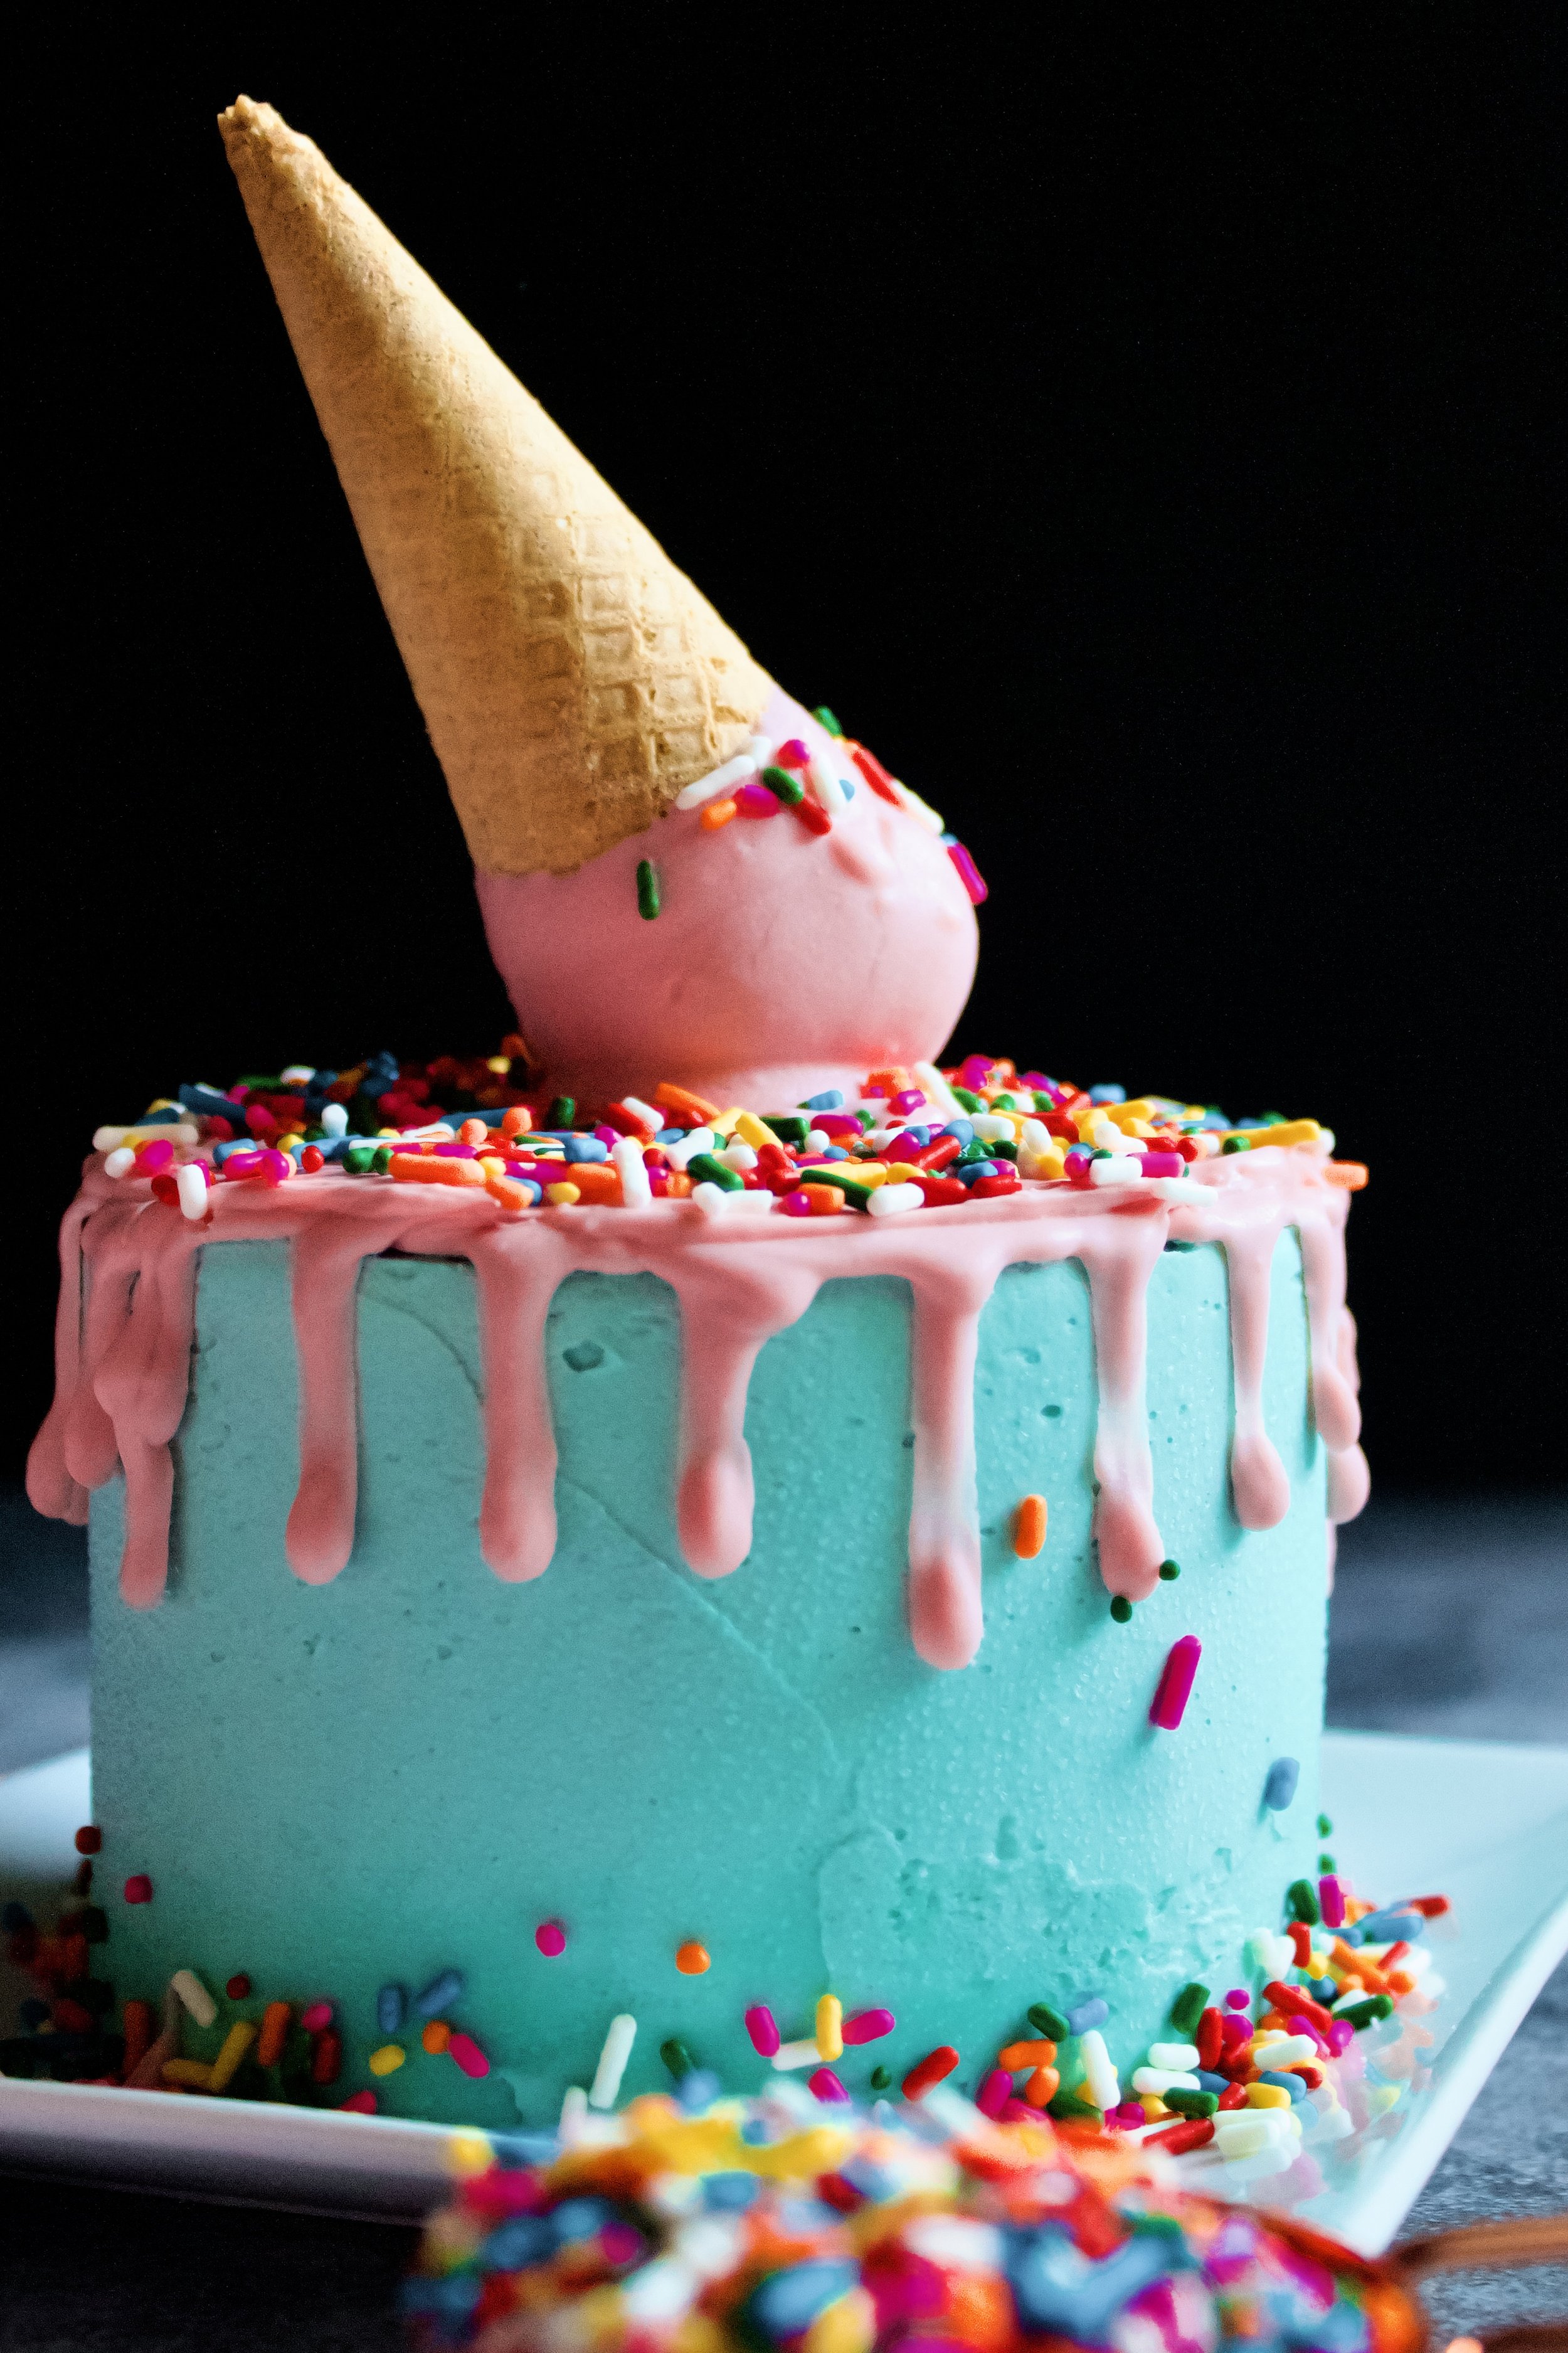
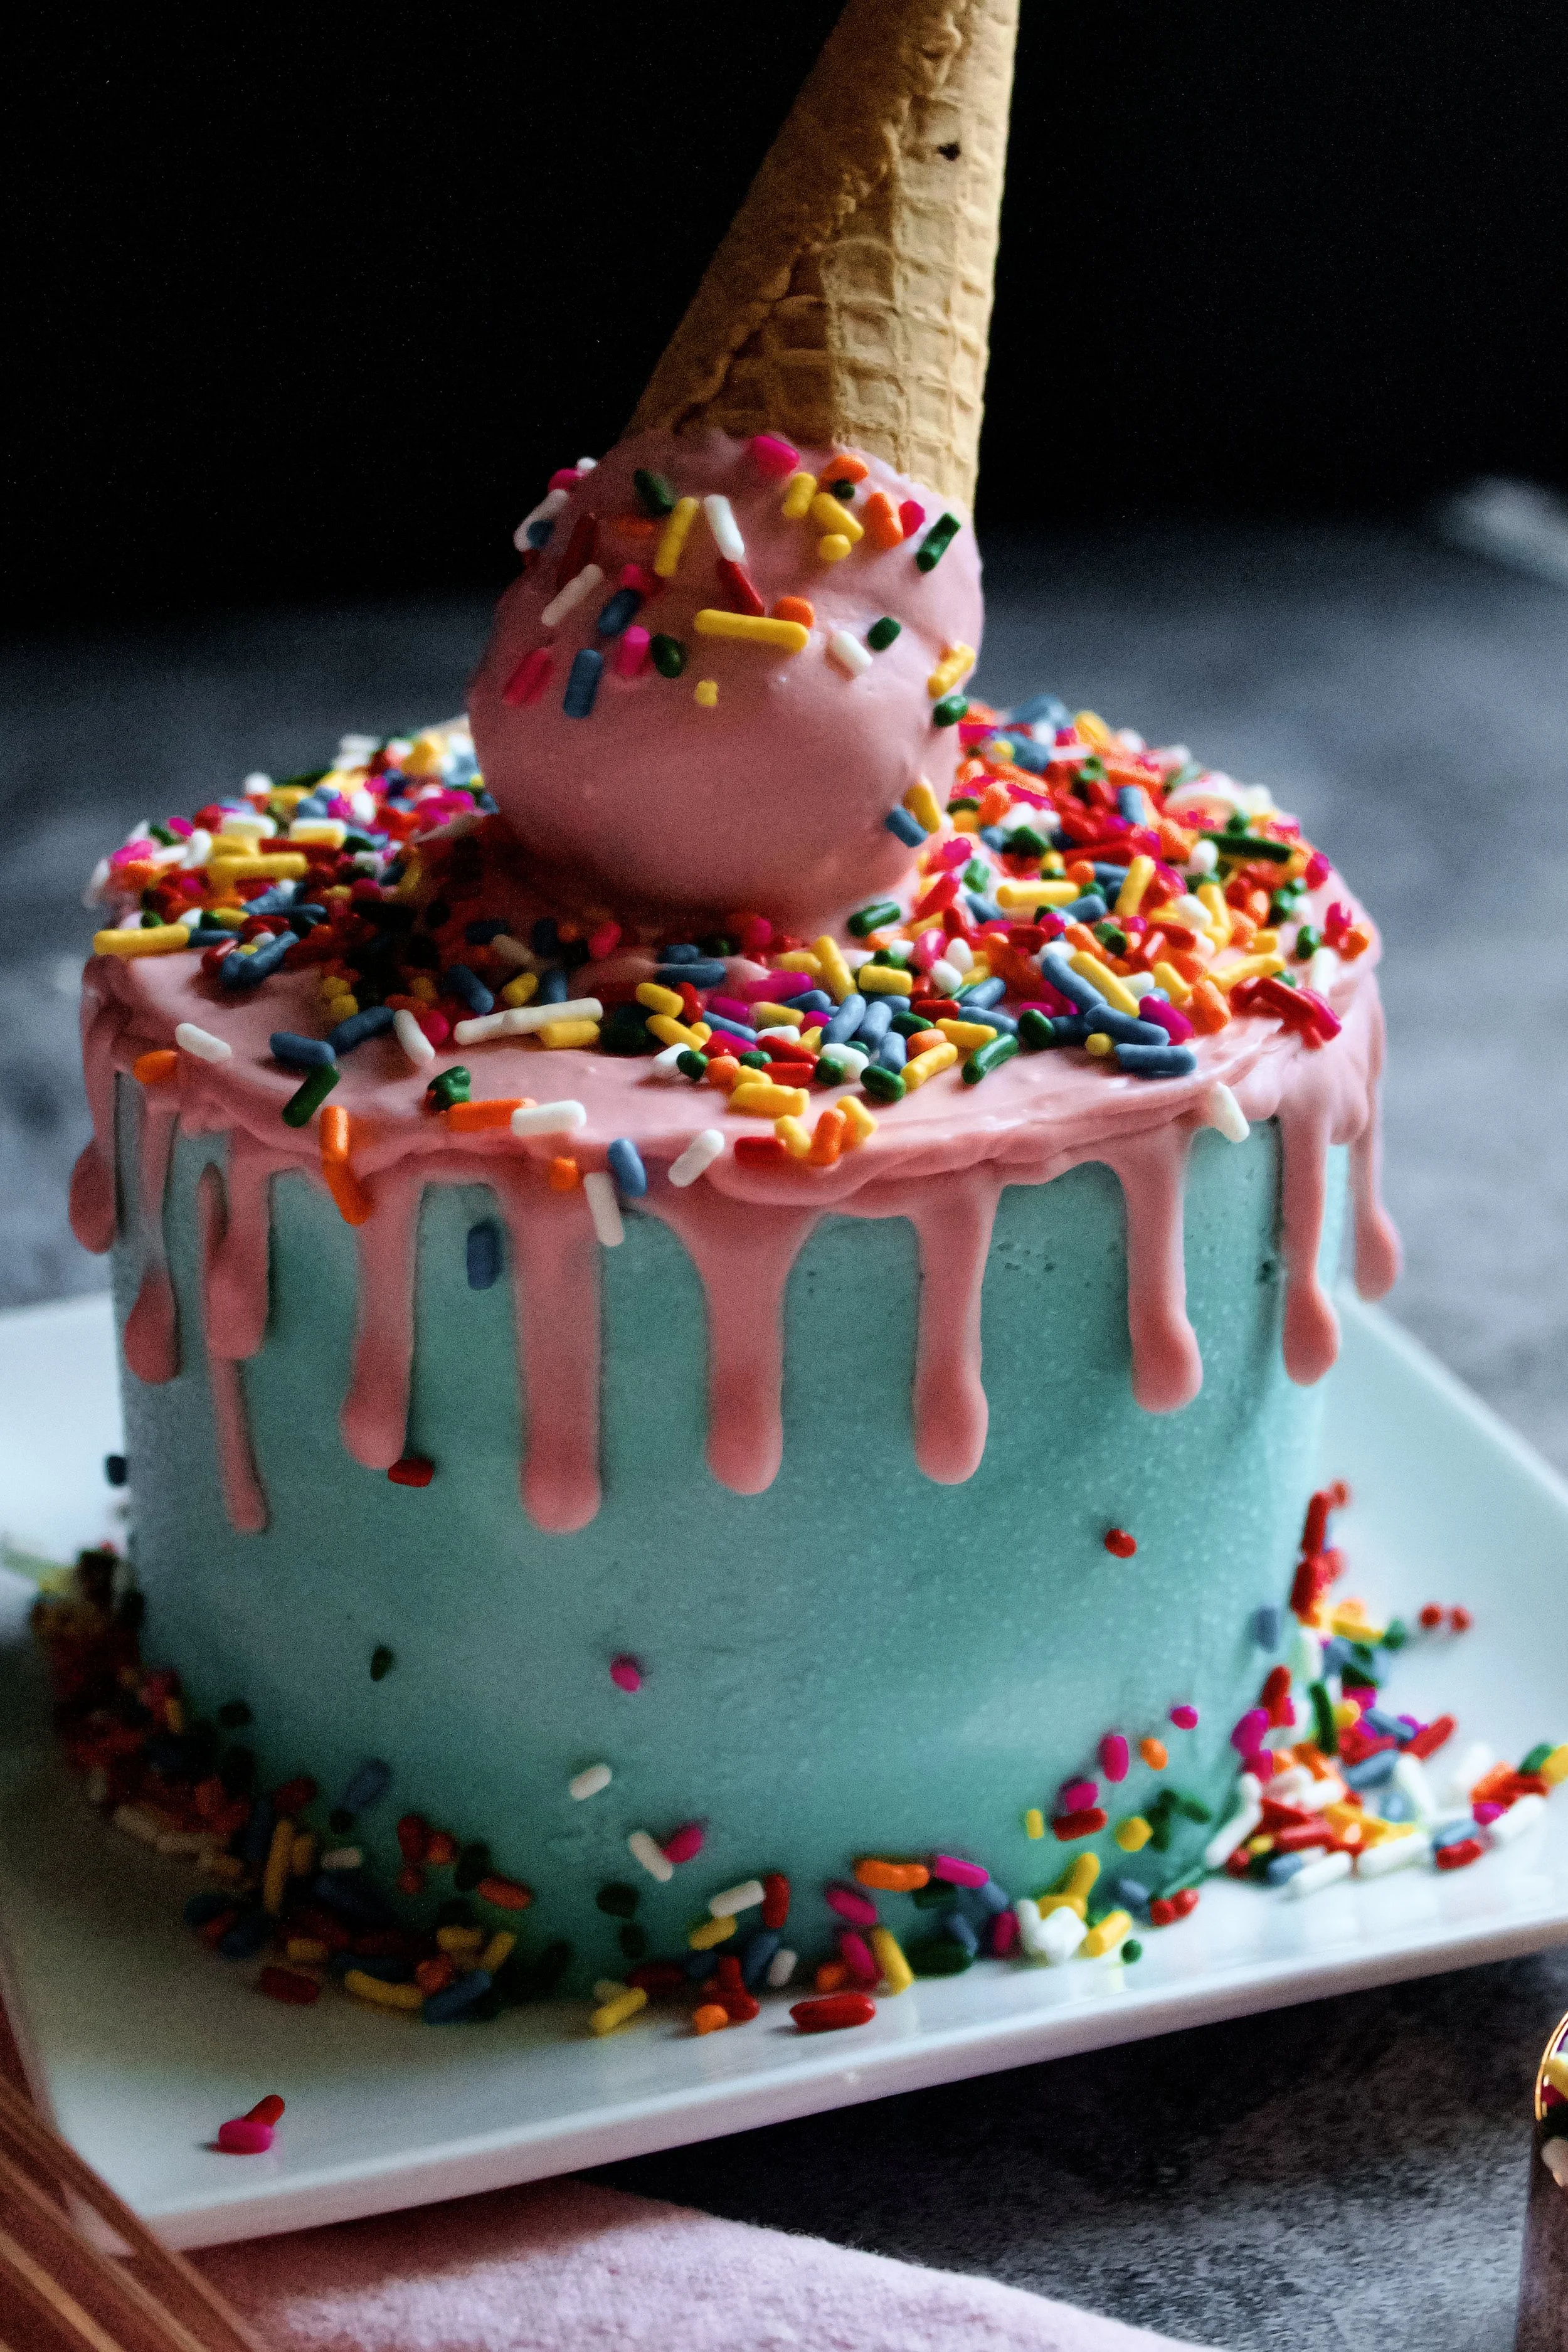
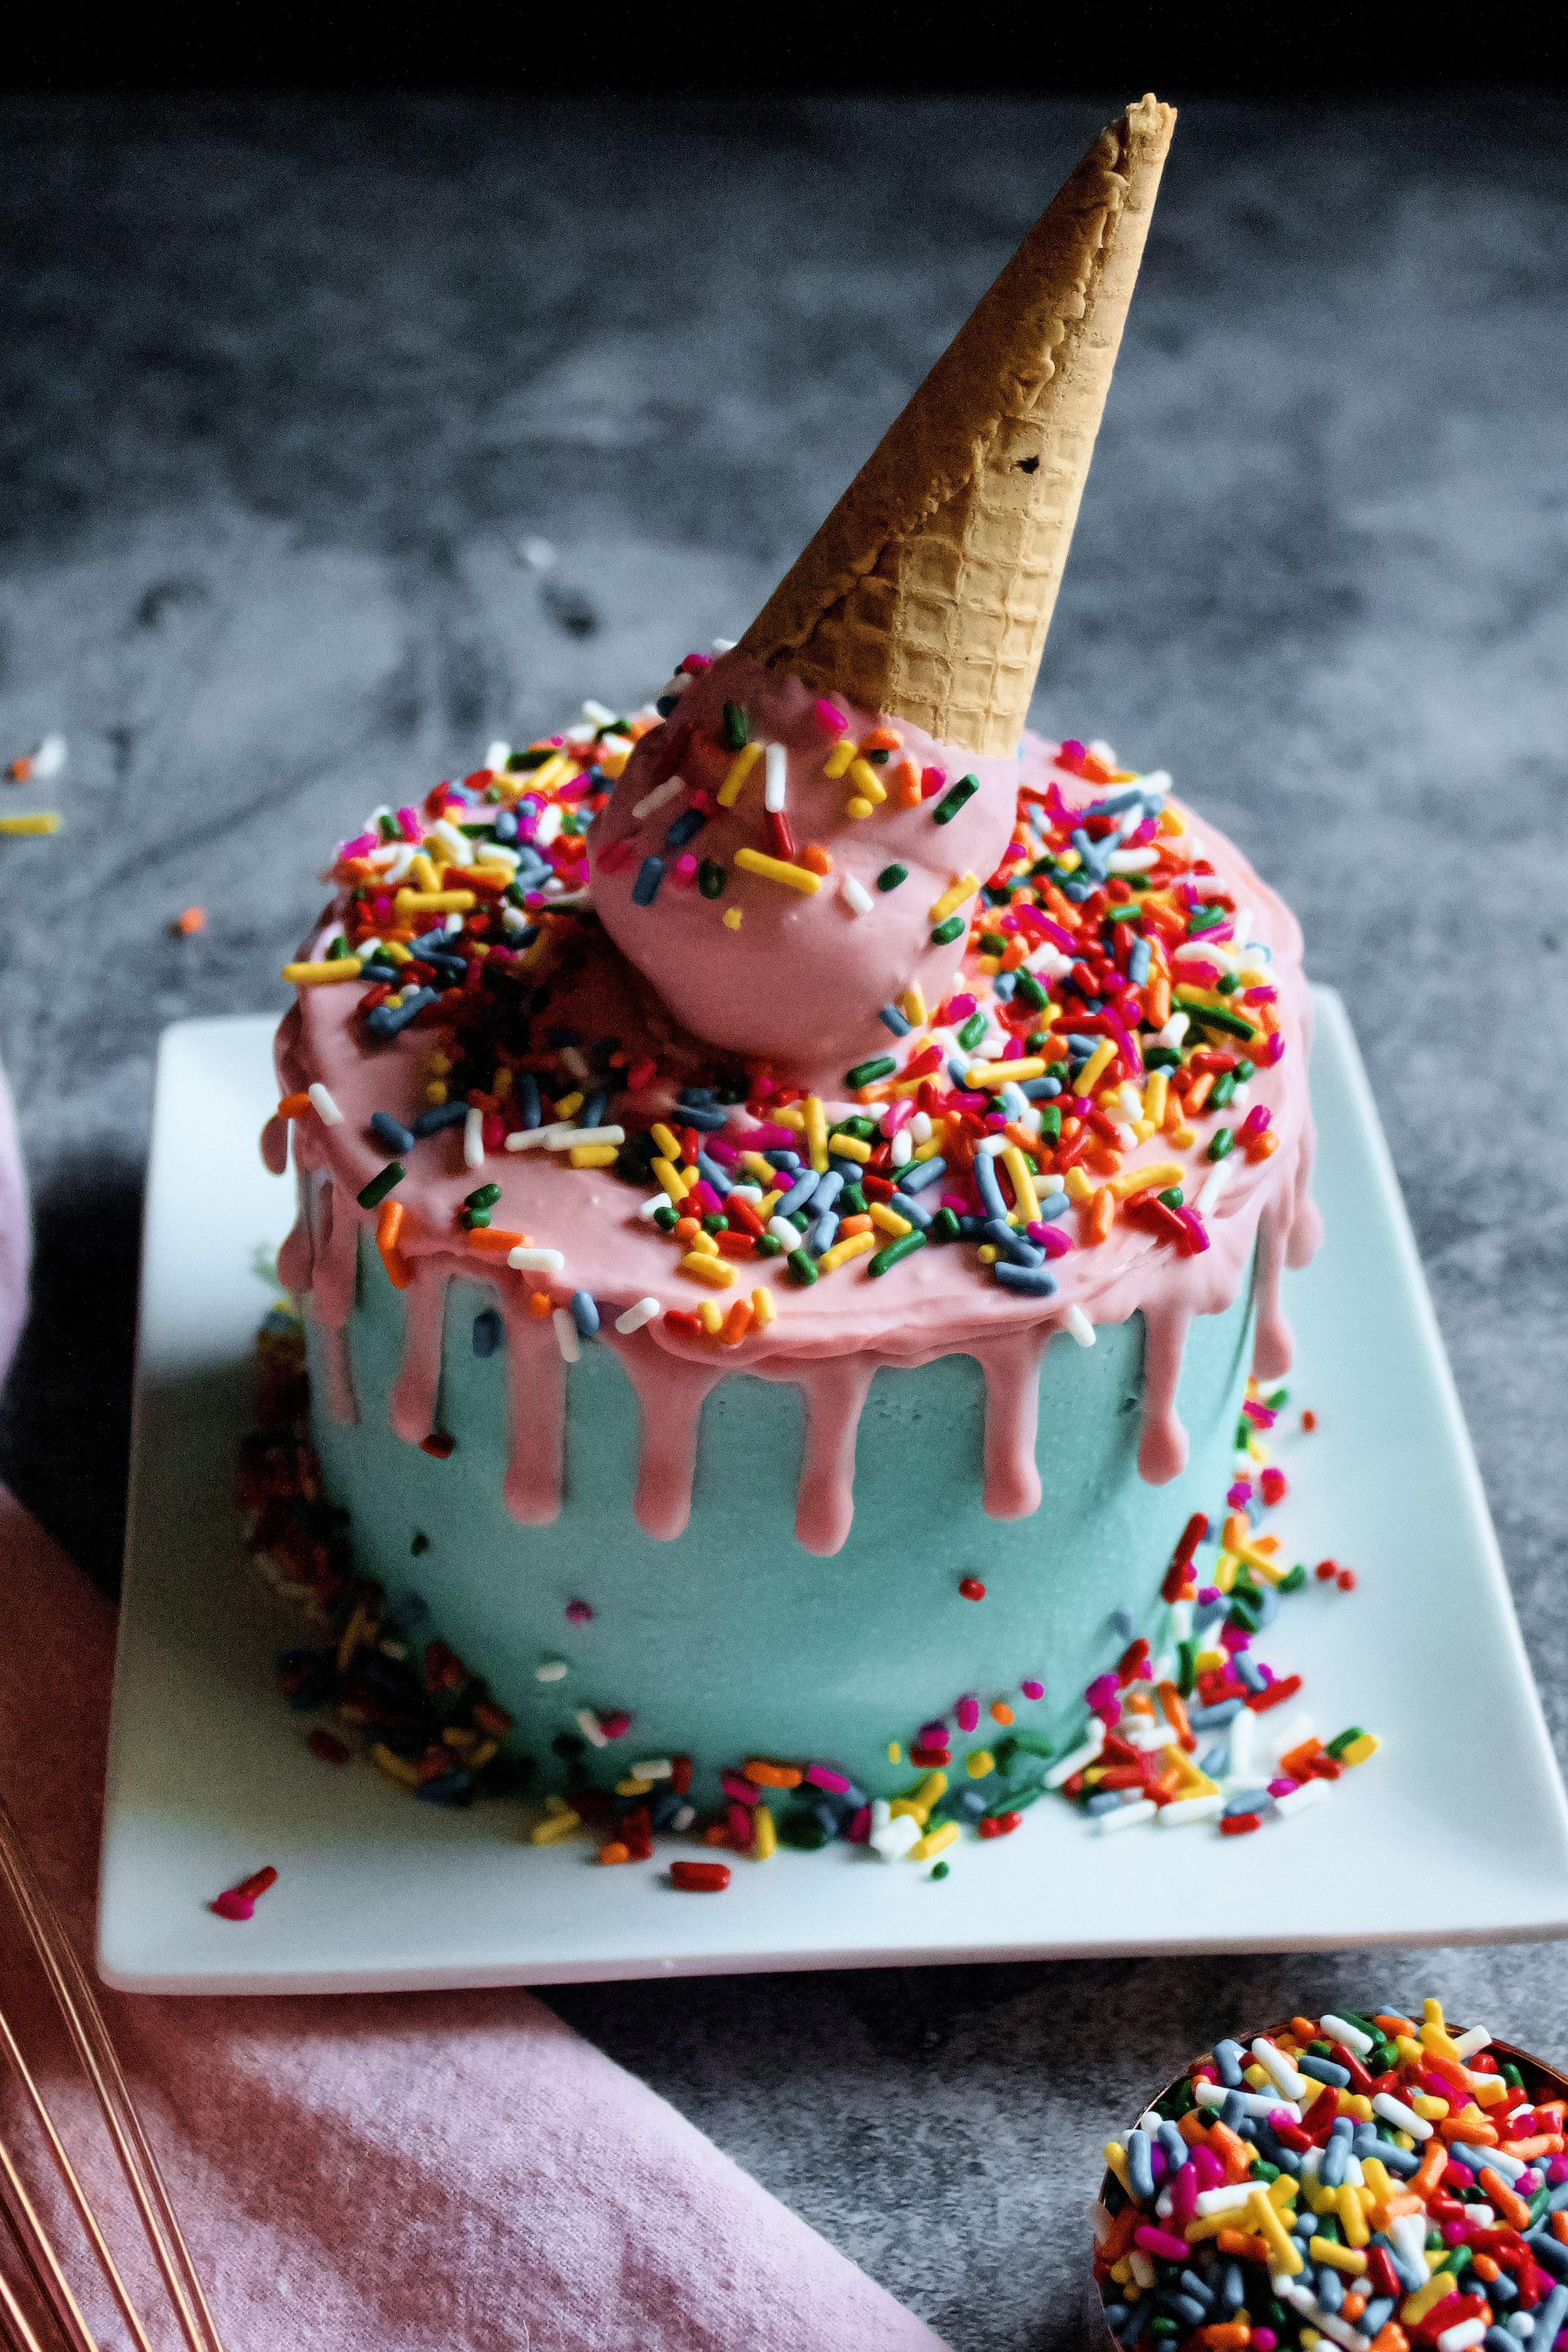
Melting Ice Cream Smash Cake
Soft, fluffy confetti cake frosted in a lovely Tiffany blue and topped with pink chocolate drip, sprinkles, and an adorable melting ice cream cake pop! This cake can be made in miniature as a smash cake or as a full sized cake. Both are equally cute and equally delicious!
This post may contain affiliate links from which, at no additional cost to you, I may earn a small commission to keep this site running. Only products I myself would or do use are recommended.
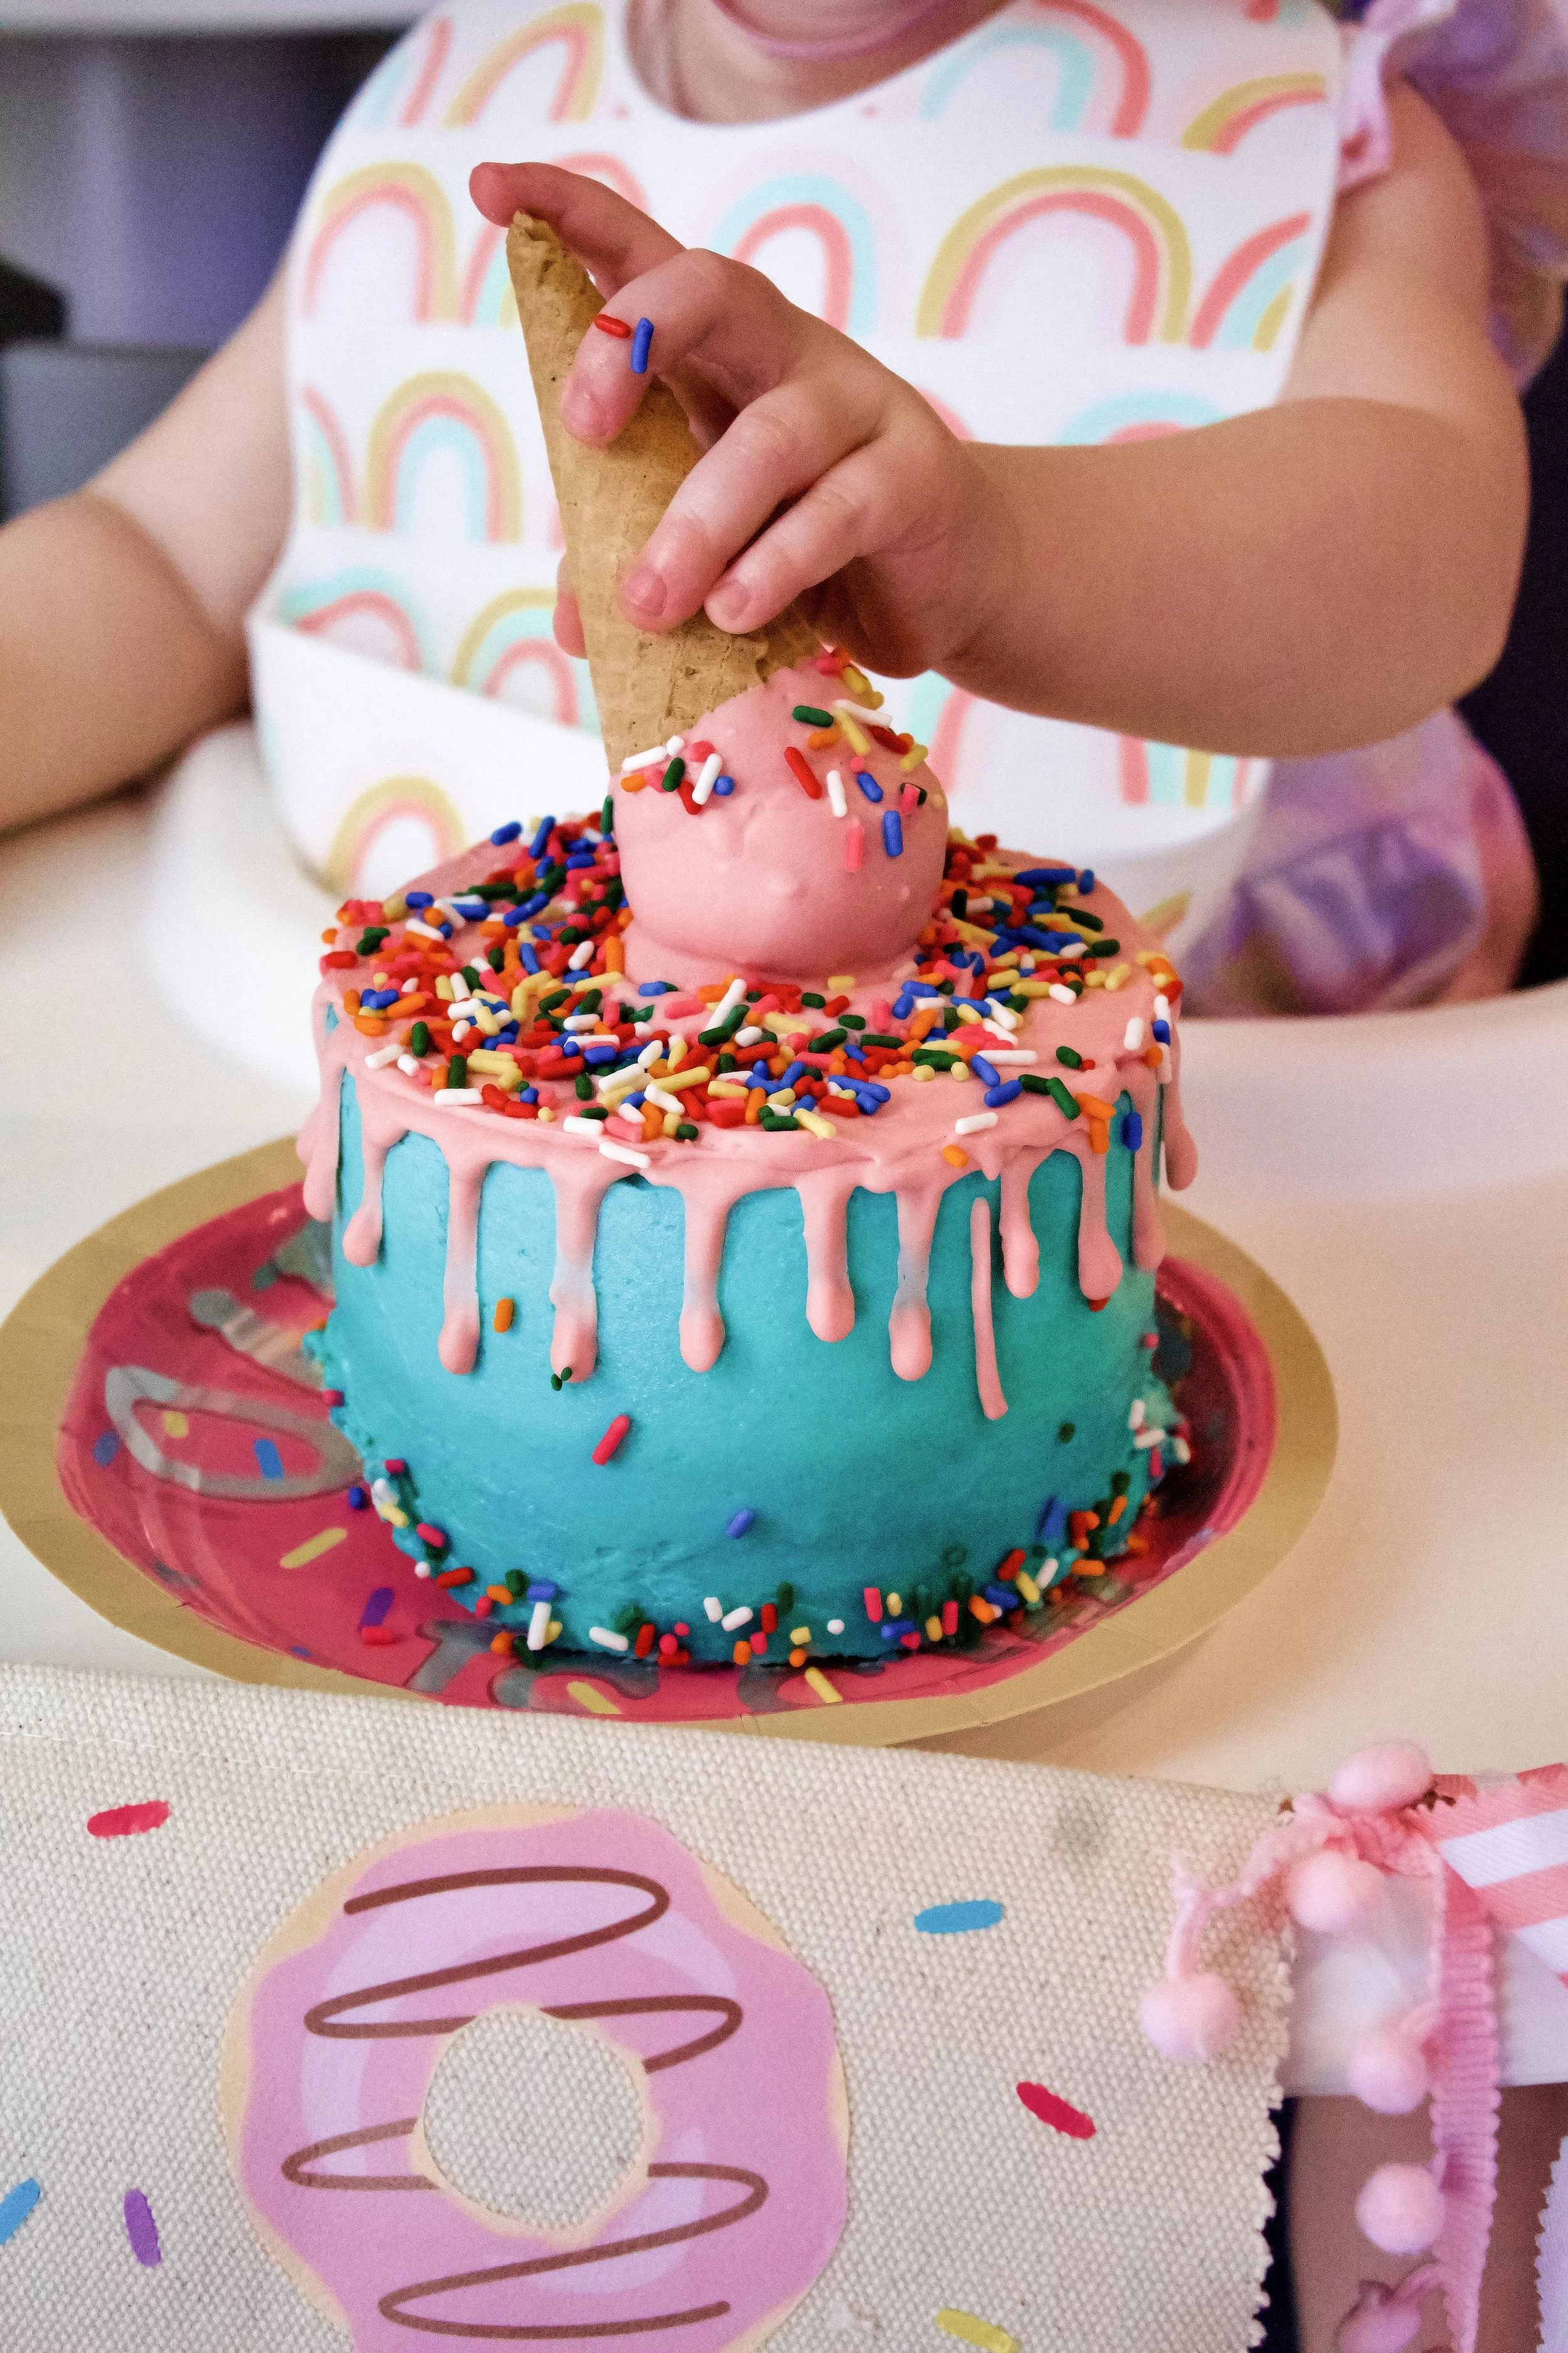
This cake! It was one of those perfect times where a vision came to reality perfectly. This was my niece’s smash cake for her first birthday. It was such a fun, adorable little party, and the cake turned out exactly as we envisioned.
I made extra batter to create both the cake pop on top, extra cake pops for the guests, and some confetti cupcakes to celebrate my sister’s recent birthday, because both the cake and the cake cake pop are delicious on their own.
However, paired together they are not only delicious but also adorable!
Why this recipe works
The vanilla cake is one of my favorites. I’ve been playing around with this basic recipe since I made this brown sugar spice cake that was to-die-for. Since then, almost all of my non-chocolate cakes are based on this recipe. However, I knew that to make a confetti cake, I’d want it as close to a white cake as possible. Using my lemonade cake variation as inspiration, I used all granulated sugar and subbed cake flour (to keep it moist, since removing the brown sugar removes some moisture). And, for good measure, I added just a bit of oil to help keep it moist. You get fluffiness from the butter and moisture from the oil—the best of both worlds. And, obviously, I stirred in some jimmies to make things festive!

The frosting is a simple vanilla American buttercream. Whipping it up for a few minutes helps make it nice and smooth, and using extra vanilla gives it more flavor, so it tastes like more than just…sugar. I also decided to dye it sky blue, partly because it reminds me of my favorite celebration cake at my favorite local bakery. It’s not necessary, but it adds a fun pop of color.
Finally, the design. This design was far easier than I expected. I just cut the waffle cones in half (otherwise you have a giant cake pop), dipped those in candy to glue the cake on, then dipped the whole thing in candy and let it dry messily, adding sprinkles while it was still wet. I froze that while I added drip to the cake, gluing the cake pop on and adding sprinkles while the drip was still wet on the top of the cake.

Key ingredients
Cake flour. You can make your own. For this recipe, you’d want to use 4 1/2 tablespoons (1/4 cup plus 1/2 tablespoon) cornstarch and add that to 1 3/4 cup plus 1 1/2 tablespoons flour. Sift and whisk twice before using in the cake.
Baking powder. Be sure it’s fresh—not open for longer than 6 months (regardless of the expiration date on the box).
Salt. Sea salt is ideal.
Butter. European butter is best for this recipe, as it has less water.
Sugar. Use granulated sugar for a classic yellow cake.
Egg. Use a fresh, large, room temperature egg.
Oil. Just a tiny bit of oil (avocado, grape seed, or canola) helps keep this cake moist.
Vanilla. Use pure extract, not imitation.
Whole milk. Whole milk will make a better cake.

Sprinkles. Jimmies are the most classic tasting here, but you can use any sprinkles you like as long as they’re not too thick or large.
Vanilla buttercream. You can use any frosting you’d like, but I think these cupcakes are perfect with classic vanilla.
Sky blue gel food coloring. This is entirely optional. You can use another color or just go with a classic off-white frosting.
Candy melts. I used used pink lightened with white, but you can use any color you’d like!
Waffle cones. I used full sized cones and just cut them with a serrated knife. You don’t need a perfect cut, as you’ll be dipping them in candy melts.

How to make melting ice cream smash cake
Make the frosting
1. If possible, make the frosting ahead so the color can deepen in the fridge. Set some aside the make the cake pop (or a fully cup if you plan to make a whole batch of cake pops). If you don’t want it to be blue or don’t have time, you can make it while the cake bakes and cools.
Make the cake
2. Sift and whisk flour, baking powder, and salt.
3. Beat butter and sugar until light and fluffy. 2-3 minutes on medium high.
4. Beat in egg. Beat on medium 30-60 seconds.


5. Beat in oil and vanilla. Beat on medium 30 seconds.
6. Alternate adding flour and milk on low. Beat on low until mostly combined, with some flour still unmixed—the next step will take care of that.
7. Gently fold in sprinkles. Don’t over stir. The flour should be all mixed in and the sprinkles roughly evenly distributed.
8. Bake. You’ll need three 4” pans (or an 8x8 or 9x9 pan and a 4” round cake cutter). Two layers will make up the smash cake, and the rest will be formed into the cake pop on top.


Assemble
9. Frost and chill cake. The cake should be chilled before doing the drip, so it’s fully set first. It’s often easiest to do a few thin coats and chill it after each one until you get the straight edges and sharp corners.
10. Make the cake pop. It’s ideal to make the cake ball and let it chill while the frosted cake chills. That way, you can dip it and then do the cake drip at the same time.
11. Melt pink candy melts (or desired color). I used about half white and half pink.
12. Dip cake pop and drip cake. Attach the chilled cake ball to a trimmed ice cream cone, dip it in the pink, immediately add sprinkles, then set it on parchment and freeze it while you do the cake’s drip. As soon as you fill the top of the cake, set the cake pop on top so it can adhere to the wet drip.
13. Immediately decorate with sprinkles. This way, they’ll adhere firmly.
Enjoy!


Tips and FAQ’s for this recipe
Can I make this a full-sized cake?
Yes! You’ll simply triple the recipe (amounts can be found here). You’ll still want to section cake off to make the melting ice cream cone. You can either trim a little extra when you trim the domed tops of the cake layers. Or, since this cake doesn’t produce much of a domed top, you can pour a bit into a single cupcake pan or a 4” cake pan (or similarly sized pan) to be crumbled into the cake ball.
Alternatively, you could triple the recipe and make one smash cake and enough cake pops for your guests, following the recipe here. Just fill two 4” cake pans almost halfway with batter and stir in some sprinkles, then pouring the rest into a greased 9x13 pan to be used for the cake pops.
If you choose to make both a full sized cake and a batch of cake pops, you’ll need to double the full recipe (which means 6x the recipe given here for a smash cake).

Make your own cake flour!
I often make my own, because it’s so easy. One cup of cake flour is just 2 tablespoons cornstarch plus 7/8 cup all-purpose flour. Our, in simpler terms, 2 tablespoons cornstarch scooped into a 1 cup measuring cup then you scoop enough all-purpose flour over that to equal 1 cup (be sure to level it off with the back of a knife). Or, for a more mathematically accurate option for this exact recipe: use 4 1/2 tablespoons (1/4 cup plus 1/2 tablespoon) cornstarch and add that to 1 3/4 cup plus 1 1/2 tablespoons flour. Sift and whisk twice before using in the cake.

What kind of sprinkles should I use?
Any kind! I prefer jimmies, because they’re the most classic confetti cake sprinkle. However, you can use any kind you like. Nonpareils are another good option, but be careful not to mix too much or the color could bleed. I don’t recommend super large sprinkles or those jumbo nonpareils, as they are just uncomfortable to bite into and could cause the cupcakes to fall apart.

Spoon then level your flour
Don’t scoop your flour! I never knew this until I started blogging, but it seriously makes a big difference. You will end up with roughly 25% more flour than the recipe called for if you just doonk (official baking term right there) your measuring spoon into the flour container and scoop. Gently spoon your flour into your measuring cup then level it off with the back of a knife. Trust me! It makes a difference.
Don’t overmix the sprinkles
You want to gently fold them in (meaning stir by scraping along the edges then pulling that toward the middle at the end of your stir). Stirring to vigorously or too long could cause the sprinkles to dissolve and dye your cake a funny color. They will disperse a little more during baking, so don’t worry too much about getting them perfectly stirred in.

Can I use a different frosting?
Yes! I’ve made this with marshmallow frosting and it’s so very delicious. Just be sure to add the food coloring BEFORE the marshmallow fluff, so it doesn’t turn gummy from all of the mixing and adding more dye that’s usually required. It will lighten up a bit after you add the fluff, so dye a little darker than you want. Another classic combo is chocolate frosting. You of course could use any frosting recipe you like, but it may not be quite the same as a classic confetti cake combo.
Split up your work
I know I did! I made this blue frosting just hours before finding out that the party it was for had been postponed—by a month. And then it was postponed again. Ah, the joys of kids who bring home colds. Anyway, I froze the frosting until I was sure we were on for celebrating, then let it defrost on the counter and fluffed it up using my hand mixer. After beating it for a minute on high, I stirred it by hand for a bit to release any air bubbles. You can freeze the frosting for about 2 months or refrigerate it for up to 2 weeks, just be sure to give it time to warm up and always stir or beat it to make it smooth again.
You can make the cake layers a day in advance, covering two for the smash cake with plastic wrap and storing on the counter overnight (or freezing if making further in advance). Crumble the other layer and form into a cake ball and let it chill overnight, so that you only need to frost and decorate the following day.
The cake can be fully assembled up to 1 day in advance and kept on the counter. Freezing is possible, but you’d need to wrap it in plastic wrap after it’s fully frozen, which can get difficult with the cake pop on top. If need be, you can frost the cake and freeze it, wrapping once it’s frozen. Once it’s defrosted (2-3 hours on the counter, still-wrapped), you can add the drip and the cone.

My cake tools
Here are my must-have tools I use for making these cupcakes. Affiliate links provided.
All-rubber spatula (this makes scraping the bowl easier so the batter and frosting doesn’t get all over a wooden handle!)
Mesh sieve (because sifting is KEY for a fluffy cake)
Sky Blue gel food coloring (or color of choice)
Pink and white candy melts(or color of choice)
Parchment paper (for chilling the melting ice cream cake pop)

Melting Ice Cream Smash Cake
- prep time: 55-60 minutes
- bake time: 15-20 minutes
- chill time: 30 minutes
- total time: 1 hour, 50 minutes (plus cooling time)
servings: 1 smash cake (see note above for making enough for guests)
Ingredients:
for the confetti cupcakes and cake ball
- ⅔ cup plus 2 teaspoons (81g) cake flour, spooned then leveled
- ¾ teaspoon (3g) baking powder
- ¼ teaspoon (3g) sea salt
- ¼ cup (57g) unsalted butter, room temperature*
- ½ cup plus 1 tablespoon (112g) granulated sugar
- 1 large egg, room temperature
- 1 tablespoon (15g) avocado or vegetable oil
- 1 teaspoon (4g) vanilla extract
- ⅓ cup (80g) whole milk, room temperature
- 3-4 tablespoons (about 50g) sprinkles (like rainbow jimmies)
to assemble
- half a batch vanilla buttercream (set ⅓ cup aside for the cake ball)
- Sky Blue gel food coloring
- 6 ounces (170g) candy melts (any color–I used pink lightened with white)
- 1 trimmed waffle cone
- more sprinkles to decorate
Instructions:
make the blue frosting in advance
- If possible, make the buttercream ahead of time so the color can deepen in the fridge. Follow directions for the vanilla buttercream. After the taste is to your liking and before the “whipping stage” (where you mix it on high for a few minutes), remove about ¼ to ⅓ cup to be used in making the cake ball. To the remainder, add a pea-sized amount of blue gel food coloring and mix on high until blended. Continue adding small amounts of coloring until you are happy with the color.
- Once you are happy with the color, beat on high for 2-3 minutes, scraping the bowl halfway through.
- Once it is light and fluffy, stir for 1-2 minutes (or run your mixer on low for about 5 minutes, scraping bowl occasionally). If possible, place in an airtight container and refrigerate overnight or up to 2 weeks (or freeze up to 2 months).
- When ready to use, bring to room temperature on the counter. This takes about 2-3 hours. If you only refrigerated it overnight, you can fluff it up by stirring by hand. If it was refrigerated longer or frozen for any length of time, use a stand or hand mixer to beat it on medium for about a minute to fluff it back up.
make the confetti cake
- Preheat oven to 325F/165C (350F/175C if at high elevation). Lightly grease and flour three 4” cake pans and line with parchment. Alternatively, you can make an 8x8 or 9x9 cake and use 4” round cake cutters to create your layers.
- In a medium mixing bowl, use a large fine mesh sieve to sift then whisk together cake flour, baking powder, and salt. Set aside.
- In the bowl of a stand mixer fitted with a paddle attachment (or a large mixing bowl with a hand mixer), beat the butter on high until fluffy, about 1 minute. Add the sugar and beat until light and fluffy, about 3 minutes. Scrape the bowl as necessary, at least once.
- Add the egg then mix on medium until light and fluffy (about 30 seconds). Scrape the bowl. Add the vanilla and oil and mix on medium until well blended.
- Add half of the flour and mix on low until just barely blended. Add the milk and mix on low until just barely blended. Add the remaining flour and mix on low until just barely blended with some flour streaks still visible.
- Using a rubber spatula, gently fold in sprinkles until evenly mixed in. This will also help mix in the remaining streaks of flour.
- Divide evenly between your cake pans. Bake for 15-20 minutes, or until a toothpick inserted in the middle comes out clean. Check early, as climate, elevation, and individual ovens can cause the bake time to vary.
- Let cakes cool in the pans 5-10 minutes, then remove to a wire rack to cool completely.
assemble
- While the cakes cool, use a serrated knife to trim about half of the ice cream cone off. You want the opening small enough to hold a small ball that will fit on the cake without overwhelming it.
- When the cakes are cool, take one layer and crumble with your fingers (or a hand mixer) until a sandy texture. Stir in the reserved white frosting until it comes together. Form into a ball. Check it against the ice cream cone you trimmed. If the cake ball is too large, remove a few pinches and reshape. If the cone is too large, trim a little more. Refrigerate the cake ball.
- Take the remaining cake layers and trim any domed tops with your serrated knife. Fill the cake then cover in a crumb coat. Chill for a few minutes then frost to desired thickness, getting the edges as straight and the corners as sharp as you can. One trick is to frost in thin layers, chilling in between.
- Once the cake ball and cake are both chilled, melt candy coating in the microwave according to directions (or use a double boiler). Be very careful not to overheat it, as it will be ruined. You can keep it warm while you dip the cake pops by placing the bowl over a saucepan with 1” simmering water over lowest heat setting.
- First, dip the very edges of the trimmed ice cream cone into the candy. Immediately place it on the cake ball and set that in the fridge or freezer. Once that’s hardened, cover the cake ball in candy coating, using a spatula to help get it fully coated. Immediately place on a parchment lined pan or place then decorate with sprinkles. Place this in the freezer to quickly set it.
- While the cake pop sets, pour the remaining candy coating in a drip bottle or uncut piping bag. Let it cool enough so that you can easily handle it. If using a piping bag, trim off just a small bit, enough to create the drips.
- Take the chilled cake out of the fridge and decorate with the candy coating, first doing the drips down the sides then spreading it across the top of the cake. Immediately place the hardened cake pop on top of the still-wet candy coating. If it’s dried too much, use some extra candy to glue it to the cake. Immediately decorate with more sprinkles.
- Let cool until completely set.
Enjoy!
Cake will last 3-5 days at room temperature.
*I highly recommend European style butter! It has less water and makes a richer dessert. If your butter has become shiny or oily, put it back in the fridge for 5-10 minutes until it firms up a bit (not hard) and is matte in appearance.