
Homemade Drumstick Ice Cream
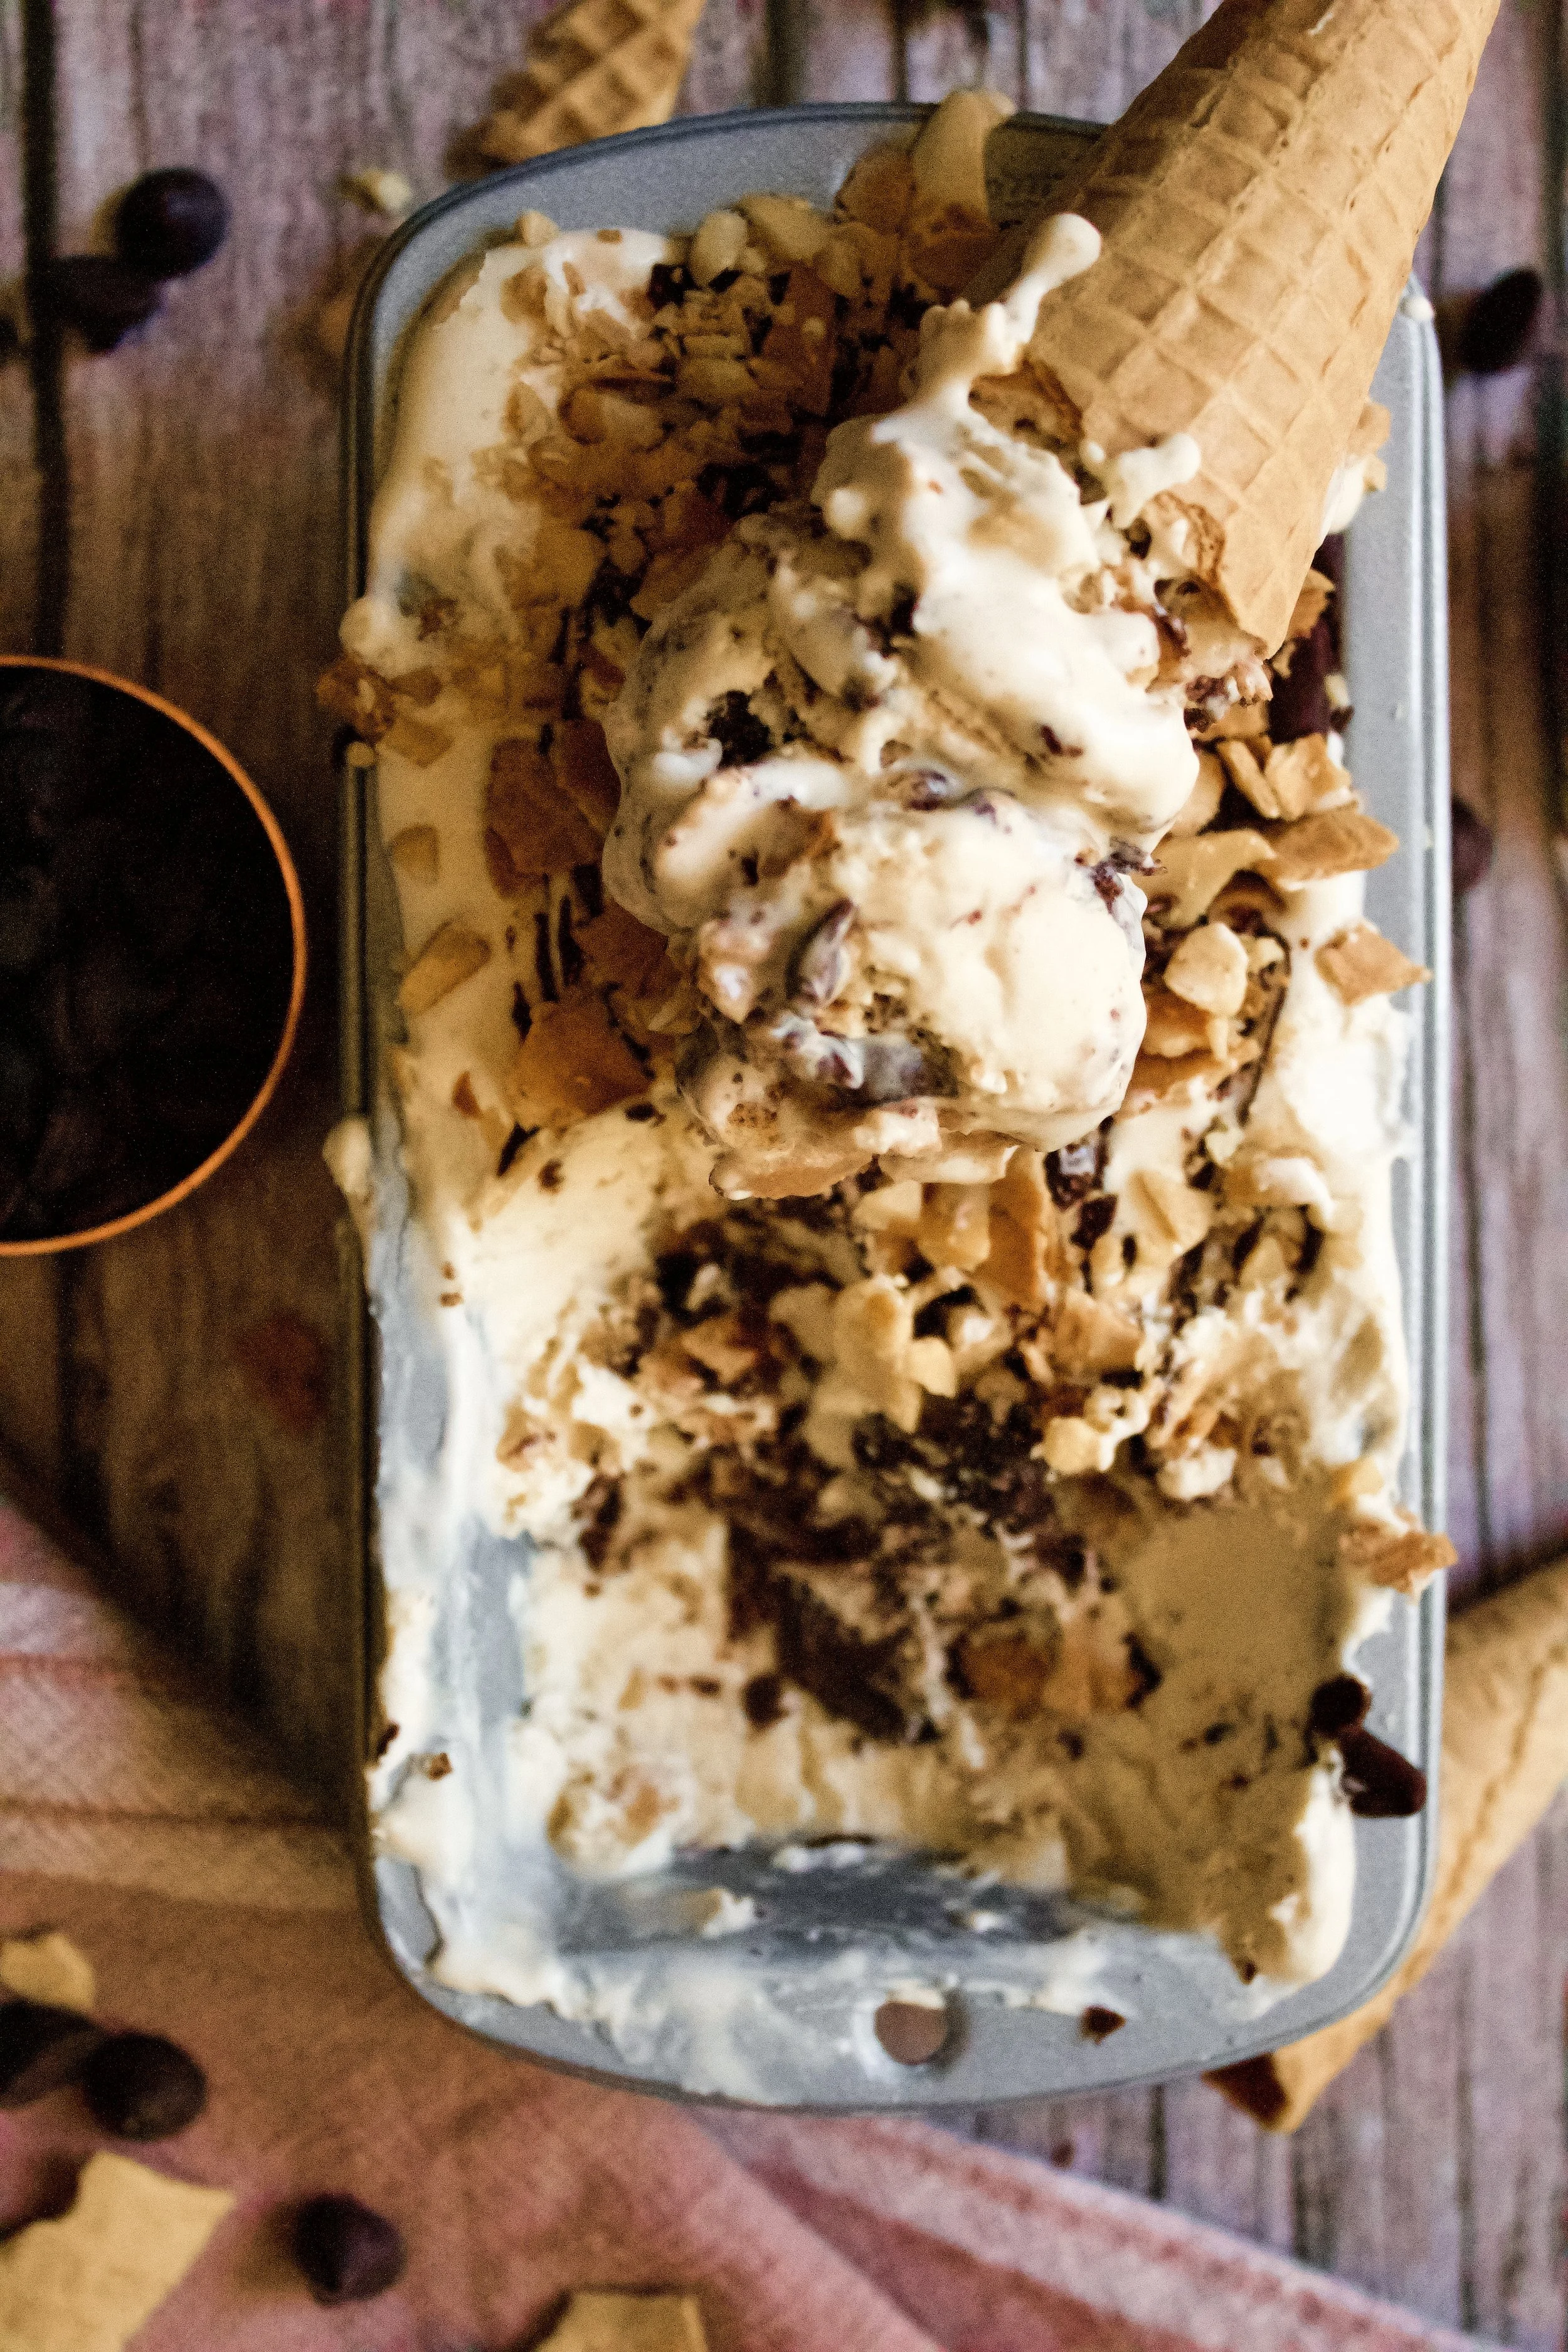
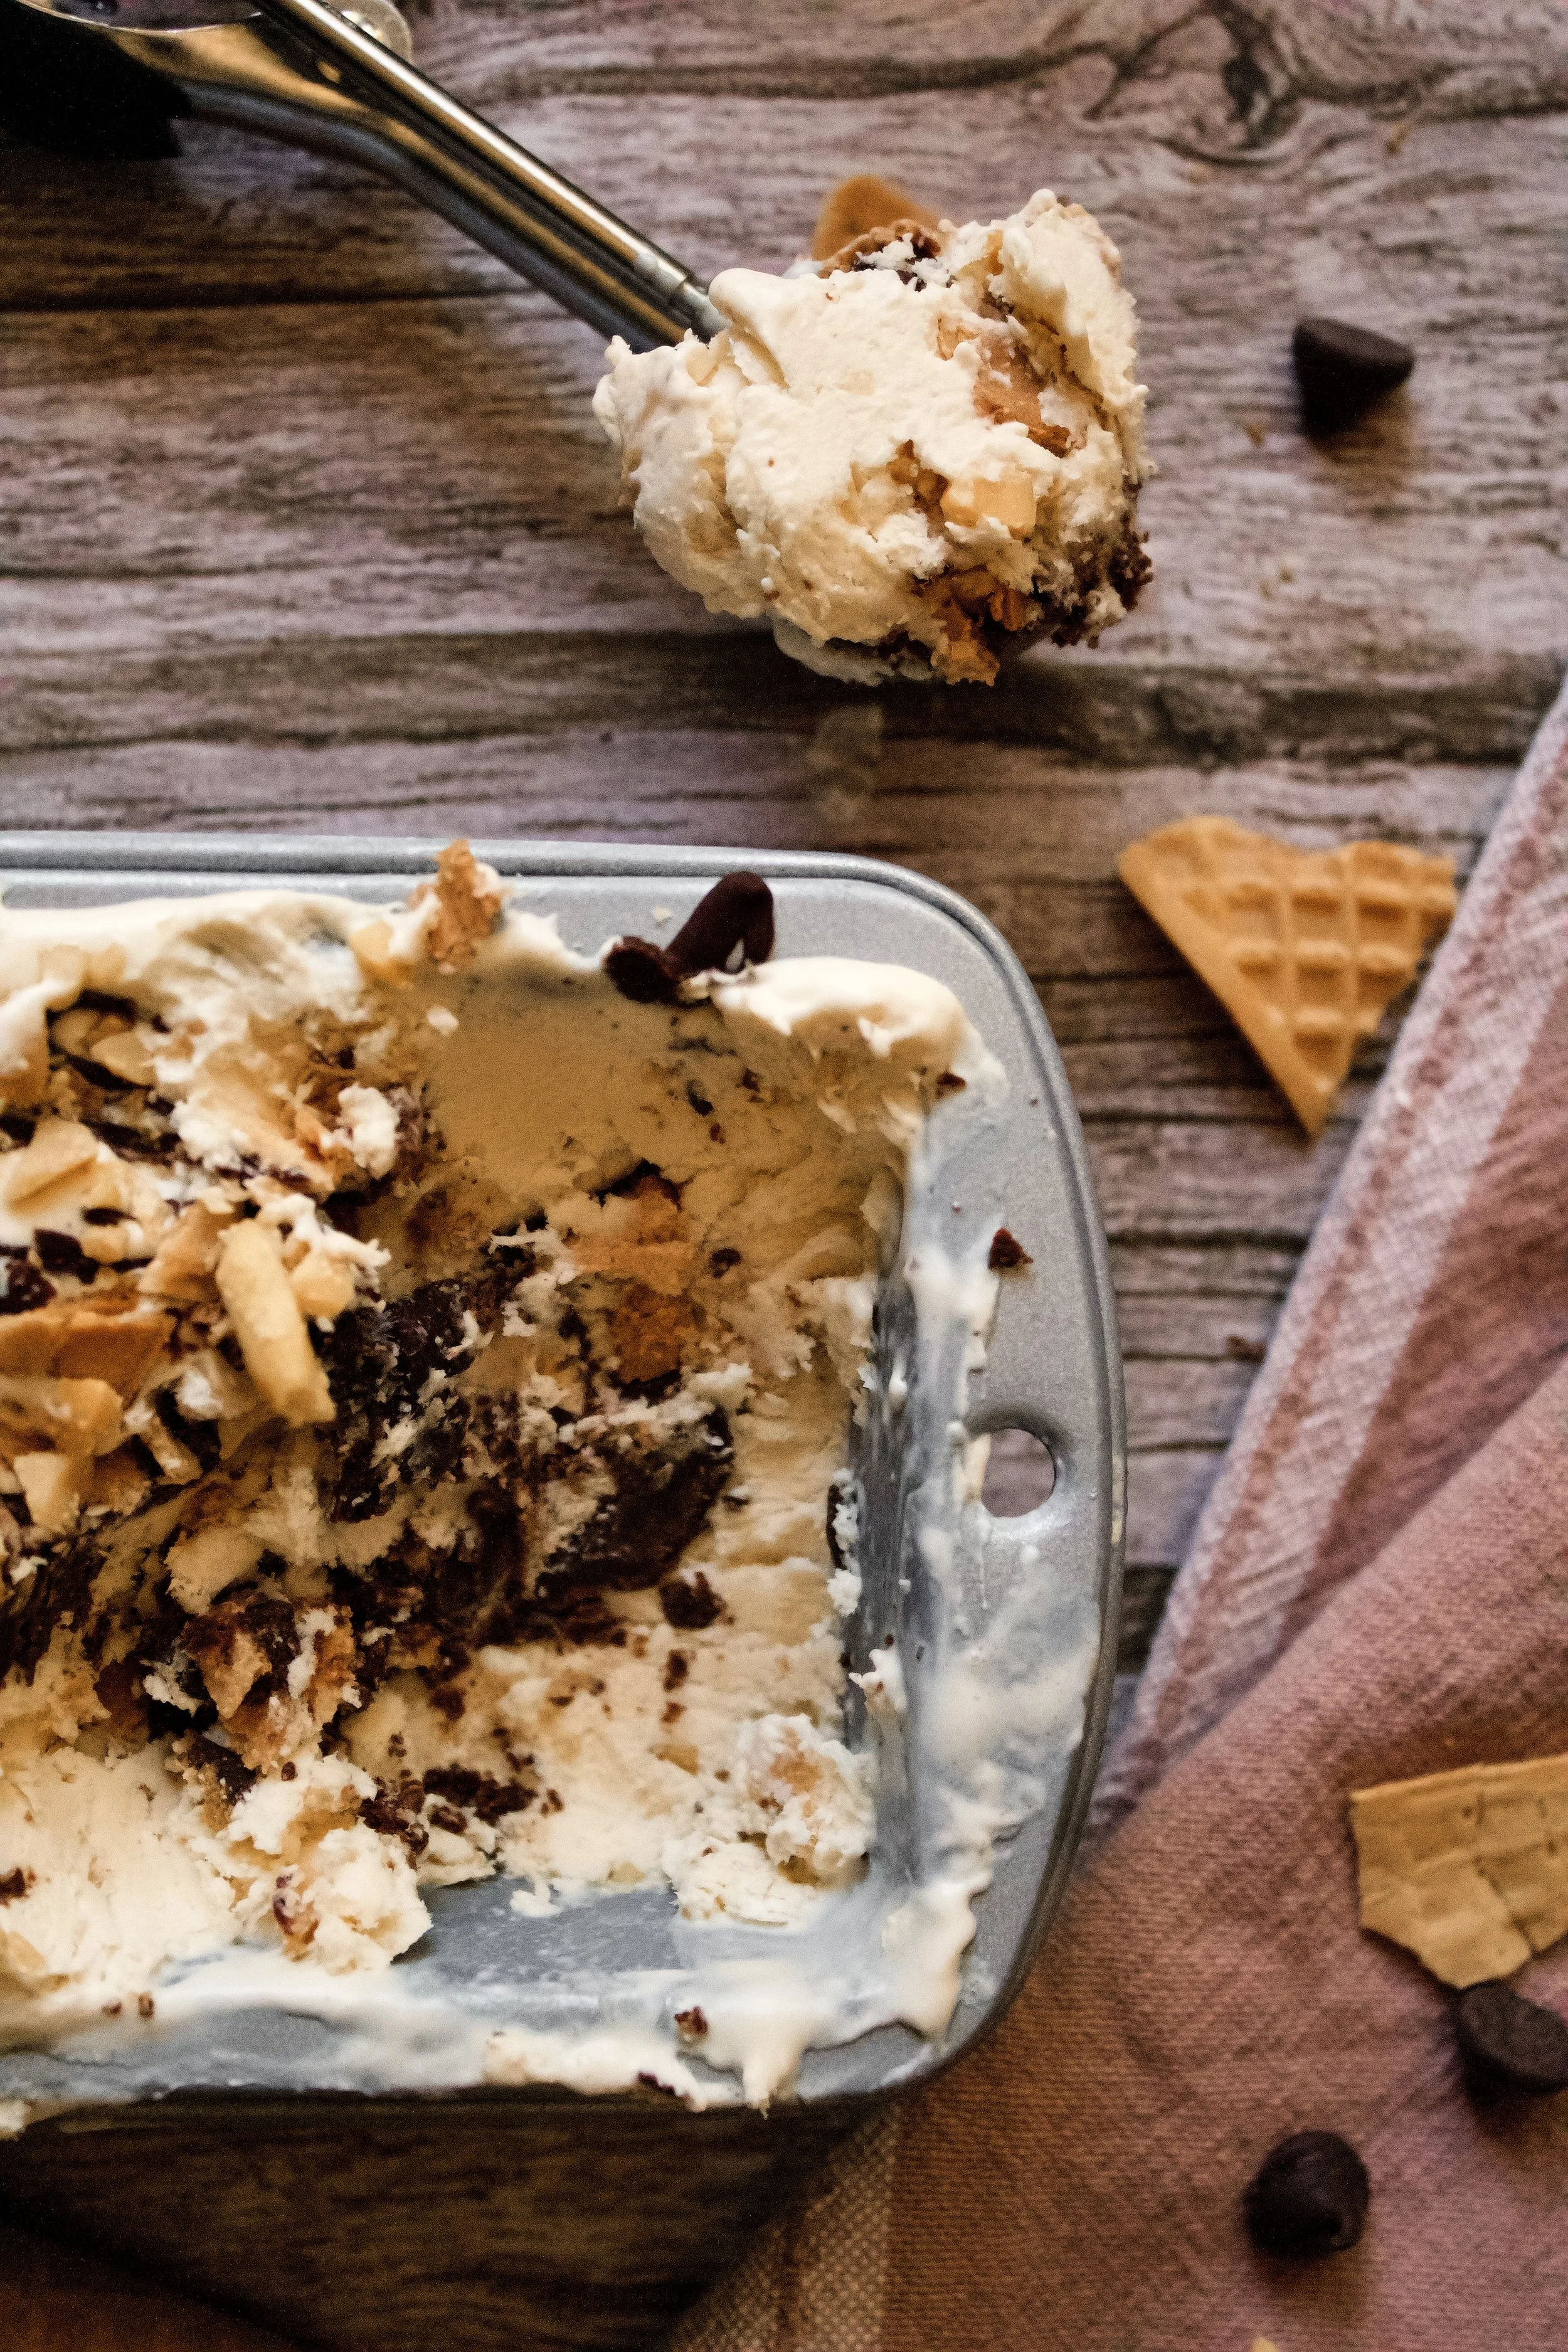
Creamy vanilla ice cream swirled with chocolate, peanuts, and waffle cone bits. Everything wonderful about that classic childhood treat, but in a homemade ice cream!
This post may contain affiliate links from which, at no additional cost to you, I may earn a small commission to keep this site running. Only products I myself would or do use are recommended.

In today’s episode of “Necessity is the Mother of Invention”, I found a perfect use for some leftover waffle cone pieces. Why did I have leftover waffle cone pieces?
Because I’m a rabbit hole of ideas. I get one and that leads to another and eventually, I’m baking seven things in one day that are somehow, in my mind, all connected by ingredients—so I’m saving time with my baking frenzy.
Like the time I made a melting ice cream cake for my niece’s first birthday. Then I decided to make a whole bunch of melting ice cream cone cake pops for the guests. Which meant I had to cut down a couple dozen waffle cones so a cake pop could fit nicely in them.
So what do you do with a couple dozen cut up bits of waffle cone?
Well, I’ll let you know when I’ve used it all up. But half of it went into this amazing ice cream. It created the perfect crunch to go along with the chocolate swirl and chopped peanuts. Dare I say, it tasted exactly like a drumstick.

Why this recipe works
The vanilla ice cream base is so simple. You can make it as a no-churn ice cream or bust out that ice cream maker and do it the old fashioned way! It uses just a few simple ingredients to get that delicious, homemade ice cream taste that’s so creamy. Then, you literally just layer the ice cream with the other ingredients you’d find in a drumstick. Melted chocolate, chopped roasted peanuts, and waffle cone pieces. And while you may wonder why anyone would make an ice cream when you can just buy a drumstick, I’d argue that the reason is how well-distributed the ingredients are. Every bit is that perfect bite. Chocolate. Peanuts. Waffle cone. Creamy ice cream. That’s why adding the ingredients in layers is ideal, to help make each bite perfection.

Key ingredients
Egg yolks. Needed to thicken the custard and provide that rich custardy base.
Sugar. Granulated sugar is used.
Vanilla. Necessary to get that rich, creamy ice cream base.
Whole milk. This is heated into the custard, so avoid using nonfat to get the best texture.
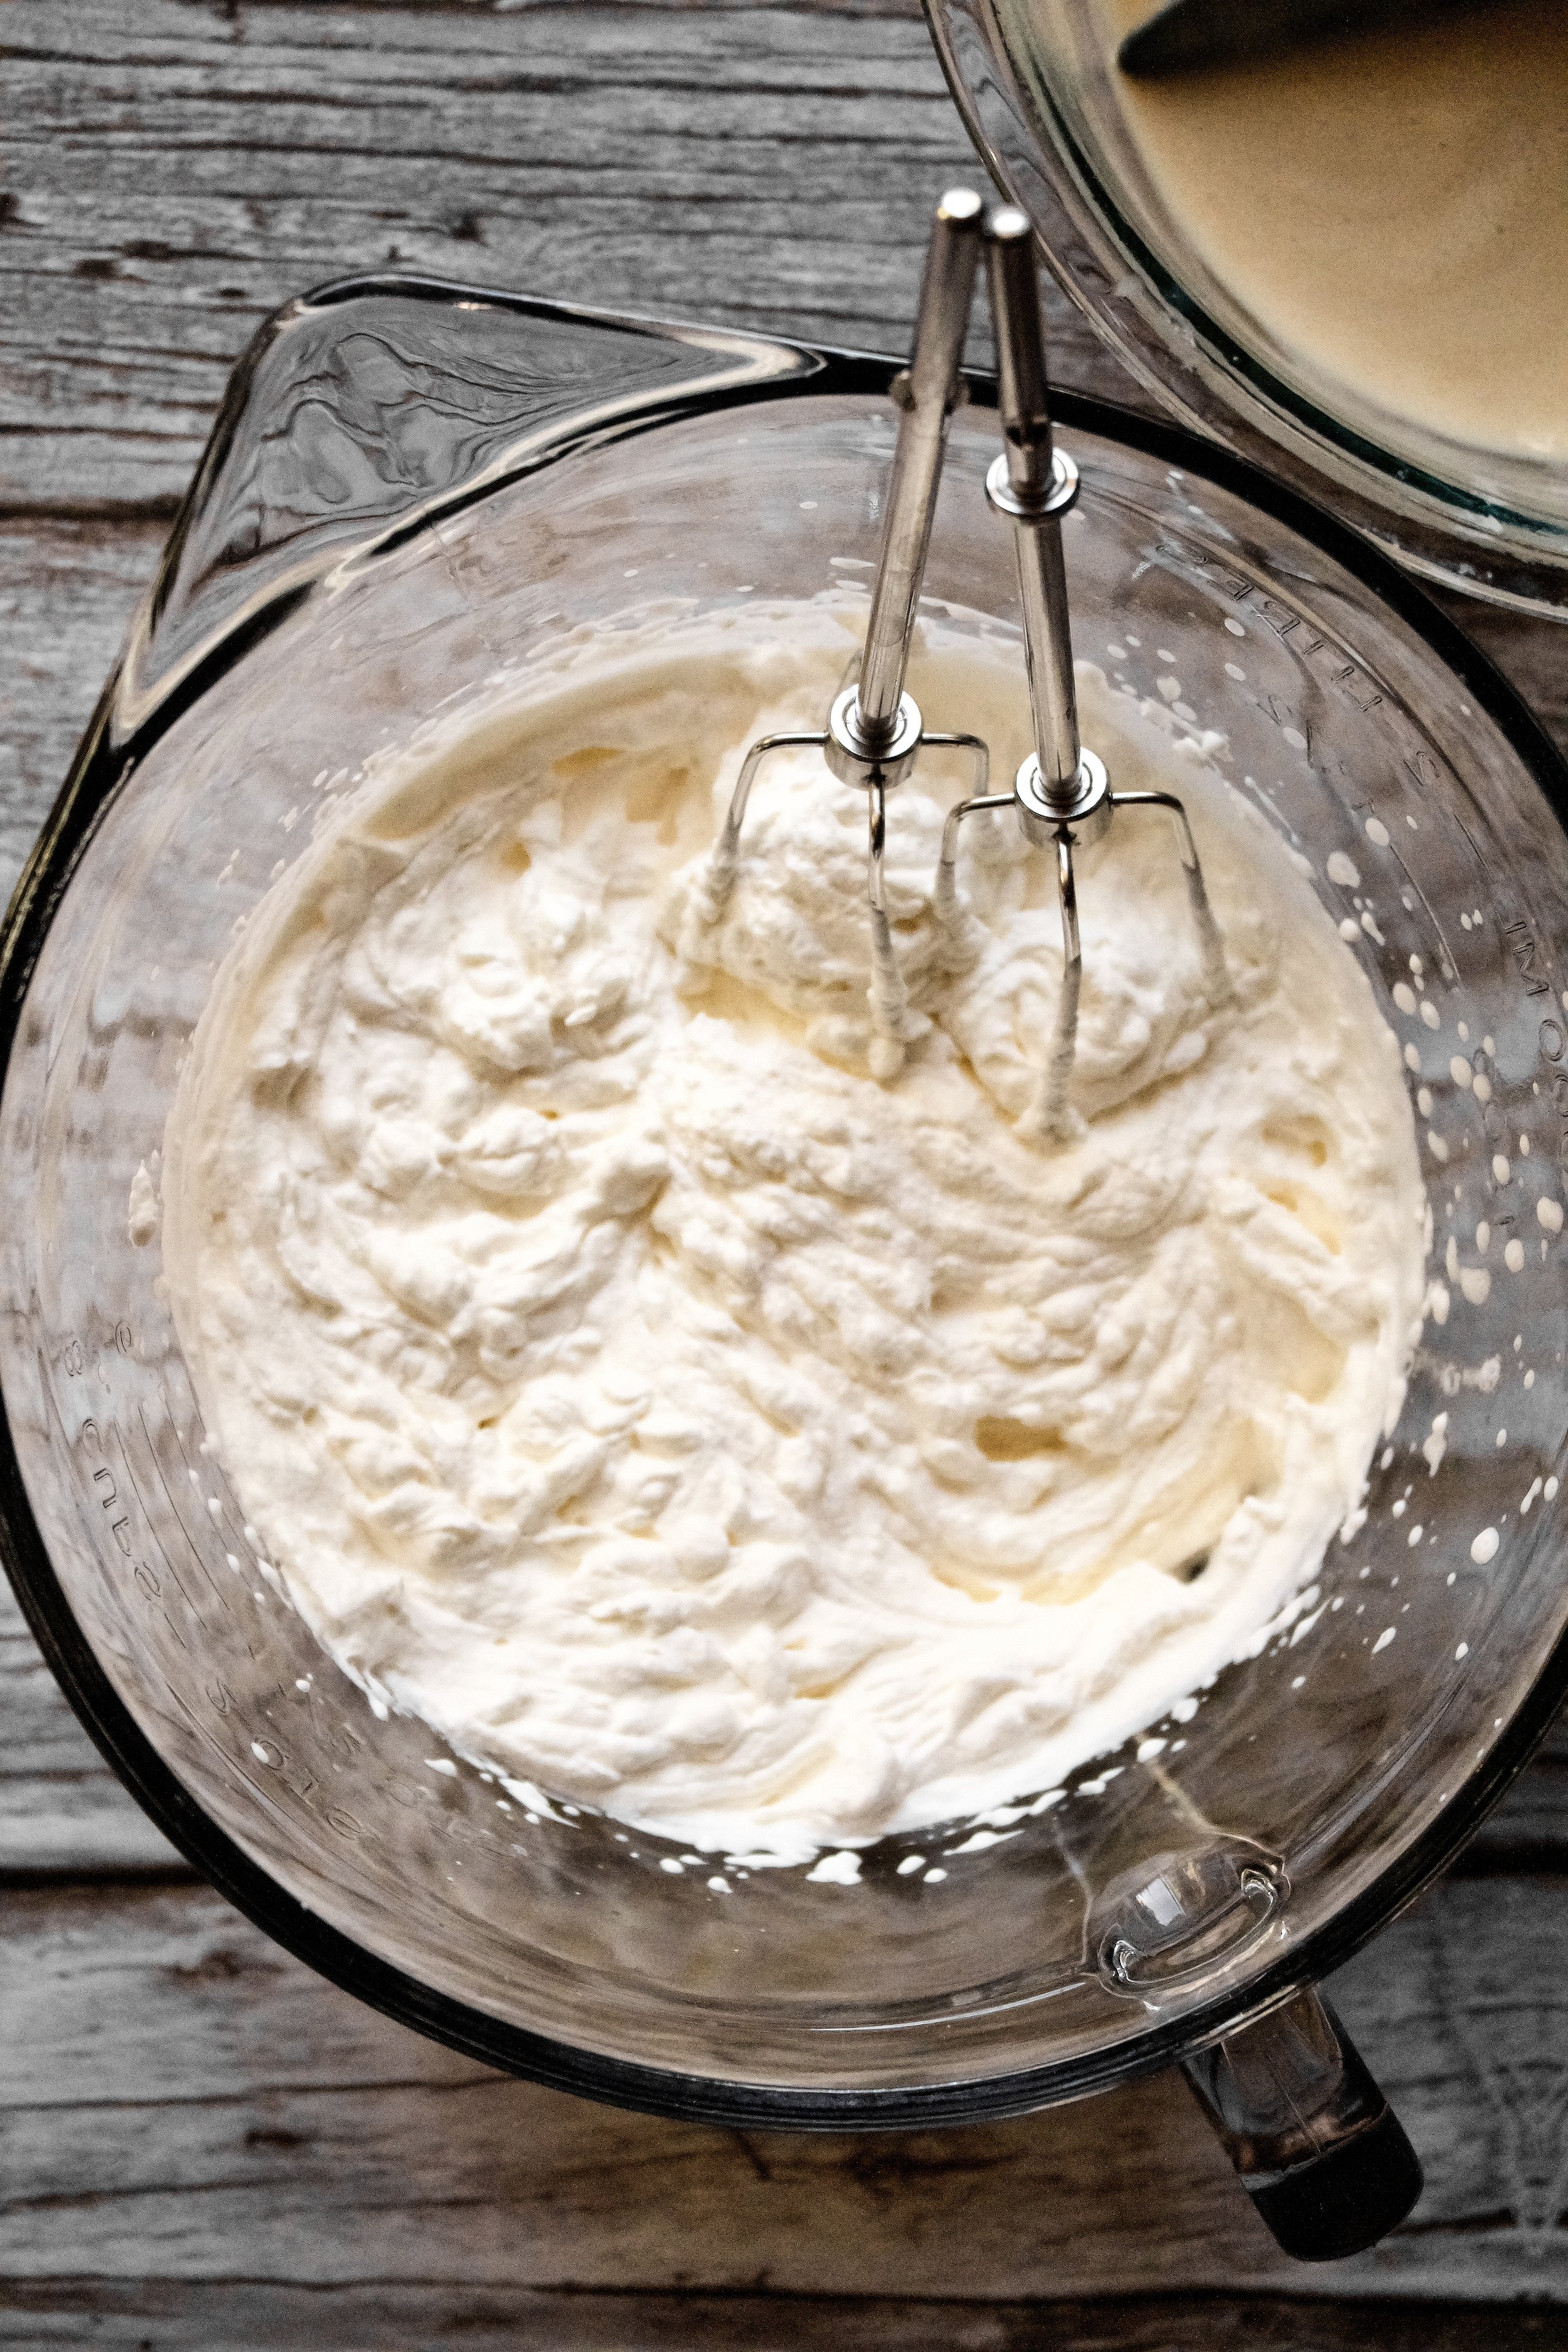
Heavy cream. You can either whip this separately and fold it into the custard OR stir the two together and churn it all in an ice cream maker. Both work relatively the same, with an ice cream maker giving a bit fluffier of a result.
Waffle cones. Don’t get the flat bottomed kind—you want a waffle-style cone. Mine came from Trader Joe’s, but they are a seasonal item. Many grocery stores carry them year round, but you may need to check in the end cap of the freezer sections to find them.
Roasted peanuts. I had already roasted peanuts that I chopped, but you can buy pre-chopped or even raw peanuts then roast and chop them yourself.
Chocolate. You can use chips or baking chocolate. As long as it’s something you can melt, it’ll work.

How to make drumstick ice cream
Make the ice cream
1. Whisk egg yolks and sugar until pale and fluffy. This takes a few minutes, so feel free to use a hand mixer. You want it pale yellow and fluffy—it should increase in volume by at least 50%.
2. Heat milk and vanilla until steaming. Heat in a medium saucepan over medium and stir frequently so it doesn’t burn.
3. Slowly whisk (temper) milk into yolks. You want to pour slowly and whisk quickly. It can take practice, so take breaks as needed and be sure you have a bowl that stays put (some of mine start spinning as I whisk).
4. Heat the custard until thickened. After all the milk is tempered into the eggs, pour it all back into the saucepan and cook, stirring constantly, until it’s roughly the thickness of instant pudding before it sets.
5. Chill until set. Place a piece of plastic wrap wright on the custard so it doesn’t form a skin. Refrigerate at least an hour.


For a slow-churned ice cream
7. Combine cooled custard and heavy cream. Stir well so everything is evenly mixed.
8. Churn according to machine directions. Be sure you have enough ice and rock salt or that you’ve frozen your maker’s insert well in advance (some require 24 hours).
9. Melt the chocolate. Melt the chocolate while the ice cream churns so it’s cooled by the time the ice cream is done. Heat in the microwave at half power in 15 second intervals. Or, you can use a double boiler (bring 2” water to a boil in a medium saucepan, turn it down to low, then set a heatproof bowl with the chocolate in it over that and stir until nearly melted, removing from heat and stirring until completely smooth).
10. Layer into container with toppings. Start with about 1/3 of the ice cream base. Drizzle 1/3 of the chocolate. Sprinkle 1/3 of the waffle cone bits and 1/3 of the peanuts (or as much as you want—it’s a flexible recipe). Repeat this process two more times until all of the ingredients are layered.
11. Freeze 3-4 hours or overnight. It’s soft-serve consistency right away, but that gets a little messy with the swirl. It’s best to freeze it at least a few hours.


For a no-churn ice cream
7. Melt the chocolate. Melt the chocolate first so it’s cooled by the time the ice cream is done. Heat in the microwave at half power in 15 second intervals. Or, you can use a double boiler (bring 2” water to a boil in a medium saucepan, turn it down to low, then set a heatproof bowl with the chocolate in it over that and stir until nearly melted, removing from heat and stirring until completely smooth).
8. Whip cream until soft peaks. You want sturdy peaks but the cream should still be shiny and just starting to turn matte in spots.
9. Fold into cooled custard. Do this in thirds so you don’t deflate the cream.
10. Layer into container with toppings. Start with about 1/3 of the ice cream base. Drizzle 1/3 of the chocolate. Sprinkle 1/3 of the waffle cone bits and 1/3 of the peanuts (or as much as you want—it’s a flexible recipe). Repeat this process two more times until all of the ingredients are layered.
11. Freeze 4-8 hours. This all depends on your freezer, but you want it sturdy enough to scoop.


Tips and FAQ’s for this recipe
Is slow-churned better than no-churn?
I notice very little difference between the two. The biggest thing I’ve found is that no-churn is harder straight from the freezer and needs a few minutes to soften on the counter. Once it has, it tastes just the same!
What if my eggs scrambled?
Sometimes, the eggs scramble just a bit. If they’ve scrambled a lot, with large chunks of egg, you should start over. However, if you’re unsure or think you see some tiny egg bits, just use a large fine mesh sieve to strain the custard before chilling. It’ll remove any egg that didn’t temper properly.
Can I make this without eggs?
Yes! I personally prefer the taste of egg-based vanilla ice creams, but you can make this recipe by using one 14 ounce can of sweetened condensed milk instead of the egg yolks, milk, and sugar (so replacing the custard). You’ll simply melt the chocolate chips and let them cool slightly stir them, the vanilla, and the cocoa powder into the sweetened condensed milk in a large mixing bowl. The replaces the custard, so you can then either add the heavy cream and churn with an ice cream maker or follow the no-churn option above.
Coat the waffle cone in chocolate
One thing that can happen after a few weeks in the freezer is that the waffle cone bits will get soggy. It shouldn’t happen right away, but I noticed it toward the end. To prevent this, you could do one of two things. You could coat the waffle cone bits in chocolate before making the ice cream. You’d need to toss them in melted chocolate then let them dry on a wire cooling rack. Alternatively, you could drizzle more chocolate on top of them right after layering them into the ice cream. This should help seal in the crispness for longer.

My tools
Here are my must-have tools I use for making ice cream. Affiliate links provided.
Ice cream container (or use a 8x4 loaf pan or 9x5 loaf pan)
Mesh sieve (in case some egg scrambles as you temper it)


Homemade Drumstick Ice Cream
- prep time: 20-25 minutes
- chill time: 1 hour
- churn time: 30 minutes*
- freeze time: 4-8 hours
- total time: 10 hours
servings: 12 (½ cup servings)
Ingredients:
- 3 large egg yolks, room temperature
- ⅔ cup (133g) granulated sugar
- 1 cup (240g) whole milk
- 1 tablespoon (13g) pure vanilla extract
- pinch sea salt
- 2 cups (480g) heavy whipping cream, cold
- 6 ounces (170g) baking chocolate, chopped
- ¾ cup (90g) chopped roasted peanuts
- 5-6 waffle ice cream cones, broken into ¼ inch pieces
- ice cream maker, prepped per directions (optional–see no-churn option at the bottom)*
Instructions:
- Follow your ice cream maker’s directions to prepare it for use, which could include placing the bowl in the freezer for up to 24 hours*.
- Whisk the egg yolks and sugar in a medium mixing bowl. Whisk until pale frothy, 2-3 minutes. At first it may seem thick and clumpy, but keep going until the sugar melts and it becomes pale and frothy. Set aside.
- Combine the whole milk, vanilla, and pinch sea salt in a medium saucepan over medium heat, stirring frequently, until it begins to steam and small bubbles begin to form along the edge of the pan.
- Temper the milk into the eggs by very, very slowly streaming the milk into the eggs while whisking the eggs very quickly. Be sure to whisk constantly and quickly as you do this to avoid scrambling the eggs.
- Once all of the milk has been added to the eggs, scrape the mixture back into the saucepan and cook, stirring constantly with a rubber spatula (be sure to get to the edges and corners), until the mixture has thickened enough to coat the back of a spoon. It should feel thicker as you stir, as well.
- Pour into a medium bowl (the bowl the eggs were in works just fine). If the eggs have scrambled, pour the whole mixture through a large fine mesh sieve set over your bowl to remove the egg bits. Cover well and refrigerate until cool, about 1 hour.
- Once the custard is cooled, combine with the heavy cream and mix well. Follow your manufacturer’s directions to churn the ice cream. Don’t overmix.
- Melt the chocolate while the ice cream churns so it’s cooled by the time the ice cream is done. Heat in the microwave at half power in 15 second intervals. Or, you can use a double boiler (bring 2” water to a boil in a medium saucepan, turn it down to low, then set a heatproof bowl with the chocolate in it over that and stir constantly until 75% melted, removing from heat and stirring until completely smooth).
- Once the ice cream is finished, layer ⅓ of it into a 9x5 loaf pan or an ice cream container. Drizzle ⅓ of the cooled chocolate onto the ice cream. You can use a knife to make some swirls with it if you’d like. Sprinkle ⅓ of the waffle cone bits and ⅓ of the peanuts on top of that. Repeat this process two more times until all ice cream, chocolate, waffle cone, and peanuts have been used.
- Freeze for at least 4 hours, ideally overnight. You may need to let it sit on the counter for 5 minutes before scooping.
Enjoy!
Store leftovers in an airtight container. Ice cream should last at least 1-2 months, but this can vary depending on your freezer and how well-sealed it is.
*If you do not have an ice cream maker, you can make this a no-churn ice cream. Follow the directions up to step 6. When the custard is cooled, melt the chocolate as indicated in step 8 then proceed with this no-churn option. Place the heavy whipping cream in the bowl of a stand mixer fitted with the whisk attachment (or use a large mixing bowl and a handheld mixer). Beat on medium until frothy then increase speed to high until stiff peaks just begin to form (the mixture will start to turn matte in appearance–watch carefully and stop your mixer when this just begins to happen). Fold ⅓ of the whipped cream into the custard until fully combined, then continue with the next ⅓ of the whipped cream, followed by the final ⅓ until all whipped cream is mixed in. Layer ice cream as directed in step 9 and freeze at least 4 hours.
