
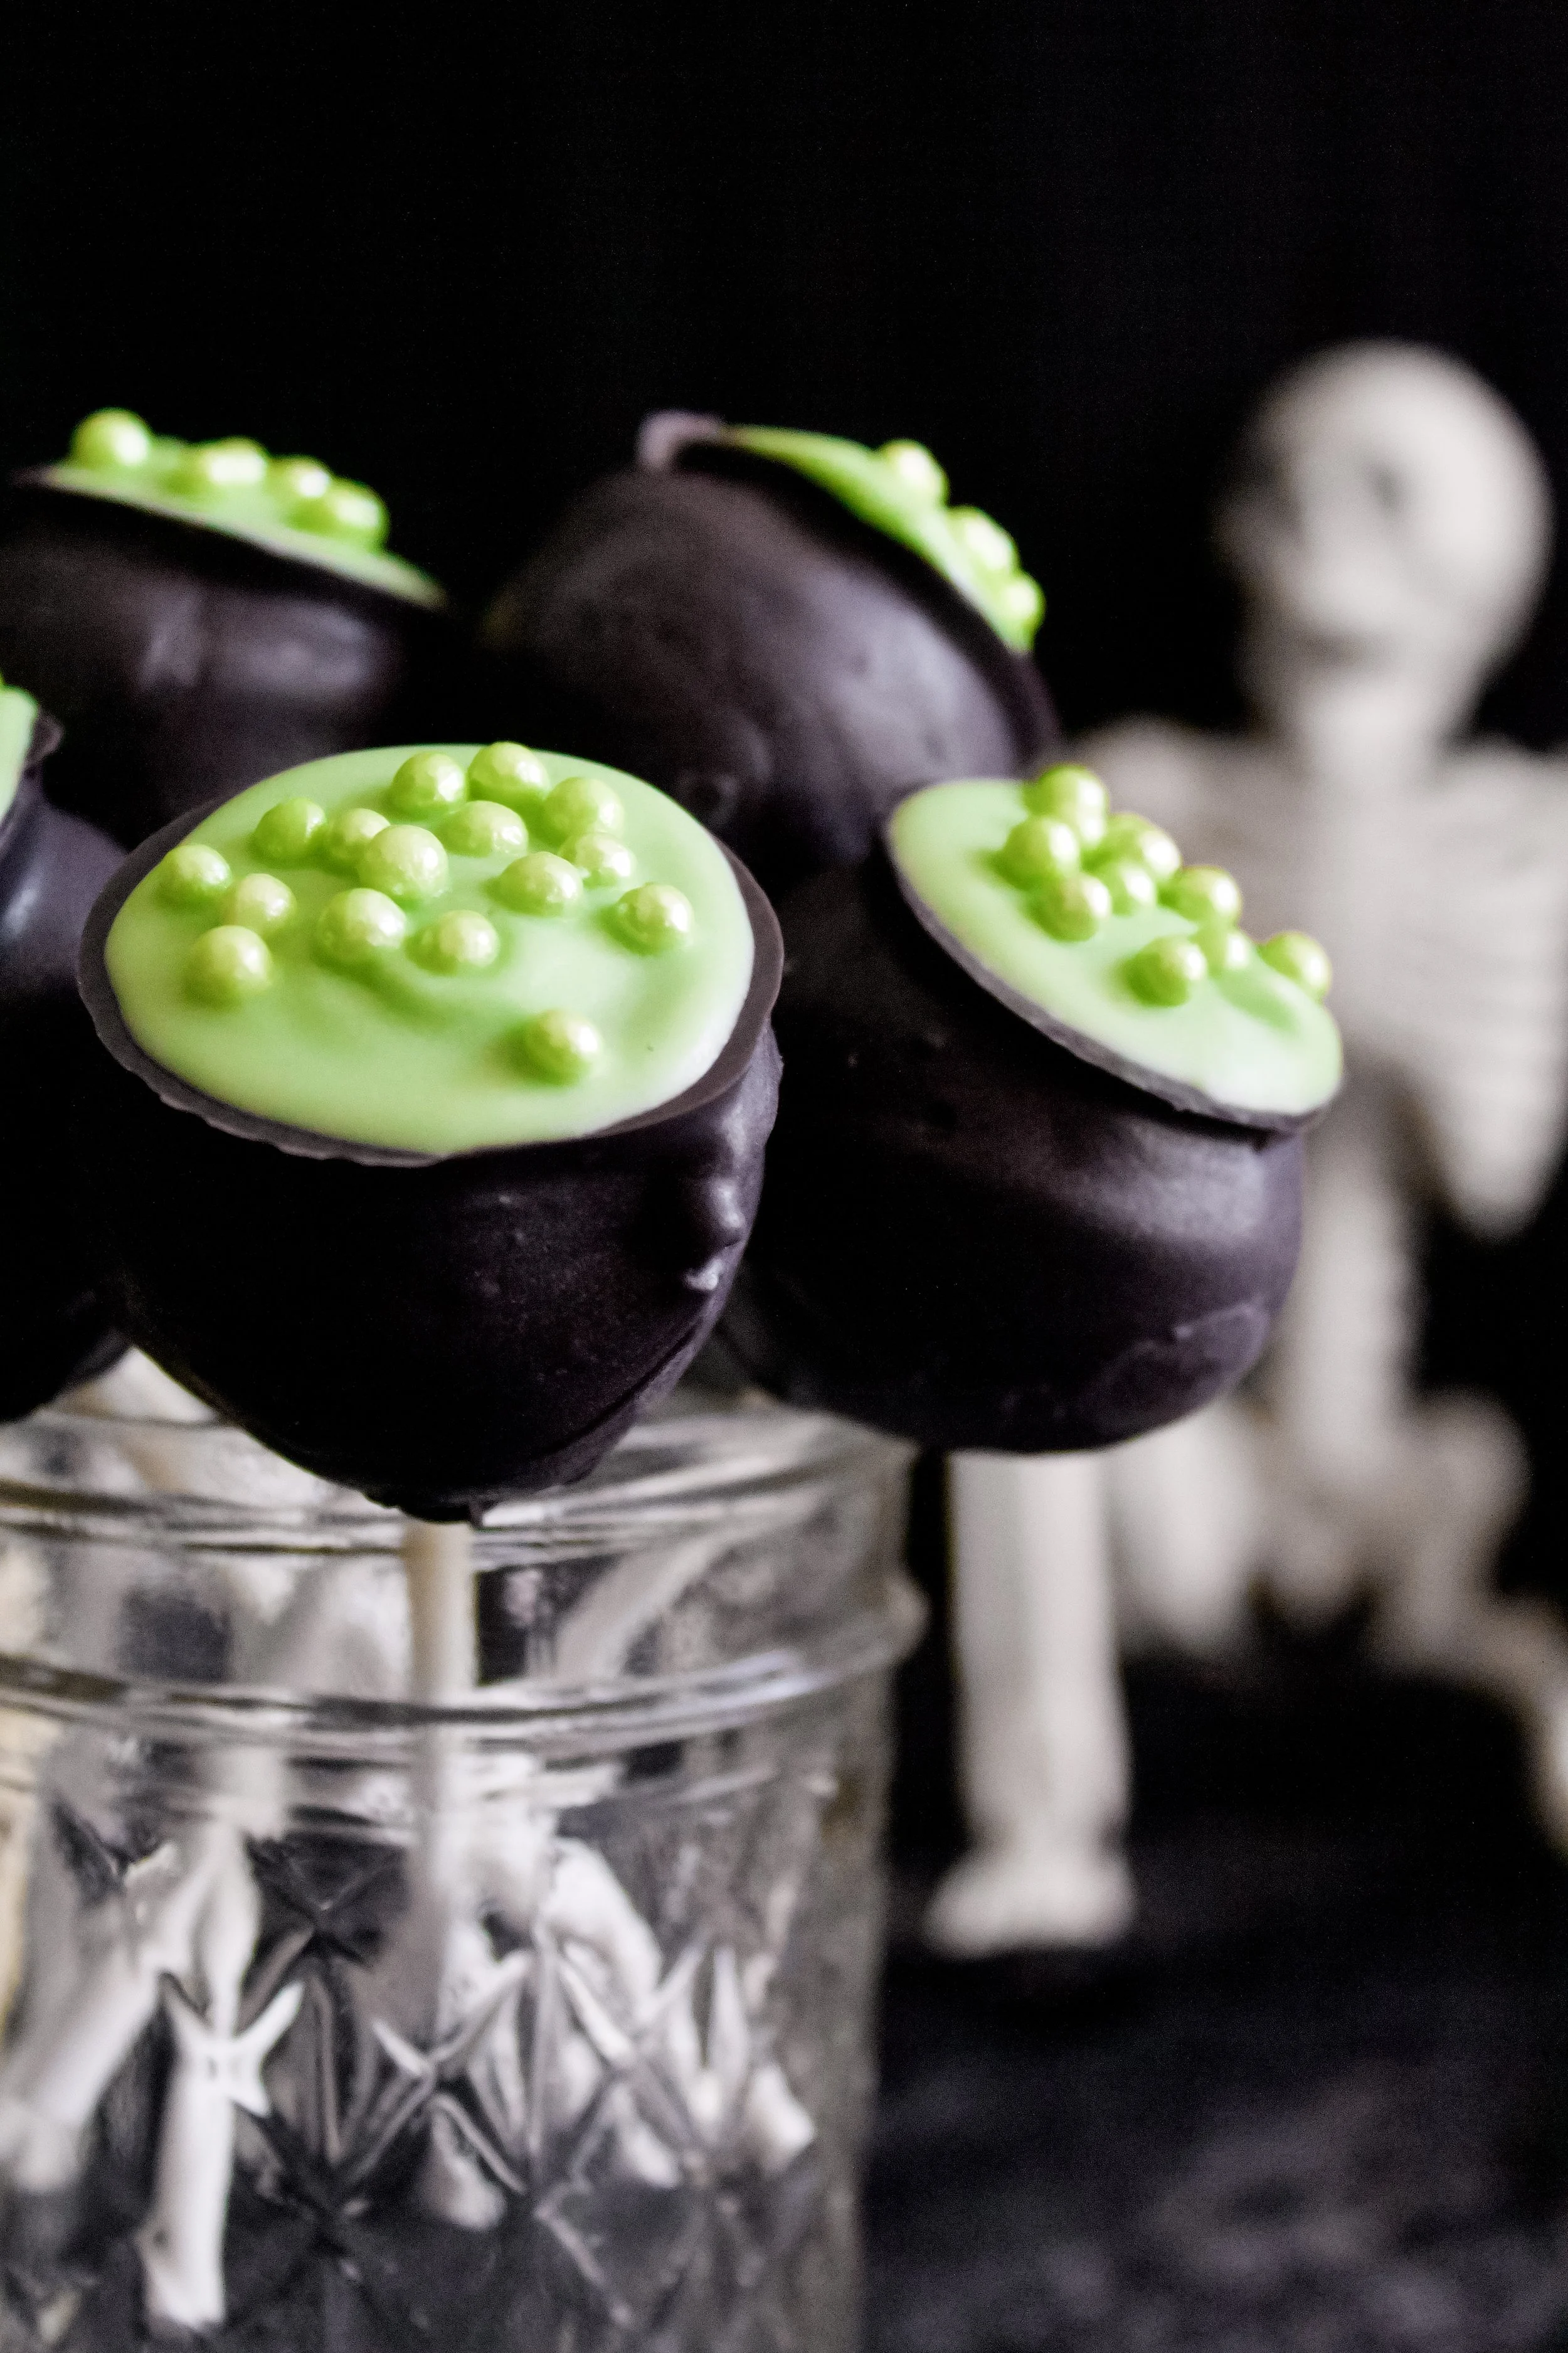
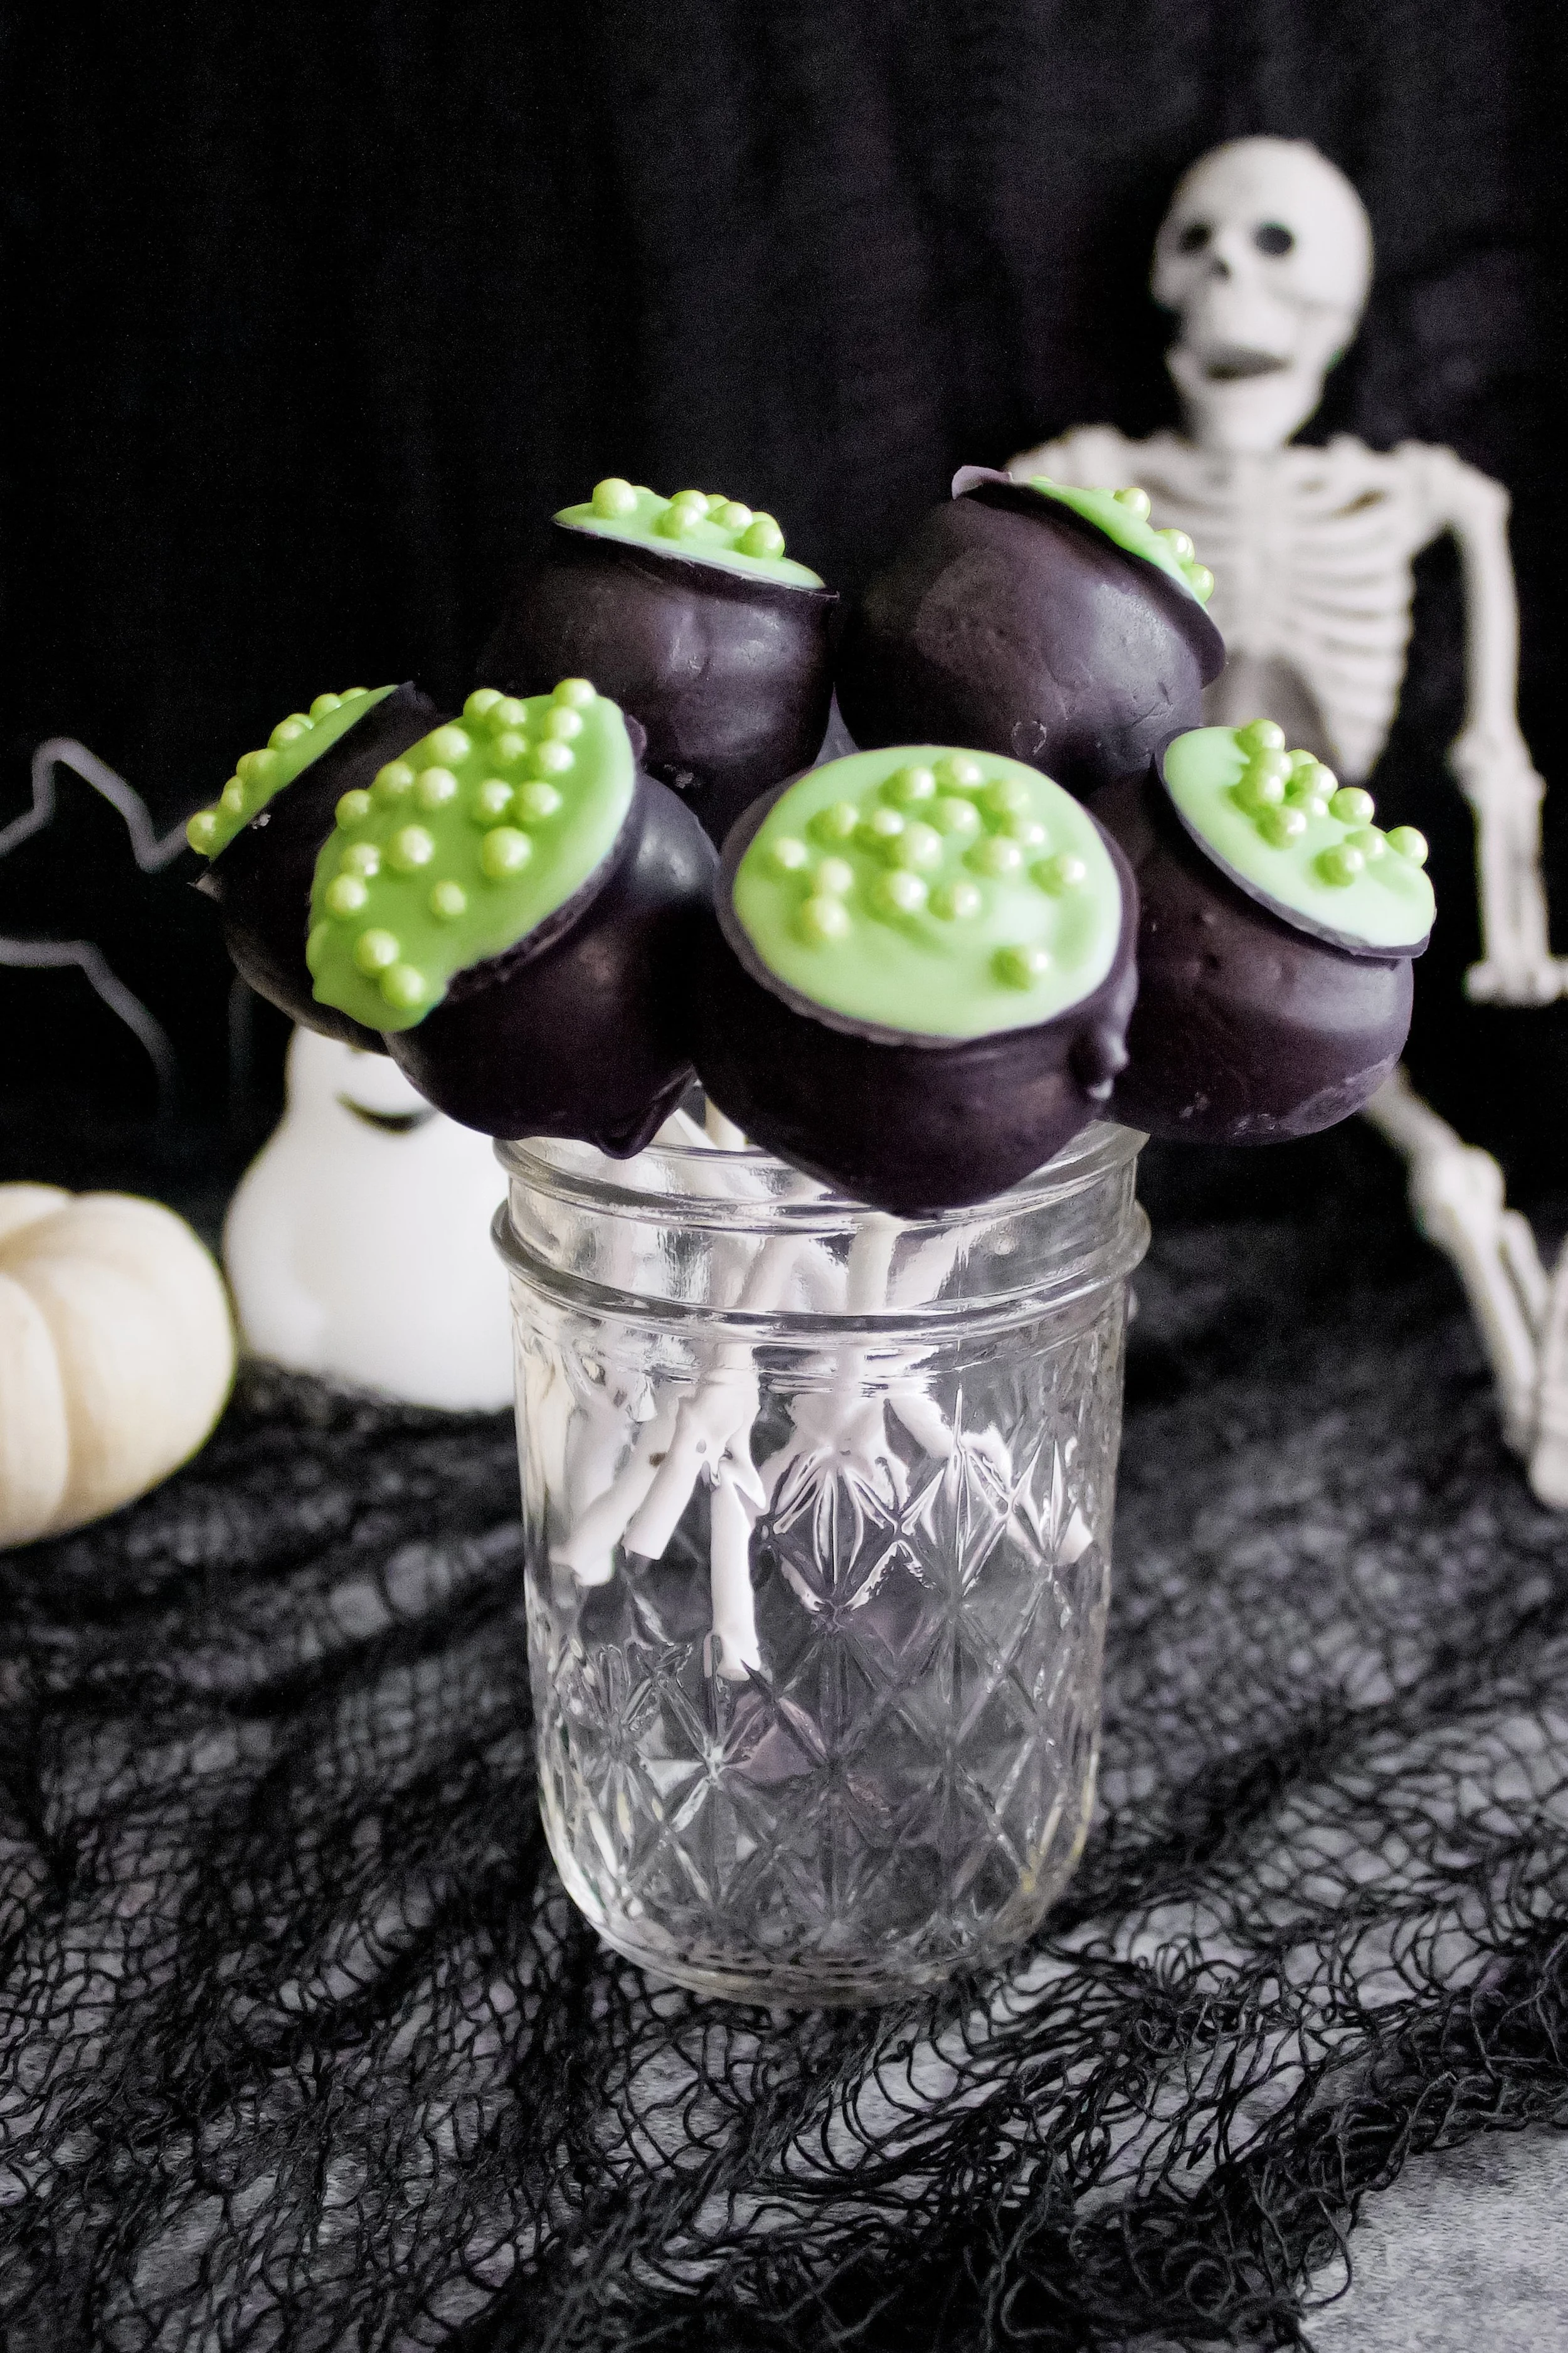
Black Chocolate Cauldron Cake Pops
Inspired by Hocus Pocus, these cake pops are filled with black chocolate cake mixed with chocolate buttercream and dipped in black candy melts. A delicious, extra chocolatey treat that’s perfect for any Halloween party!
This post may contain affiliate links from which, at no additional cost to you, I may earn a small commission to keep this site running. Only products I myself would or do use are recommended.
Who’s seen Hocus Pocus 2??? To be honest, as someone who saw Hocus Pocus in theaters as a child, I was a bit disappointed. The energy just wasn’t there, and I don’t think the characters were written in an authentic way. It felt like they were trying too hard. At times, they missed the mark.
Don’t get me wrong, I still loved it and plan to watch it again.
It just wasn’t as fantastic as the first movie.
But I still threw a Hocus Pocus party with my fall-loving friends. So of course I had to make a themed dessert! It was harder than I expected. To make something really on-point, I’d need to be much, much better at dessert decorating than I am. I don’t have time for that. And I probably don’t have the skill for that.
Plus, my goal is to share doable desserts you can make at home, not impossibly beautiful works of art that only an artist could replicate.
So, I finally had an idea that is one of my current favorites: themed cake pops.
I can totally roll a ball of cake into a shape then dip that in candy coating. Easy peasy. Plus, for these pops you don’t have to shape it perfectly, because you’re drying it upside down to create the cauldron top.
Cute and easy? Yes, please.

Why this recipe works
The black chocolate cake and the chocolate buttercream are just perfect in this recipe. Black chocolate is somehow rich, dark and bitter, yet naturally sweet. I can’t quite describe it. It has this taste that I’m just obsessed with, and it tastes like the chocolate part of an Oreo or similar cookie. Because those use black chocolate. This recipe is actually adjusted from my favorite chocolate cake recipe, using black cocoa. It uses a little less sugar, less oil, and an extra egg. Which may mean nothing to you, but the result is tons of flavor and a very fluffy cake. The sponge is one of my favorites.
I also love chocolate on chocolate. You can make regular chocolate buttercream or use black cocoa to make a black chocolate buttercream. I had run out of black cocoa and also had some regular chocolate buttercream leftover, so I just used up what I had.

As for decoration, I used plain black candy melts then dried the cake pops upside down to create a flat top, which looked like a cauldron. I then used lime green candy melts and spread that in the center of the flat top to create the look of the witch’s brew used in the original Hocus Pocus. I honestly could have left it there, but I decided to add some large, green sugar pearl sprinkles to give that “bubbling brew” look to them. It all really came together well!
A couple of notes: If you don’t have black cocoa or prefer to use regular, you can make the center of these cake pops black by adding a bit of black gel food coloring when you mix it all together. Also, you could use a vanilla cake recipe instead and dye it any color you want, such as lime green to match the top. I just thought chocolate would taste better, so I went with that.
Key ingredients and materials
Flour. Always spoon then level flour, and never skip sifting! Trust me. The cake is just not as good without sifting with a fine mesh sieve.
Black cocoa. Again, be sure to sift this. Not a lot of stores carry this, but I buy mine here.
Sugar. This cake actually uses less sugar than most of my other cakes, but the black chocolate provides more than enough flavor to make it delicious.
Baking soda and powder. The combo helps create a great fluffiness in this cake.
Salt. Sea salt is ideal, but table will work, too.
Eggs. Use large, fresh, room temperature eggs.
Oil. I prefer avocado or grape seed, as they are the “healthy” oils with not taste and little color. Vegetable and canola work, too.
Buttermilk. I usually make my own by putting 1 tablespoon white vinegar in a 1 cup measuring cup then filling it with room temperature whole milk, stirring, and letting it sit for 5 minutes while I sift and whisk the dry ingredients.
Vanilla. Use pure extract! It just tastes better.
Hot coffee. I prefer blonde coffee in this cake, so that it helps bring out the chocolate flavor without adding any bitterness or coffee flavor.

Chocolate buttercream. You can honestly use any buttercream you want. My absolute favorite frosting with this cake recipe is marshmallow! You only need about a cup, so if you have any leftover, this is a great use for it! I always freeze my leftovers (rolled up in plastic wrap like a log so I can slice off as much as I need). You’d be surprised how often leftover frosting comes in handy!
Black and green candy melts. If possible, get lime green. Otherwise, you’ll need to dilute it using mostly white with a little bit of dark green.
Cake pop sticks. Try to get longer ones, so you have more options for displaying them in taller cups.
Parchment or a silicone mat. This may feel optional, but you really do need either parchment or a silicone mat to line your cookie sheet for drying the black candy coating.
Green sugar pearls. These are optional, and create a “bubbling” cauldron look. I don’t actually like their taste, so I eat around them and would probably omit them from a few cake pops in the future, just so I have some I can eat.

How to make black chocolate cauldron cake pops
Make the cake
1. Sift and whisk dry ingredients. I usually don’t sift the sugar because we use organic, which is larger grain. However, everything else must be sifted.
2. Combine eggs, oil, buttermilk, and vanilla. Whisk vigorously until well combined. You’ll know this is the case when the oil and eggs are emulsified, meaning everything is one homogenous color and texture.
3. Slowly whisk in hot coffee. Pour slowly with one hand and whisk vigorously with the other. It can help to have a bowl that stays put for this, as I’ve nearly whisked mine off the counter before.
4. Slowly stir wet ingredients into dry. Use the paddle attachment on low and pour slowly—taking about 30 seconds or so to combine. Scrape the bowl before continuing (or use a paddle attachment with a rubber scraper built in—they’re life-changing!).
5. Beat on medium for exactly 2 minutes. No more, no less. Beat on just under medium if your paddle has the built-in scraper.
6. Bake. Pour into your prepared pan(s) and bake 25-30 minutes for two 8” rounds or 40-45 minutes for a 9x13 cake, until a toothpick inserted in the middle comes out with just some moist crumbs—not fully clean (that means it’s slightly over baked). Check early, as baking times can vary by climate, elevation, and even ovens.


Assemble
7. While the cake cools, make the buttercream. You can also make the buttercream ahead of time or use leftovers of your favorite flavor.
8. Crumble completely cooled cake. Be sure it’s not chunky—you want it all as evenly small as possible so you get a round cake ball.
9. Stir in buttercream. You want it evenly stirred in so the mixture comes together.
10. Shape and chill cake balls. If they aren’t getting very round, you can chill them for an hour then re-shape them to get them perfectly round. Also, you can make more of a cylindrical shape if you want tall cauldrons.
11. Dip into black candy melts. I dip my cake sticks into the melted candy, insert that into the chilled cake ball, then continue on until I’ve got all pops on sticks. Freeze those for a few minutes then take a couple out at a time to dip in the black candy. This ensures they stay on the stick when dipping. Set them top side down to create a flat topped cauldron. Let set until hardened.
12. Spread green candy melts on top. I found that using a small spatula to spread a bit of green on top was easiest to get the right look without it melting the flat top or dripping too far down the sides.
13. Top with green sugar pearls and cool. You’ll need either a cake pop stand, an upturned colander, or several short cups to set them upright to cool.
Enjoy!


Tips and FAQ’s for this recipe
Can these be made ahead?
Yes! You can keep them at room temperature for a day or two (longer does work, but the chocolate can begin to discolor). They’ll last in the fridge (covered with plastic wrap or in an airtight container) for 1-2 weeks or in the freezer (again, covered) 1-2 months.
Where do I get black cocoa?
I order mine online here. I bake with it quite frequently and this this bag lasts me several months at least. I’ve seen it in some specialty stores, but not ones I go to regularly, so ordering it is my preferred method.

Split up your work!
This may sound like an intense recipe, but it’s really just a handful of steps with a good deal of cooling and chilling involved. To make things easier, I suggest making your cake and buttercream the day before. You could also roll the cake balls and chill them overnight, as long as you cover them well (with plastic wrap or in an airtight container). That way, there’s less to do in one single day.

Can I use a different cake recipe?
Yes! Most recipes call for boxed cake, but I just can’t bring myself to make that when I have such an easy homemade cake that I love so much. You could use plain chocolate and add black food coloring. You could also dye it another color, using my vanilla butter cake or vanilla Greek yogurt cake (or even something like lemon or champagne).
Can I use a different frosting?
Again, yes! I used chocolate because I had some leftover. However, I almost exclusively make this blackout cake with marshmallow frosting. It tastes just like an Oreo and is the ultimate “cookies and cream” flavor. I also think this would be divine with a black chocolate frosting—the exact same as my chocolate buttercream, but using black cocoa in stead of regular. It would have more of a chocolate cookie taste and would be pure black without food coloring. Some other great options are plain vanilla, chocolate hazelnut, or chocolate marshmallow.

How do I get the filling round?
You need to shape it twice. I’ve found that with a softer cake like this, it’s difficult to get it perfectly round when you first mix in the frosting. But if you chill it then roll it again, it gets almost perfectly round. Just avoid freezing it, as that not only makes it difficult to do the final shaping but also makes it difficult to dip, not always making friends with the coating layer.
How to I keep the candy coating from turning grainy?
Keep it warm! I don’t own a microwave, so I had not choice but to melt my candy on a double boiler (a saucepan filled with 2 inches water, brought to a boil, then turned down to low). I just kept the bowl on the double boiler at low, stirring it every so often so it stayed in a melted state.

How do I display these?
Any way you’d like! Once they’re dry, you don’t have to worry about keeping them separate or not letting them touch. I arranged mine in a mason jar to take these photos, but the next week I made some adorable hunny pot cake pops for a Winnie the Pooh baby shower and displayed them in little flower pots with styrofoam situated inside. Any cup or similar item will work.
How do I cool the cake pops?
I’ve used blocks of styrofoam before, but I didn’t have those this time around and instead used an upturned colander. You could also poke some holes in a cardboard box or turn a colander over. Just be careful to arrange them concentrically so one side of whatever you’re using doesn’t get too weighed down and fall over. Cause that’s definitely happened to me.

My tools
Here are my must-have tools I use for making these cake pops. Affiliate links provided.
Mesh sieve (because sifting is KEY for a fluffy cake)
All-rubber spatula (this makes scraping the bowl easier as the batter and frosting doesn’t get all over a wooden handle!)


Black Chocolate Cauldron Cake Pops
- prep time: 50-55 minutes
- bake time: 25-45 minutes (depending on pans used)
- chill time: 4 hours (divided)
- total time: 5 hours, 40 minutes
servings: 36-48
Ingredients:
for the black chocolate cake *
- 1 ½ cups (350g) granulated sugar
- 1 ⅔ cups (226g) flour, spooned then leveled and sifted
- ¾ cup (75g) black cocoa powder, spooned then leveled and sifted
- 2 teaspoons (8g) baking powder
- 1 teaspoon (5g) baking soda
- ½ teaspoon (3g) sea salt
- 3 eggs, room temperature
- 1 cup (236g) buttermilk, room temperature**
- ⅓ cup (108g) avocado oil (can sub vegetable, grape seed, or canola oil)
- 1 tablespoon (13g) pure vanilla extract
- 1 cup (240g) hot, light roast coffee (or hot water)
to assemble
- quarter batch chocolate buttercream (or 1+ cup of your favorite frosting)*
- black gel food coloring (optional, to make filling pure black)
- black and light green candy melts
- light green sugar pearls
- cake pop sticks
- parchment paper or a silicone mat
Instructions:
make the black chocolate cake layers
- Preheat oven to 325F/165C (350F/175C if at high elevation). Lightly grease and flour a 9x13 baking pan (or use baking spray). Alternatively, you can use two 8” or 9” cake pans or three 6” cake pans to make the bake time shorter. This is also a great time to set your coffee to percolate (unless using hot water or espresso and hot water, which is what I do).
- Whisk together the sugar, flour, cocoa powder, baking powder, baking soda, and salt in the bowl of your stand mixer or a large mixing bowl, sifting everything but the sugar (unless yours is fine enough to sift--go for it!). Set aside.
- In a separate medium mixing bowl, whisk the eggs, buttermilk, oil, and vanilla together until well-blended and fully emulsified, about 1 minute.
- Very, very slowly stream the hot coffee or water into the wet ingredients, whisking vigorously and constantly as you pour to avoid scrambling the eggs. Feel free to do this in segments if it’s easier. If you do scramble some of the eggs, you can run the mixture through your fine mesh sieve to remove the cooked egg bits.
- Using the paddle attachment (or a hand mixer), turn your stand mixer to low and slowly pour the wet ingredients into the dry. This should take about 30 seconds or so. The batter will clump up then thin out. Once you’ve poured all the wet ingredients, immediately turn off the mixer. Scrape down the bottom and sides. Beat on medium for exactly 2 minutes (set a timer).
- Pour into your prepared pan(s). Bake for 40-45 minutes (25-30 for two round pans, 20-25 minutes for three), until a toothpick inserted in the middle comes out with just a few moist crumbs (ideally not fully clean, as this could mean they’re over baked). Check early and rotate halfway if not using convection. Be sure to check each pan separately, as one might bake faster than the other.
- Let cool completely in the pan.
assemble
- While the cake cools, make your buttercream (if not made ahead). If desired, you can use black cocoa in the buttercream, but it's not necessary to create a black filling.
- Once the cake is cool, use your hands or a hand mixer or a stand mixer fitted with the paddle attachment. Try to get it all crumbled up well so you don’t have any large chunks–those will make it hard to make a round cake truffle. Add the buttercream (and gel food coloring, if desired) and mix on low or stir gently until fully combined. It shouldn’t come together like bread dough, but it should be evenly mixed. If you squeeze some together in your hand, it should stay. If it’s falling apart, add 1-2 more tablespoons buttercream.
- Use a small cookie scoop or spoon to get about 1 ½ tablespoons cake. Roll between your palms to create as round a ball as you can get. Don’t worry if they’re not perfectly round–you can fix that after they chill for a bit. Place on a parchment or silicone lined, rimmed baking sheet. Refrigerate at least 2 hours, until firm. If the balls weren’t very round on the first roll, you can reshape them after an hour of chilling, which helps them stay more round.
- Melt black candy coating in the microwave according to directions (or use a double boiler). Be very careful not to overheat it, as it will be ruined. You can keep it warm while you dip the cake pops by placing the bowl over a saucepan with 1” simmering water over lowest heat setting.
- Remove just a few cake balls from the fridge at a time. Dip the very end of a cake pop stick in the black candy and insert into a cake ball. Carefully place back on the baking sheet in the fridge, to set the candy “glue”.
- Once all cake balls are glued to cake pop sticks and the candy is set, either transfer to a plate or prepare a second baking sheet with parchment or silicone so you have a non-refrigerated spot to set the fully dipped cake pops.
- Again, take just a few cake pops out of the fridge at a time. Dip carefully in the black candy coating, covering the whole cake pop. If it’s so thick that the cake is falling off of the stick, you can thin it out with a teaspoon of coconut oil or shortening.
- After dipping each cake pop, place upside down on your prepared baking sheet that is not refrigerated. Press gently to ensure you end up with a flat top (once you turn it right side up).
- Leave all cake pops to cool. Ideally, do this at room temperature, as the fridge often creates condensation on the outside that can create a speckled look once it evaporates.
- After the black candy has hardened, about 1 hour, melt the green candy the same way you melted the black. It’s not such a big deal if it’s thicker, as you will be spreading it with a knife or spatula.
- At this time, be sure you have a place ready to stand the pops upright as they dry. This can be a block of styrofoam, a cardboard box with small holes cut out for the sticks, or any kind of stand you plan to use for the pops.
- Using a knife, offset spatula, or small rubber spatula, spread a small amount of melted green candy on the top of the cauldron. You can let a little drip off the edge, as desired. Sprinkle with green sugar pearls, if using.
- Place upright in your prepared spot to cool until hardened, about 1 hour.
Enjoy!
Cake pops should be stored in an airtight container. They will last at room temperature for 3-5 days, in the fridge 1-2 weeks, or in the freezer 6-8 weeks.
*You can use a vanilla cake and dye it green, if desired. Also, you can use any frosting you prefer. One of my favorites with this cake is marshmallow!
**You can make your own buttermilk by adding 1 tablespoon white vinegar with enough room temperature whole milk to equal 1 cup total. Stir and let sit 10 minutes while you prep the rest of the ingredients.
