
Shamrock Mint Brownies
Fudgy fresh mint brownies topped with green mint buttercream. These are a perfect St. Patrick’s Day treat for kids and adults alike!
This post may contain affiliate links from which, at no additional cost to you, I may earn a small commission to keep this site running. Only products I myself would or do use are recommended.
Holy cow, I am SO tired. Like, bone tired. Can barely hold my head up tired.
I made desserts for a baby shower this weekend, and it’s also my husband’s birthday and we’re going to the snow. So I pretty much spent every spare moment this week baking or packing or cleaning.
Let’s just say, dipped Rice Krispy Treats are adorable and so perfect for a baby shower and so time consuming! It took me forever to get the hang of it, as I kept having treats fall off of the stick or just fall apart.
Apparently, the trick is to insert the cake pop stick (if using) using candy melts to “glue” it in then freeze the whole thing so it’s sturdy enough to dip into warm candy coating.
In case you were wondering. ;)
So, now that that’s done, I can focus on grading 31 research papers in the next week. Funnnnnnn times.
Anyway, I can’t believe it’s already March. School and life kinda made February fly by and it’s almost spring!!! Although you wouldn’t know that from the weather in California. But at least it’s coming soon. Along with fun things like Easter and St. Patrick’s Day!
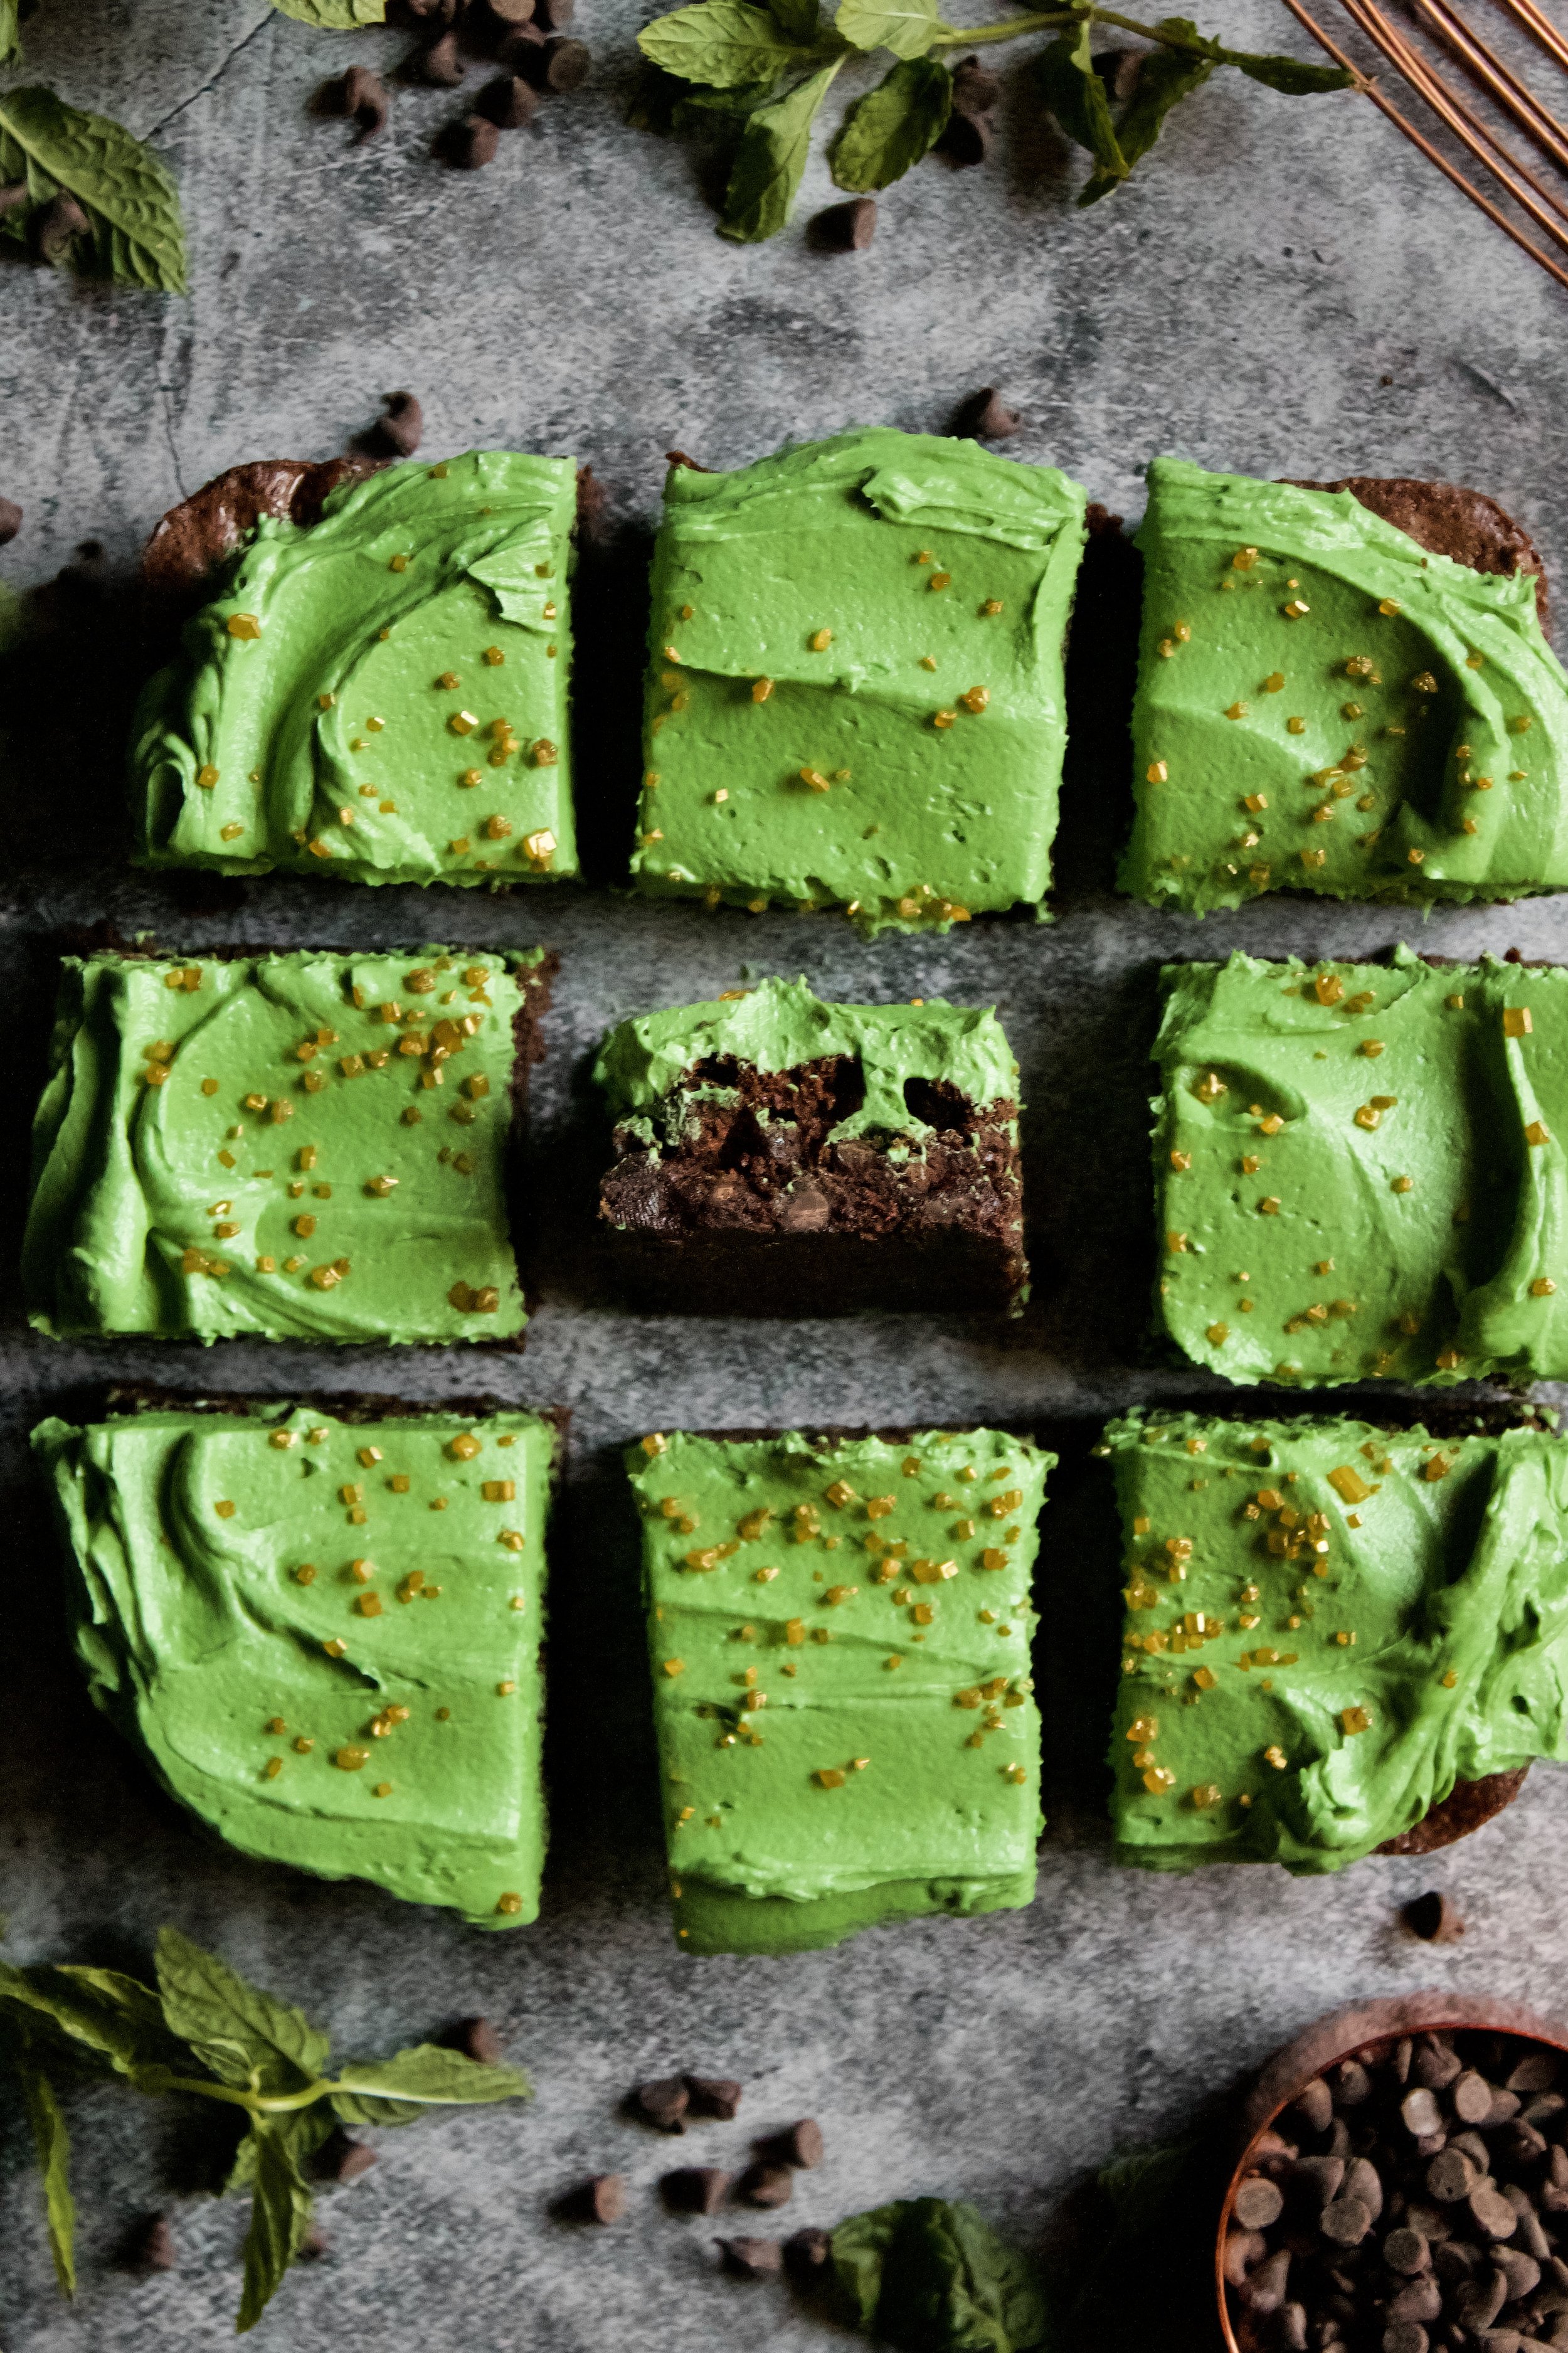
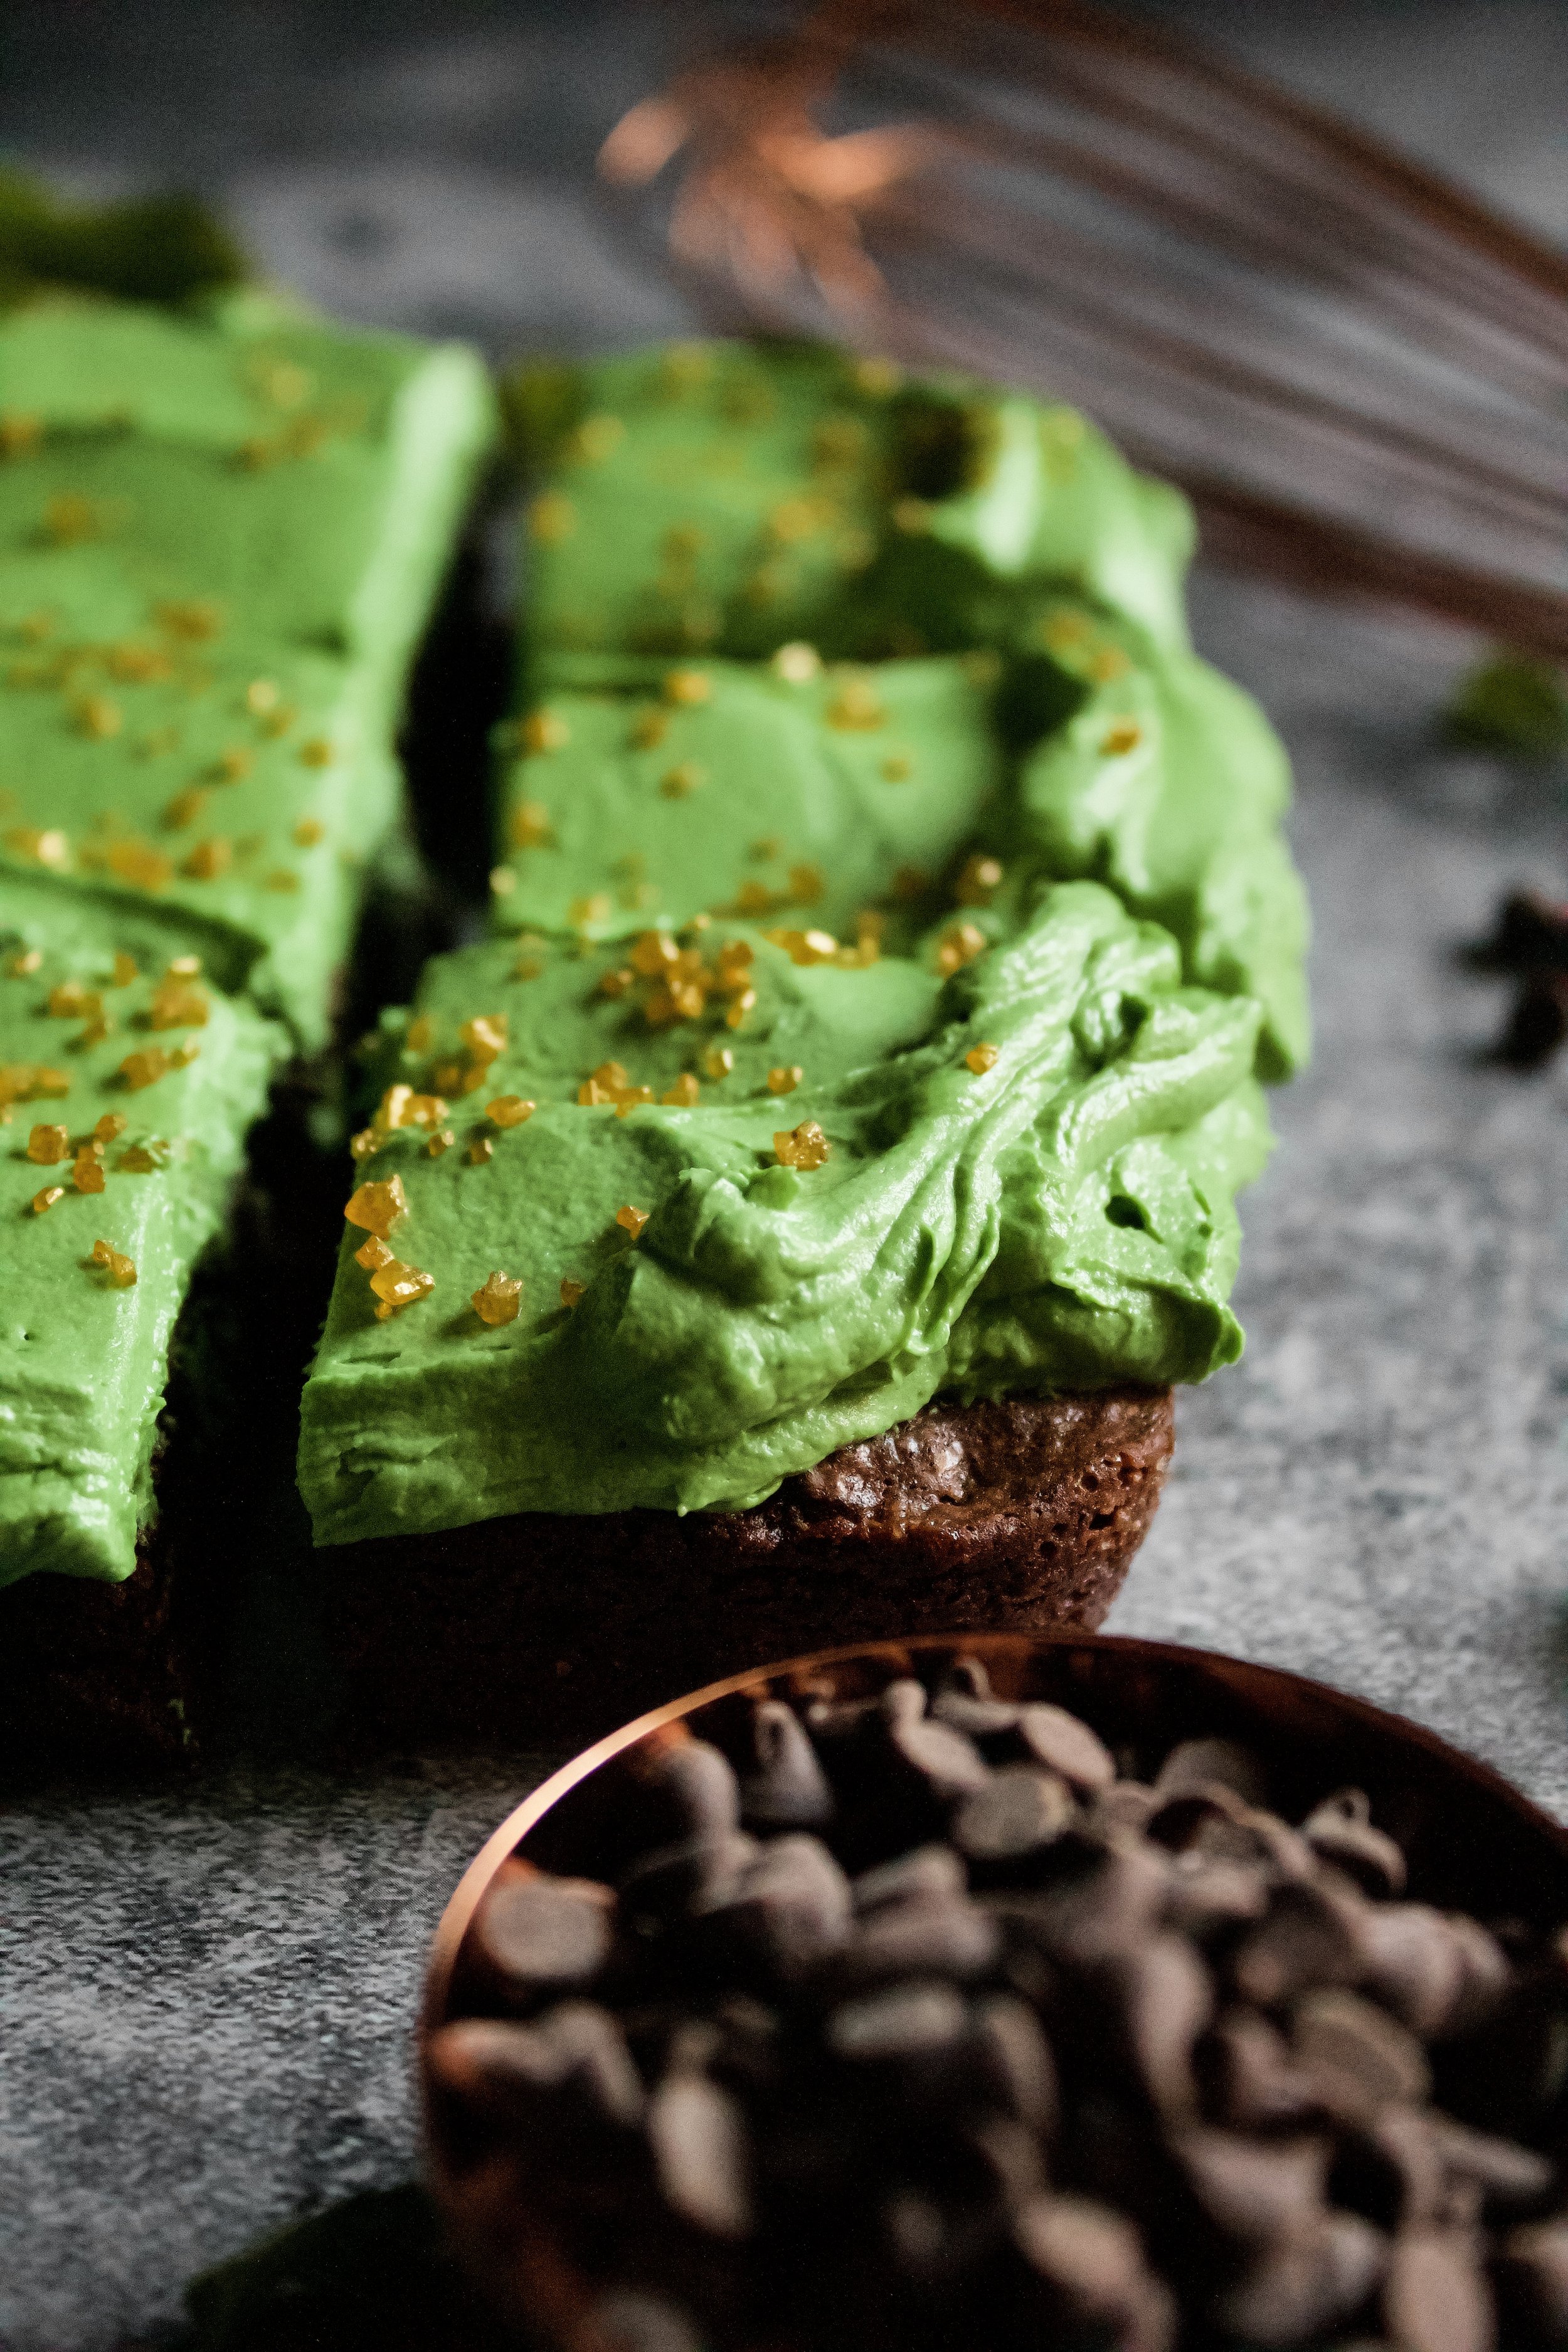
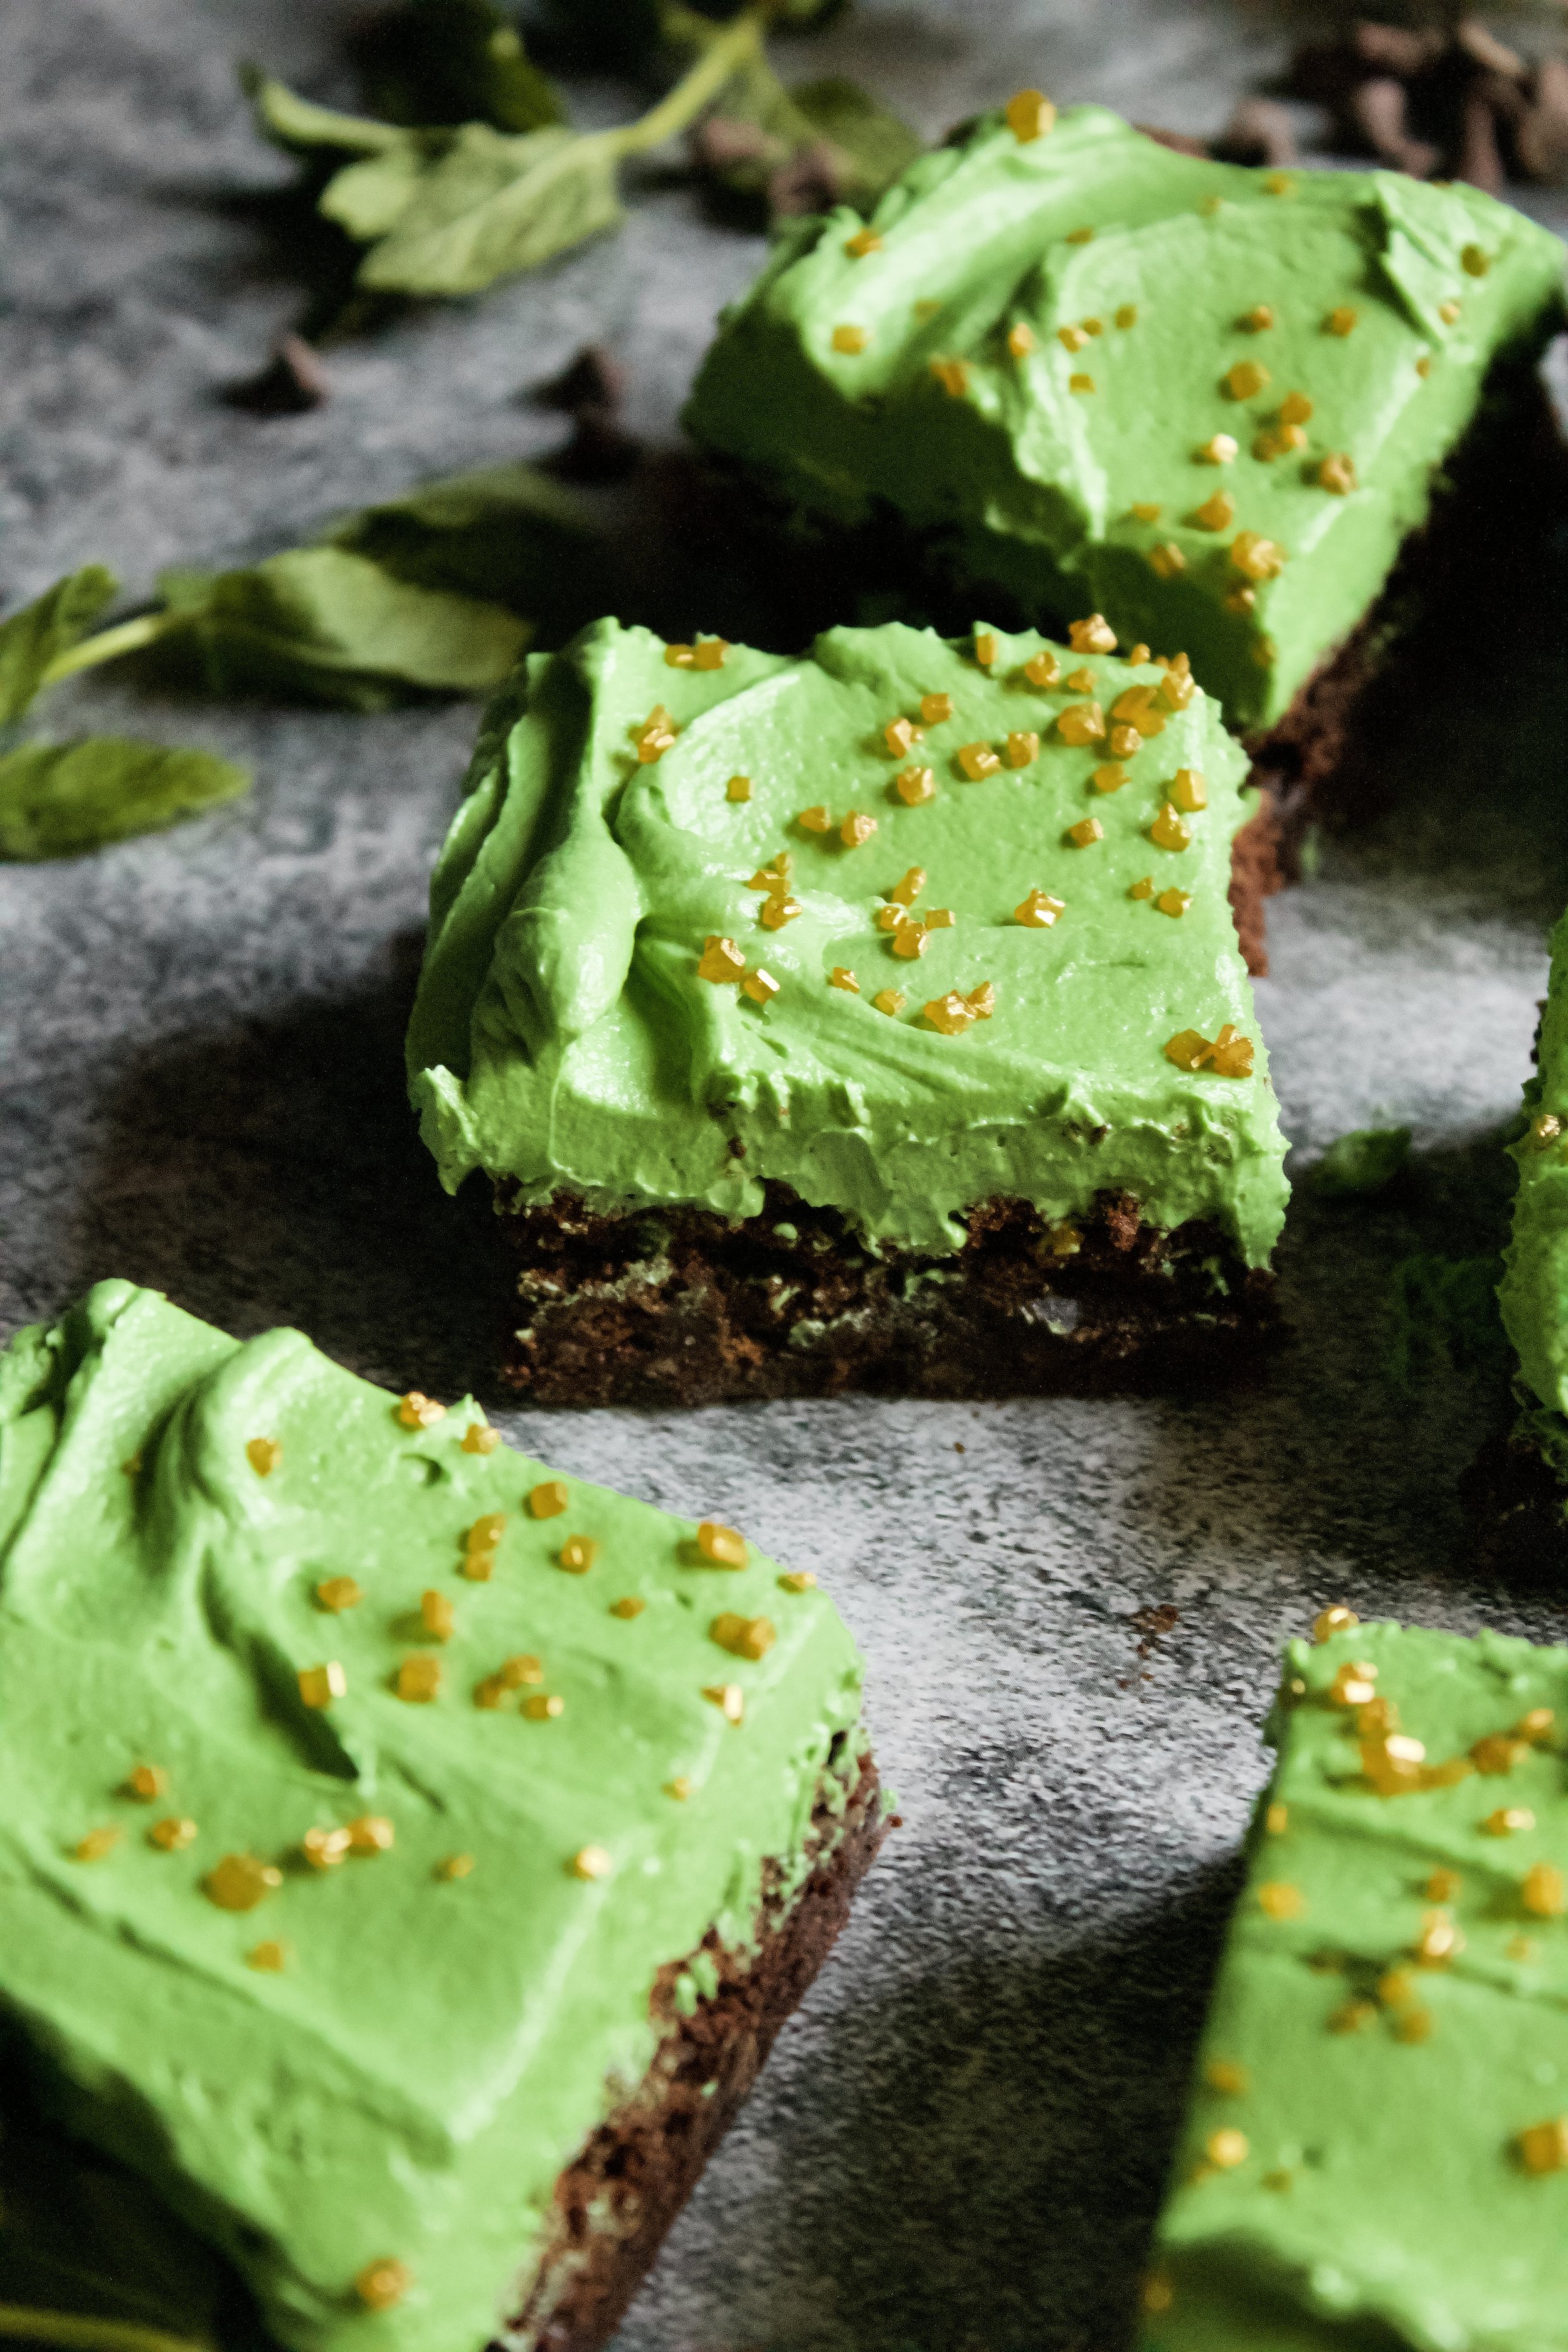
A while back, I tried out the most adorable little shamrock mint brownies. Basically, mint brownies with green mint frosting and gold sprinkles.
They were as adorable as they were delicious. Just something simple and fresh for this fun little holiday.

Why this recipe works
First, the brownies. Blending the sugar with the mint helps release the oils and flavor, which also means you won’t have chunks of mint leaves in your browneis. Because we’re using so little flour, it’s okay to use just butter in these brownies. It gives just enough fluff to help them rise but also plenty of moisture to keep these soft for days. Also, melting the butter before mixing with the sugar helps dissolve the sugar before baking. Sugar turns liquid when heated, so you want it melted before baking if possible, to help the brownies come together. We’re also going to bake these just until set. They’ll be fudgy and chewy but still sliceable. And finally, extra chocolate chips. You’re going to measure with your heart here—but don’t get crazy. One cup or so of chocolate chips is perfect. Or less. Or none. Follow your chocolate loving heart here.

The buttercream has a great texture thanks to European butter (less water equals creamier buttercream) and whipping it for a few minutes once the flavors are perfect. Another key here is the peppermint (or mint extract—up to personal preference). You want to use just a little of a reputable brand (even just McCormick is fine). Also, be aware that the flavor will intensify over time (especially in the fridge), so stop when the taste is pleasantly noticeable, not punching you in the taste buds.
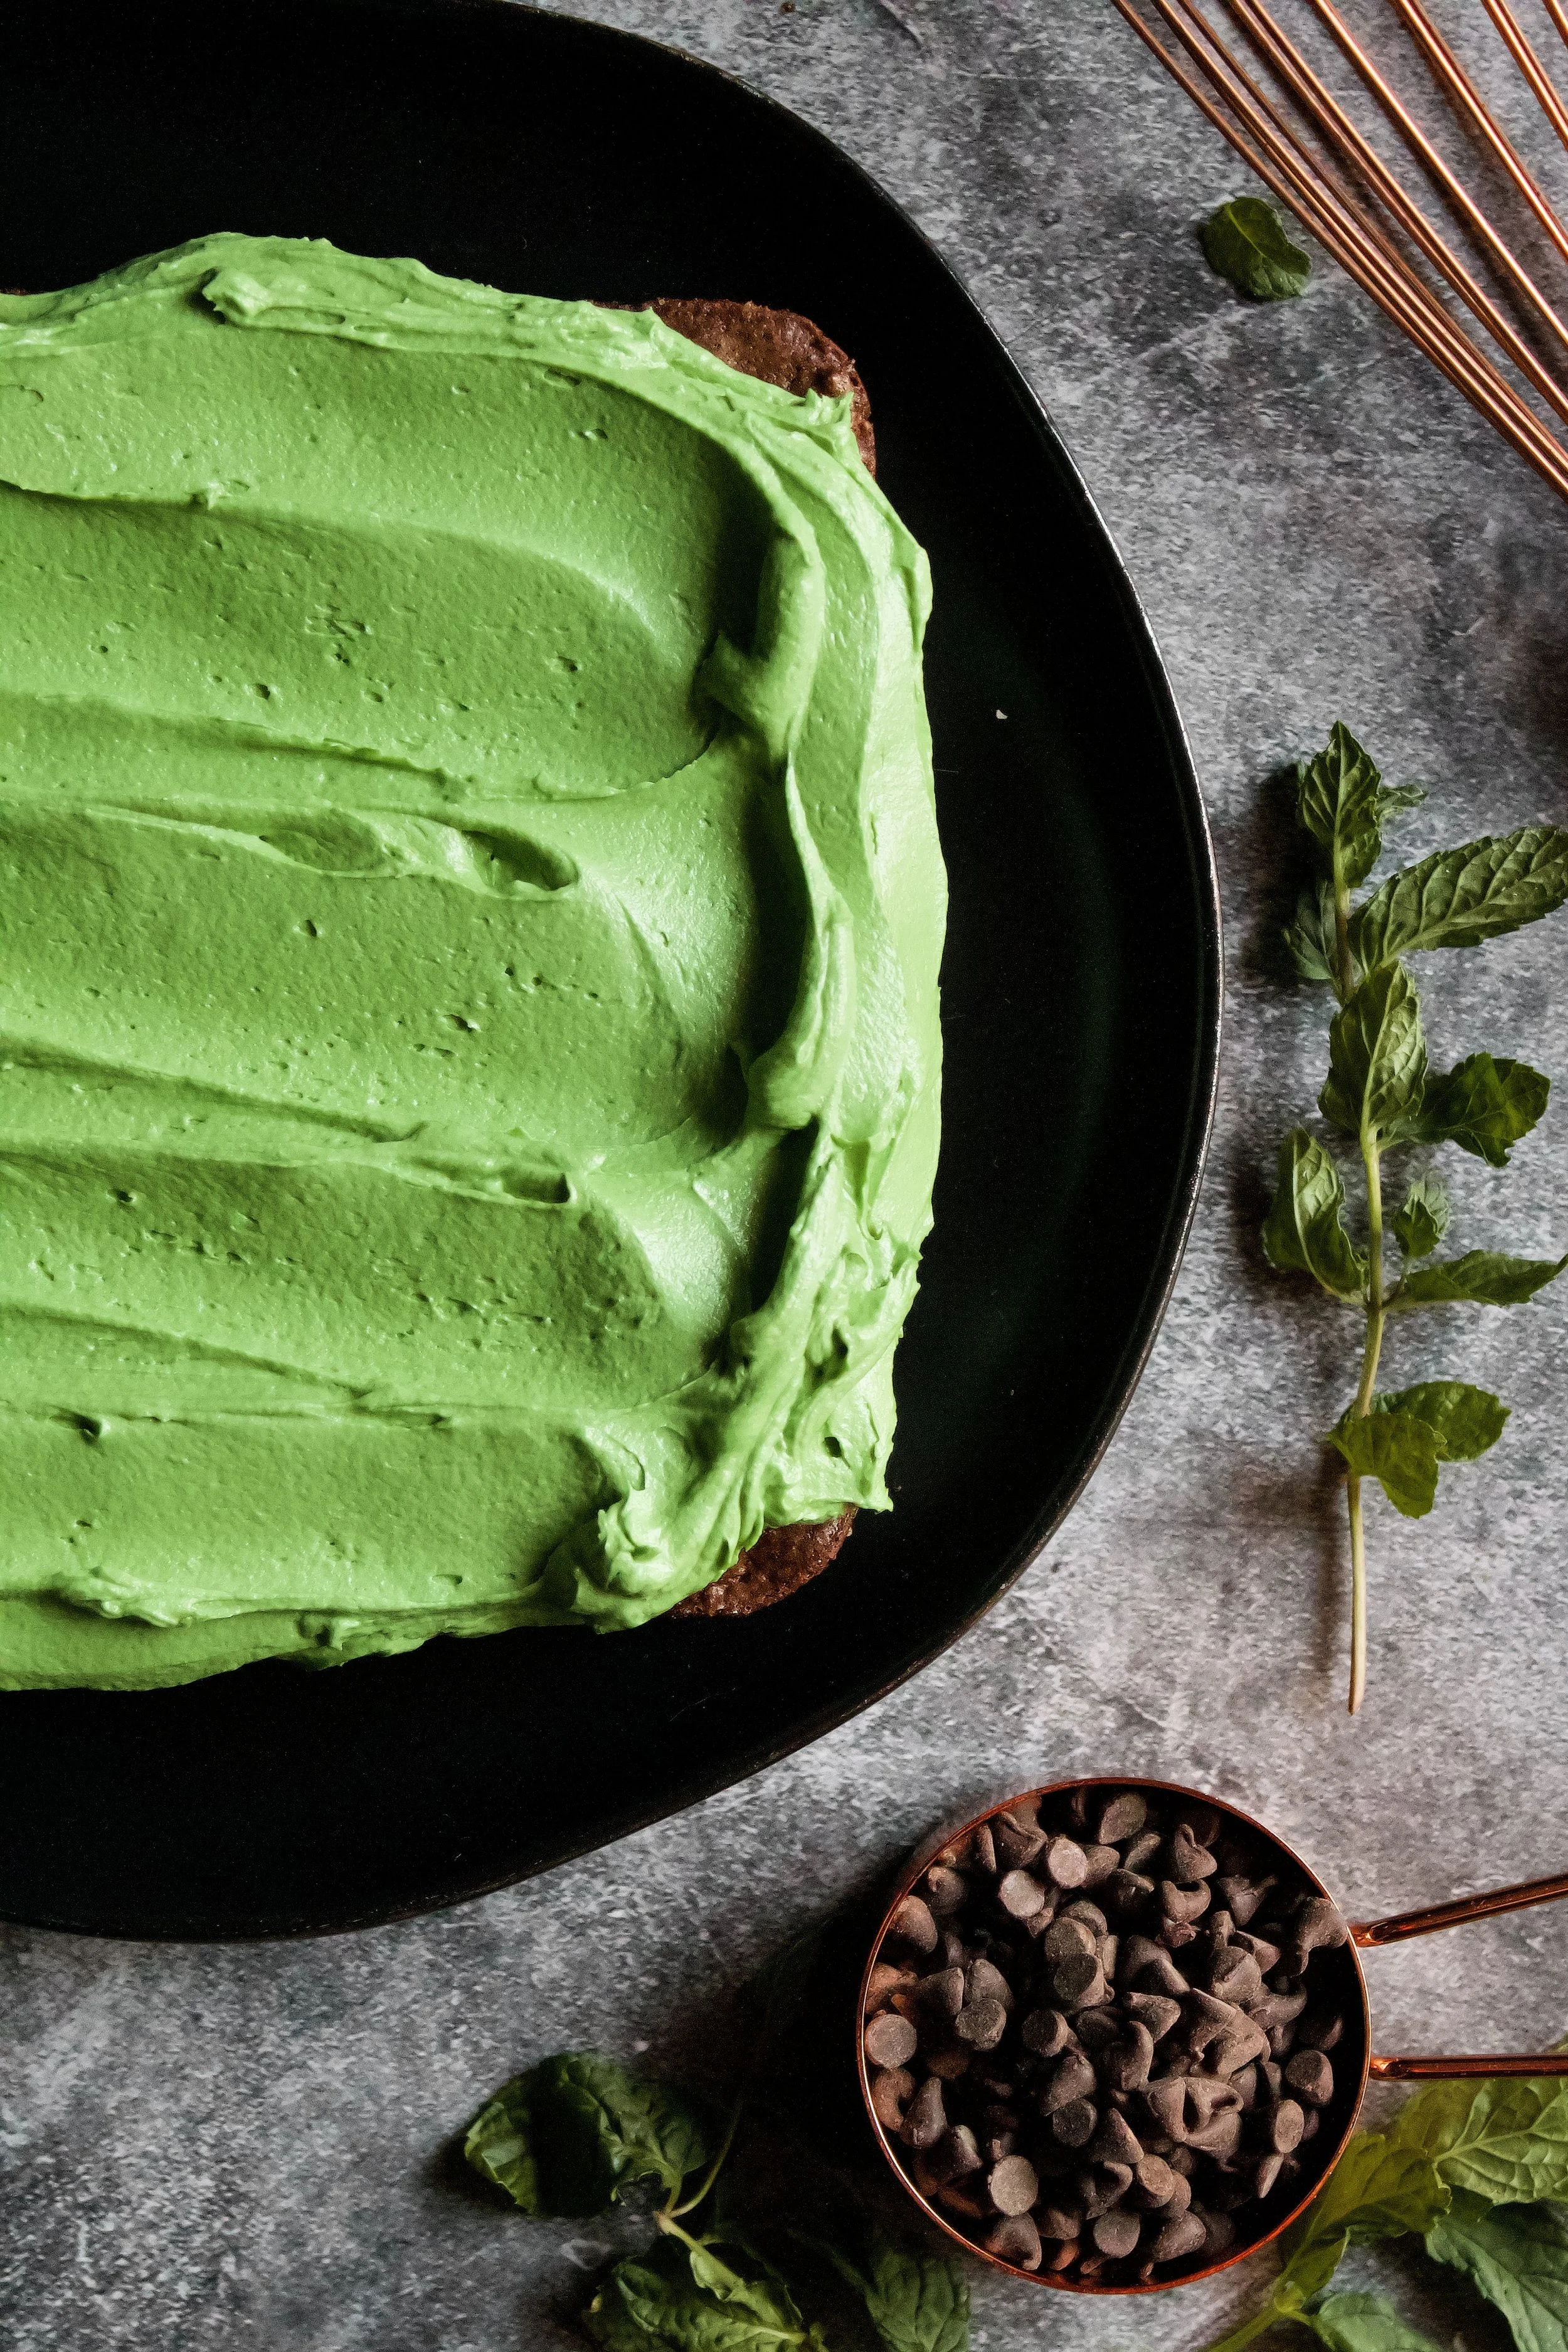
And finally, the decoration. It’s so simple to dye the frosting green. I used Wilton’s Leaf Green. It was the perfect shade of “shamrock”. I also added gold sanding sugar, both for crunch and looks. It gives these that “pot of gold” feel and adds a pop of flavor!

Key ingredients
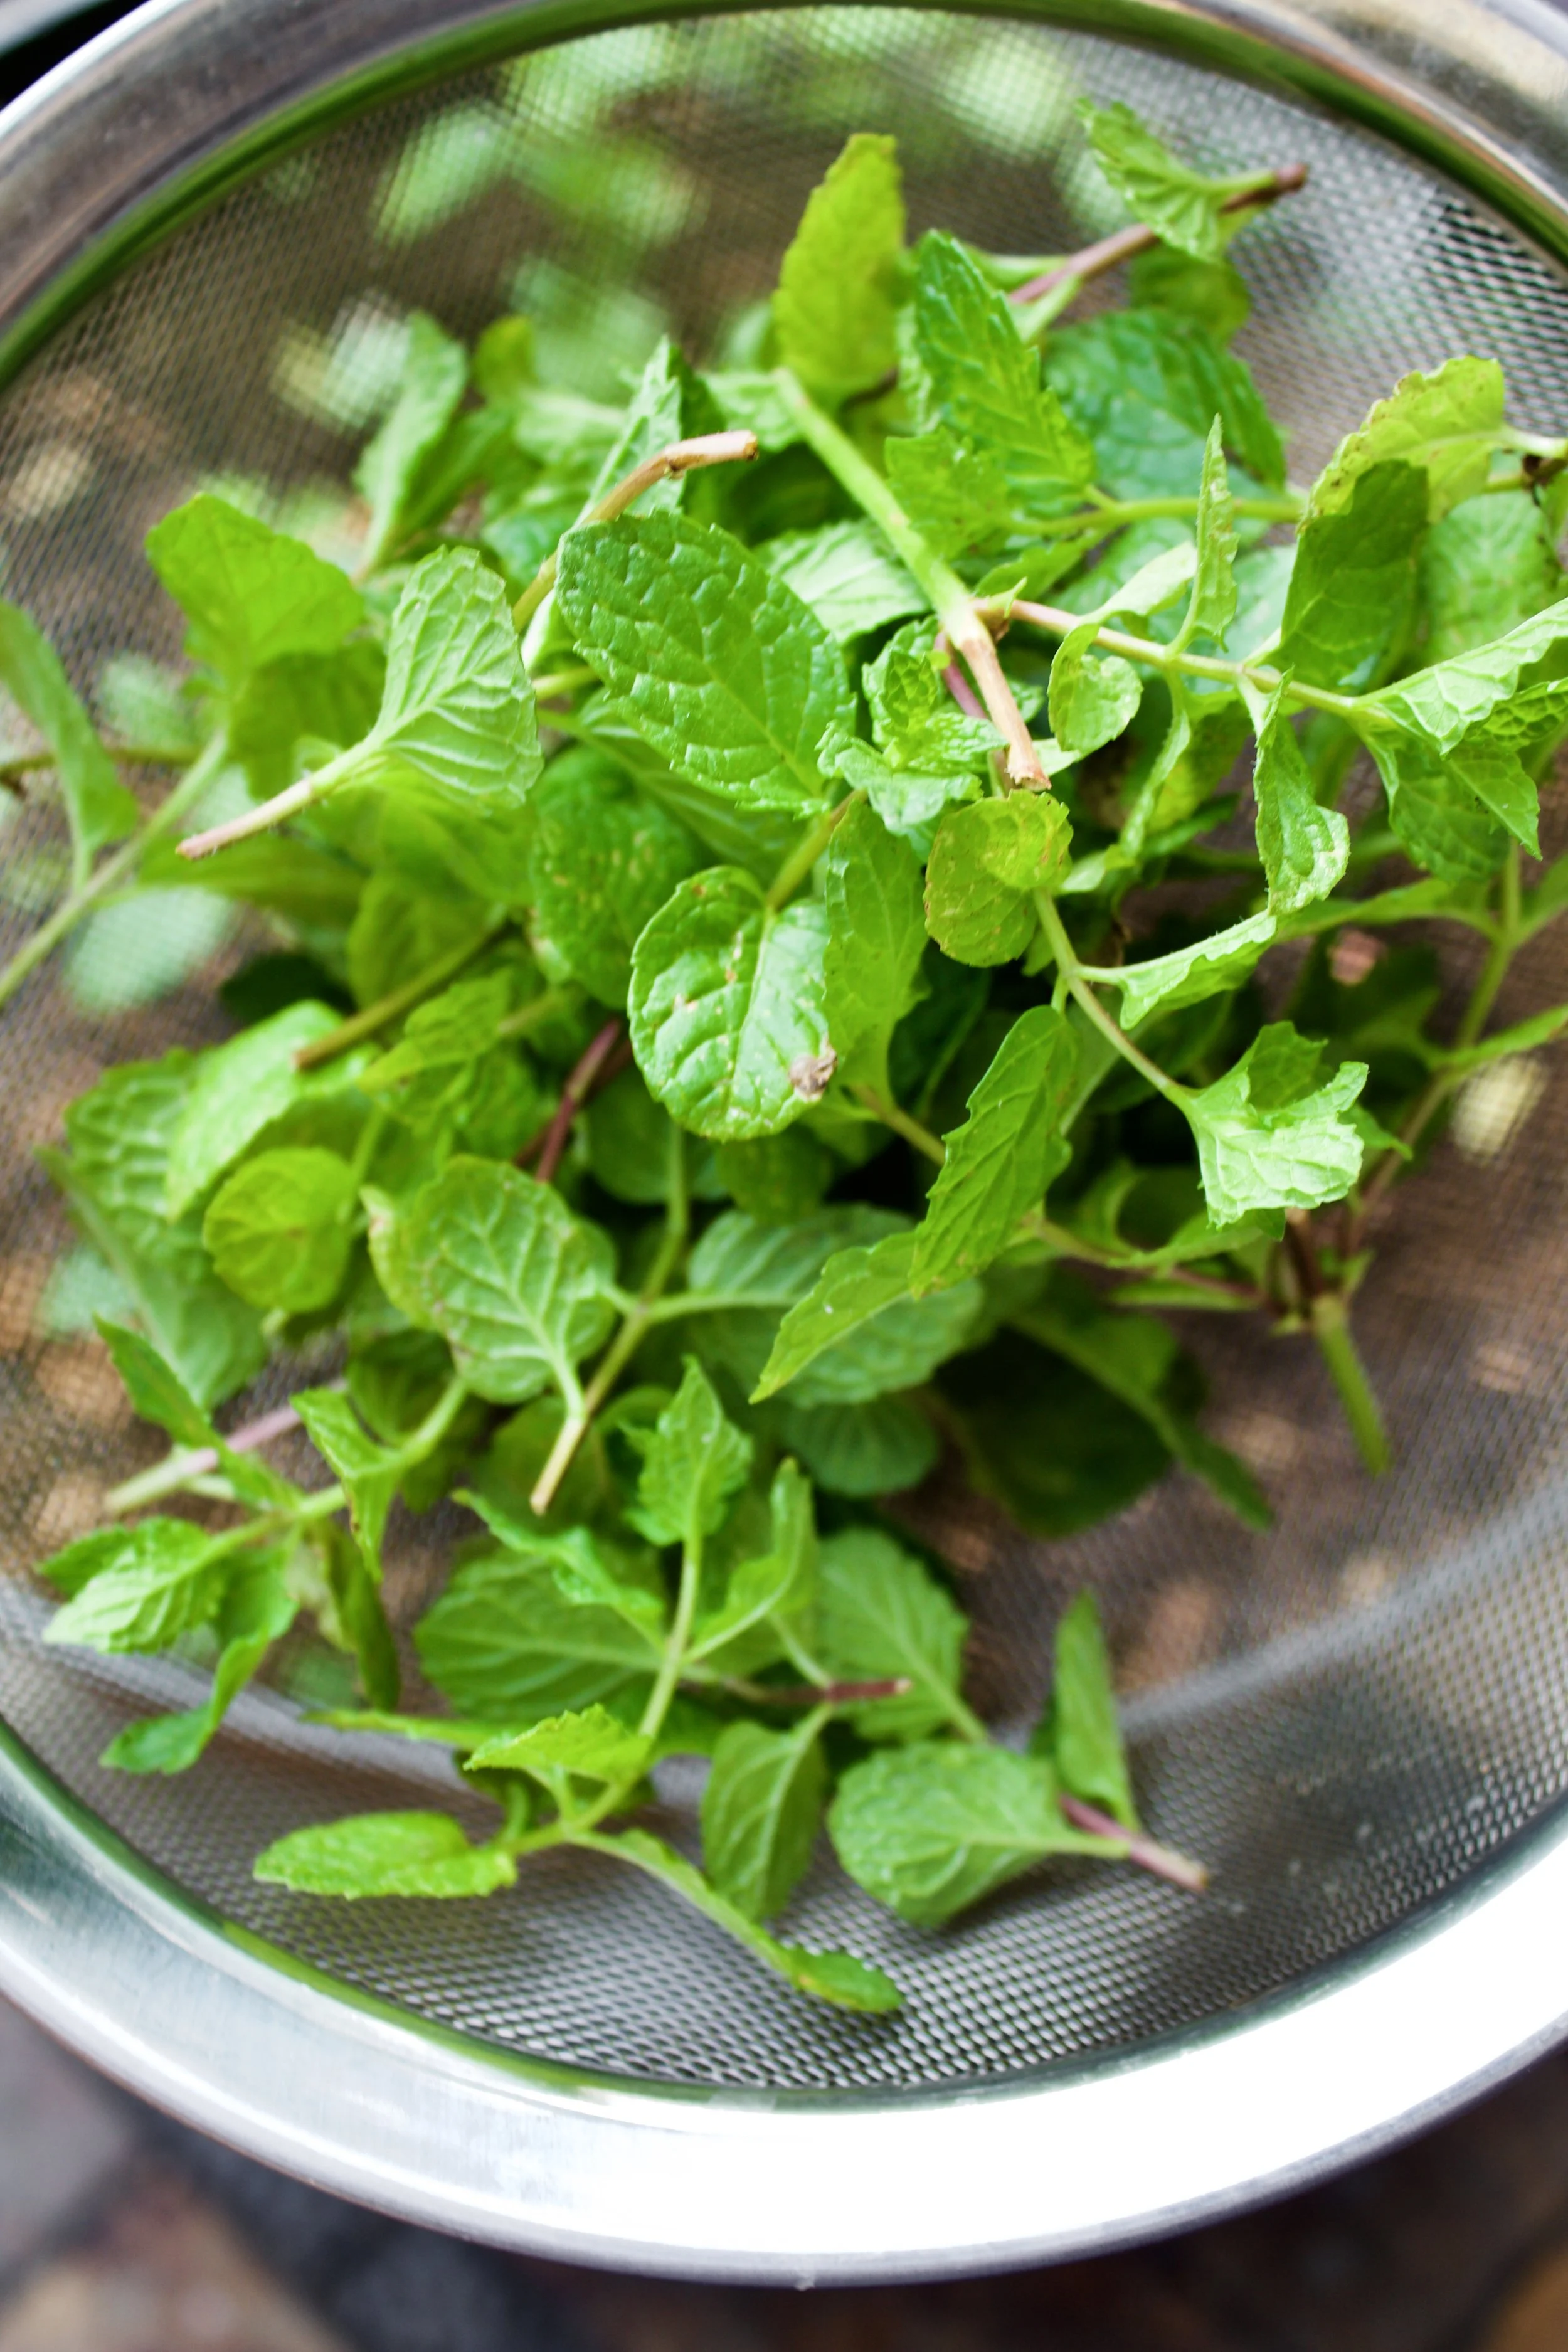
Fresh mint leaves. These are optional, and you can certainly make regular brownies, but I just love the fresh minty taste!
Flour. Be sure to spoon then level the flour so you don’t have too much.
Cocoa powder. Use unsweetened cocoa, and do not skip the sifting!
Baking powder. Use fresh baking powder, meaning not opened longer than 6 months.
Salt. Sea salt is ideal.
Butter. European butter is best, as it has less water.
Sugar. Use granulated sugar.
Eggs. Use fresh, large, room temperature eggs.
Vanilla extract. Use pure extract, not imitation.
Chocolate Chips. You can use any size and flavor you’d like! I used semisweet.
Peppermint buttercream. This can be made ahead of time and kept refrigerated for up to 2 weeks or frozen 1-2 months. You can also make this with regular mint extract instead of peppermint. Both are great, and it’s up to personal preference.
Green gel food dye. I used Leaf Green, but any green or combination of greens that you like is fine.
Gold sprinkles. These are optional, but they add both a cute “pot of gold” look and also a little crunch.

How to make shamrock mint brownies
1. Blend sugar and mint leaves. I used a mini food processor, but a blender would work, too.
2. Sift and whisk the flour, cocoa, baking powder, and salt.
3. Melt the butter.
4. Whisk still-hot butter into the sugar. Whisk for a good minute or so to help it begin to dissolve.
5. Add the eggs and vanilla, one at a time. Whisk about a minute after each egg. Add the vanilla and whisk well again.
6. Gently fold in dry ingredients. Leave some streaks of flour.


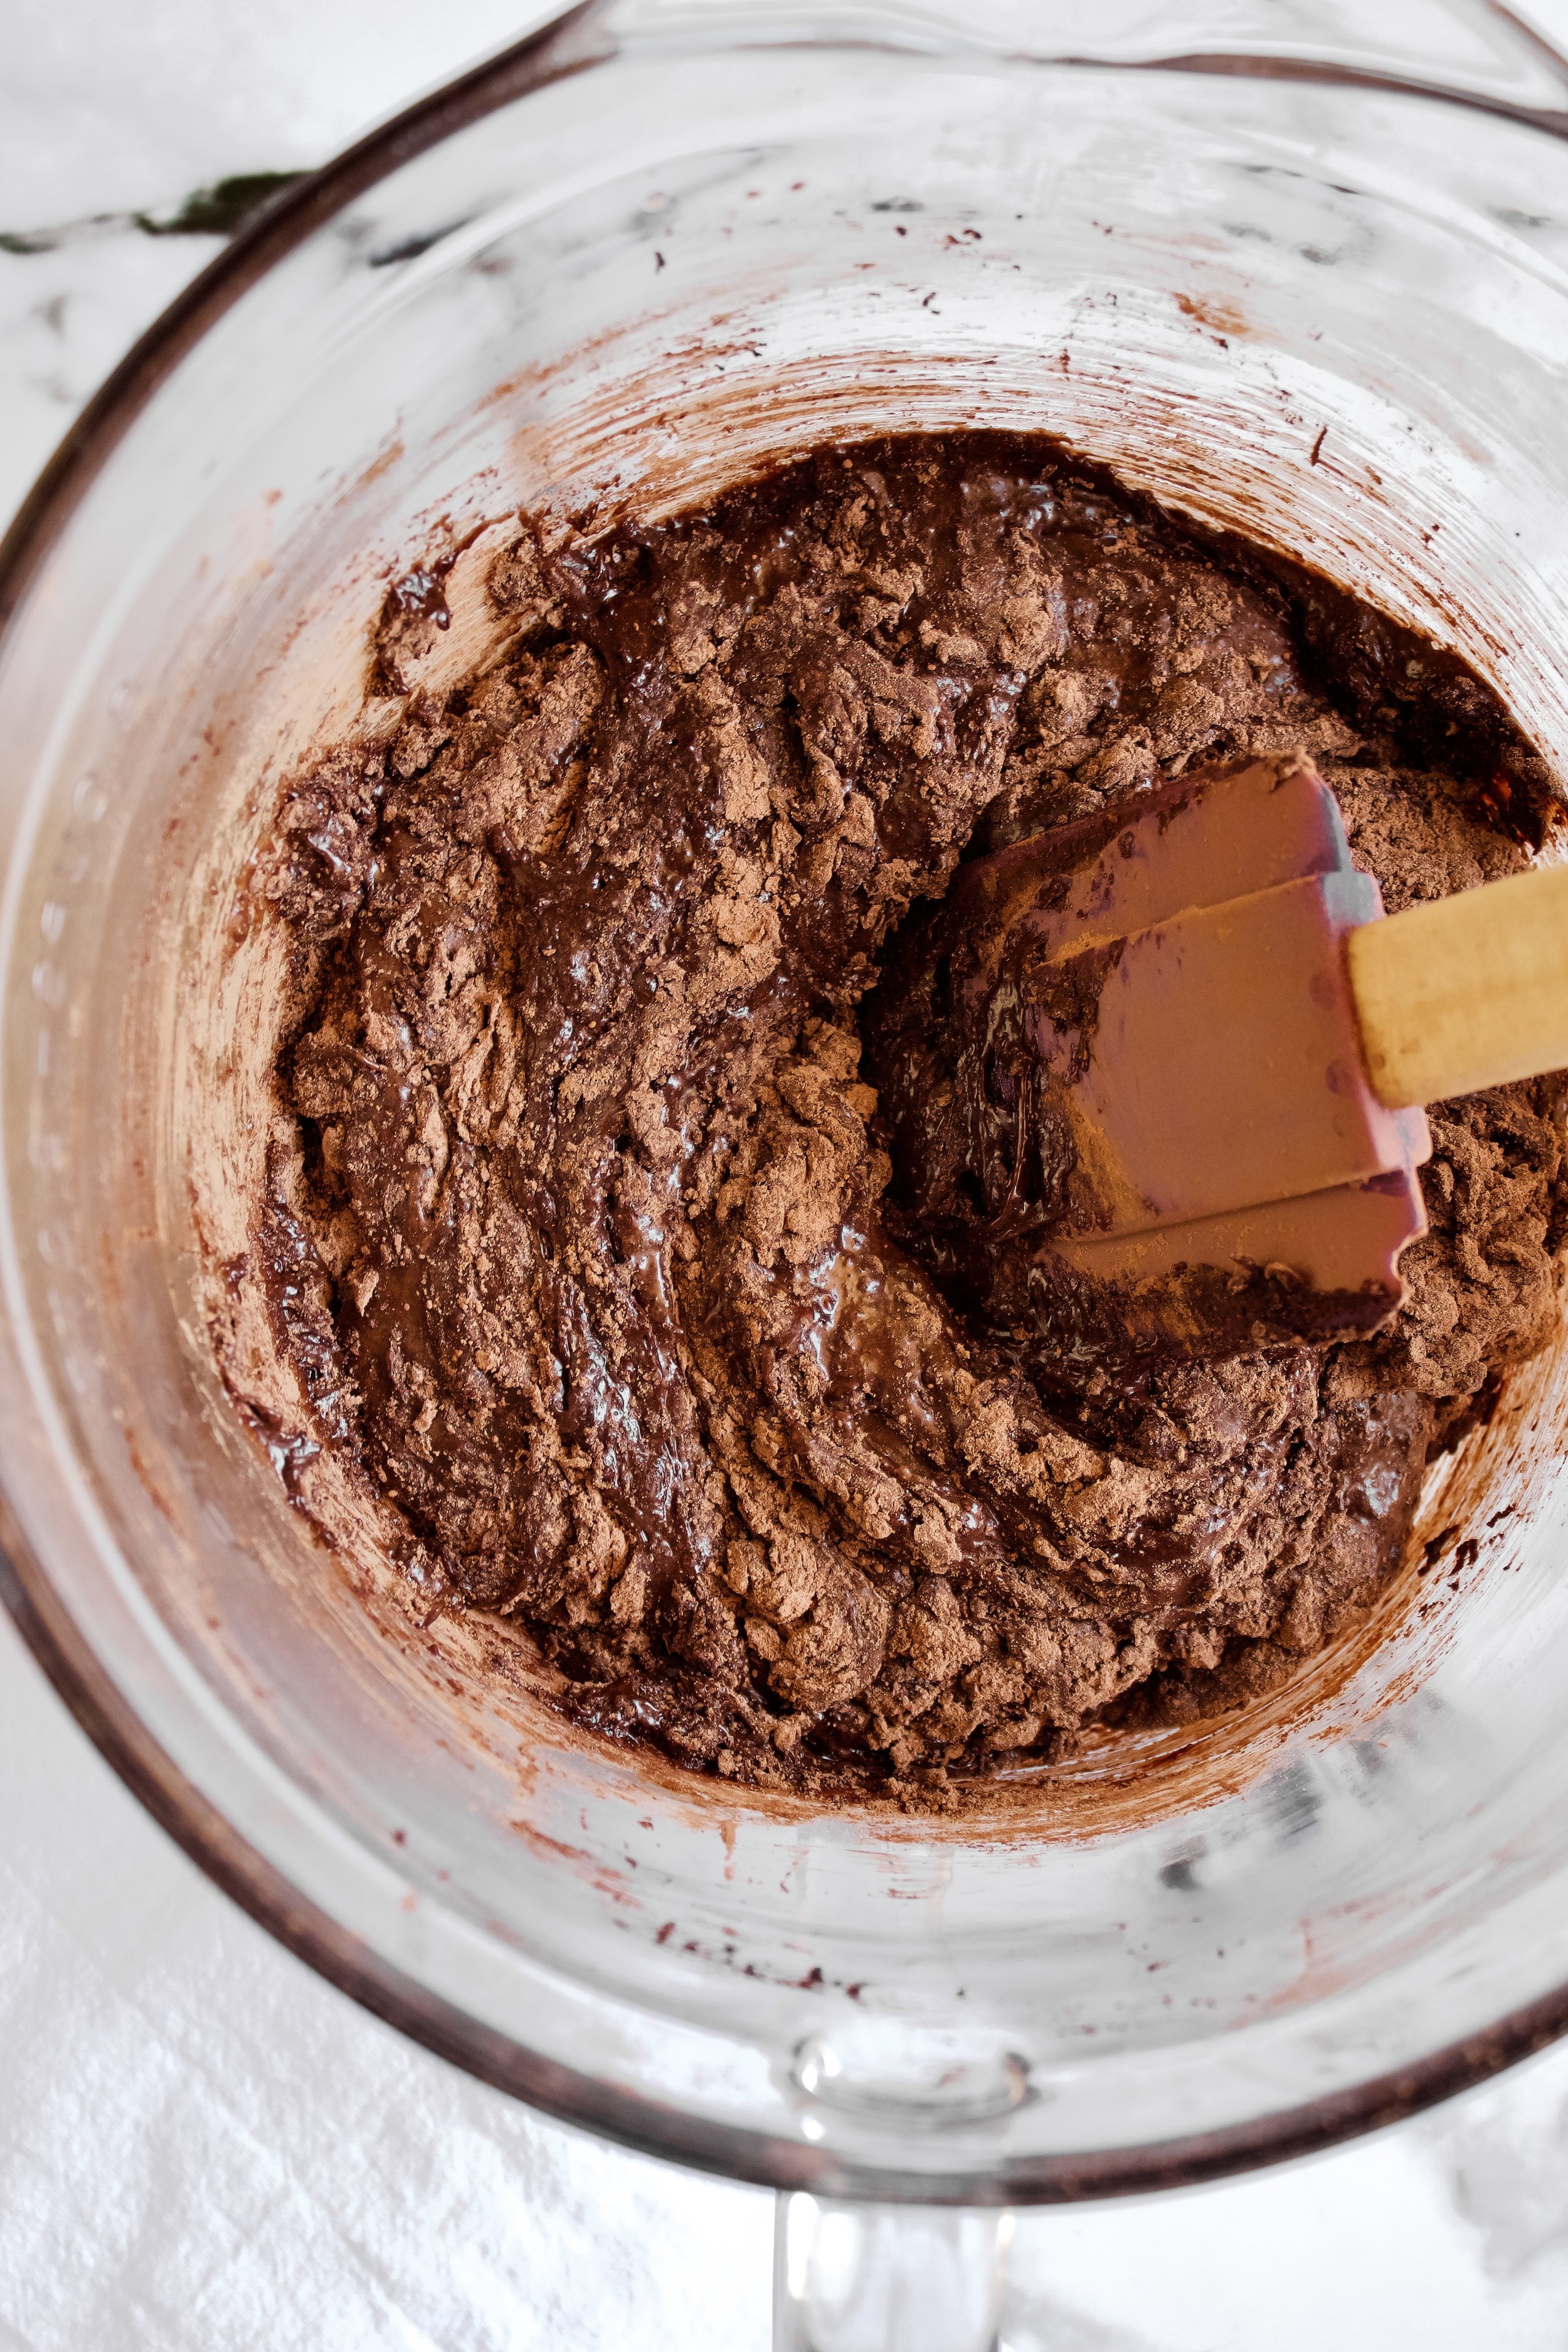
7. Fold in the chocolate chips. This step should take care of the remaining streaks of cocoa and flour.
8. Pour into a greased pan and bake. Brownies are done when the top is no longer shiny and the middle is slightly jiggly but not liquidy. You can also use a toothpick, but most people like it when about half of the toothpick comes out with some doughy (not raw) batter on it.
9. Make buttercream while brownies cool. You can also make this ahead of time to let the color deepen. Both the green color and peppermint (or plain mint) flavor will deepen with refrigeration. It can be made up to a week ahead and refrigerated. Just be sure to let it soften on the counter for a few hours before using.
10. Frost and top with sprinkles. Sprinkles are optional, but highly recommended.
Enjoy!


Tips and FAQ’s for this recipe
Can I put extract in the brownies?
That’s entirely up to you. I think there’s plenty of mint flavor with just the leaves in the brownies, but if you want a stronger punch, you can add 1/4 teaspoon mint or peppermint extract in the brownies.
Whisk sugar well
The idea is to dissolve the sugar quite a bit. It turns to liquid in the oven, so you want it liquid before the baking so it can absorb into the flour and cocoa. Something magical happens in this process, making a super fudgy brownie.

Use quality cocoa
Since cocoa is the main flavor here, you want a good brand. Opt for something organic and fair trade, if possible, because this usually means it was produced in smaller batches and thus higher quality and is often fresher, too. Plus, the flavor of the high quality cocoa is always noticeable in the brownies. My go-to is Volupta, from Costco, but some other good options are Ghirardelli, Guittard, Scharffen Berger, Anthony’s, or even Hershey’s Special Dark in a pinch.

Sift your dry ingredients
Usually, you don’t need to sift the dry ingredients unless it’s cake. However, I realized that every time I tried making brownies, my cocoa left little clumps that in turn caused me to over mix my batter. Instead, sifting the dry ingredients means you can simply fold them into the wet ingredients without over mixing, resulting in a tender, fudgy brownie that’s not dense.

Measure the chocolate chips with your heart
I was telling my best friend about some amazing cookies I’d just made and that it was crazy how easy the recipe was. Of course, I always use extra chocolate chips. And she said one of my favorite quotes I’ve ever heard: chocolate chips should be measured with the heart. And it’s true. I always measure out what the recipe calls for then pour a little extra for good measure. But two notes: 1) this only works for mix-in chocolate chips, like in cookies and brownies, not ganache or things like these dark chocolate cupcakes, and 2) there is a point where you’ve added so many chocolate chips that they’re literally drowning out the batter or dough. As long as you keep those in mind, follow your heart.
Does the peppermint brand matter?
Yes! McCormick is a pretty reliable brand, but it can taste like toothpaste if you use too much. I’ve also weirdly had good luck with the Whole Foods 365 peppermint. Nielsen-Massey is another one I’ve had pretty good luck with, but I haven’t tried their peppermint. The key is starting small and adding more as needed. Also, the flavor WILL intensify over time—especially in the fridge, so if you plan to make this ahead of time or more than a few hours before serving your dessert, err on the side of “that’s just right” rather than “yeah I taste that peppermint.”
Take your time adjusting the flavors in the frosting
If you add too much peppermint extract (which is easy if you don’t use a measuring spoon), it will be overwhelming and taste like toothpaste. Or, the absolute worst, is adding too much heavy cream. You can easily turn American buttercream (which is what this is) to soup or cause it to break (i.e. separate) by adding too much liquid, such as heavy cream or coffee. So, use a light hand and have the patience to take an extra 5 minutes adjusting the flavors. In the end, you’ll love the result and get to taste test more frosting.

My tools
Here are my must-have tools I use for making these brownies. Affiliate links provided.
Fine mesh sieve (because sifting is KEY)
All-rubber spatula (this makes scraping the bowl easier so the batter doesn’t get all over a wooden handle!)
Mini serving spatula (weird, but I LOVE this for bars and brownies!)
Stand mixer or handheld mixer (for the buttercream)
1M piping tips (for piping rosettes)
Offset spatula (to spread regular frosting)


Shamrock Mint Brownies
- prep time: 15-20 minutes
- bake time: 20-25 minutes
- total time: 45 minutes
servings: 12-16 (or 9, if you cut them bakery sized, which I highly recommend!)
Ingredients:
- 1 cup (200g) granulated sugar
- 1 handful (about 30-40 large leaves) fresh mint, rinsed and dried
- ½ cup (68g) all-purpose flour
- ⅔ cup (53g) unsweetened cocoa powder
- ½ teaspoon (2g) baking powder
- ¼ teaspoon (2g) sea salt (or ½ teaspoon (3g) table salt)
- ½ cup (113g) unsalted butter*
- 2 large eggs
- 1 tablespoon (13g) pure vanilla extract
- 1 cup (170g) chocolate chips (or as many as your heart says you need)
- half a batch peppermint buttercream (can sub regular mint extract)**
- green gel food dye
- gold sanding sugar (optional)
Instructions:
- Preheat oven to 350F/175C. Grease an 8x8 square pan with butter and flour or baking spray.
- In a small food processor or blender, blend the sugar and mint until the mint is finely ground. You’ll hit a point where it’s about the size of quinoa or a bit smaller and just isn’t getting any smaller, so stop then. If you keep blending, it’ll create a crusty paste on the blades of your food processor/blender instead of becoming finer. Place in a large-ish mixing bowl and set aside.
- Using a fine mesh sieve set over a small mixing bowl, sift then whisk together the flour, cocoa powder, baking powder, and salt. Set aside.
- In a small saucepan, melt the butter until completely liquid. Immediately add it to the mint sugar and whisk for about a minute, until it comes together and the sugar begins to dissolve.
- Add the eggs, one at a time, whisking for about a minute after each egg. Add the vanilla and whisk well again (half a minute should do this time).
- Add the dry ingredients in and gently fold in with a wooden spoon or rubber spatula, until almost blended some streaks of flour remain.
- Gently fold in the chocolate chips.
- Pour into your prepared pan, smoothing the top and getting the batter mostly into the corners (I like to leave a ½ inch gap that will absolutely fill in during baking but prevent an overly crunchy corner).
- Bake for 20-25 minutes, or until the top is no longer shiny/raw looking and the middle is slightly jiggly but not liquidy and a toothpick comes out with a bit of matte, fudgy batter. If you prefer fully cooked, non-fudgy-middle brownies, cook a little longer until a toothpick comes out with several brownie crumbs rather than a smear of almost-cooked batter. Let cool completely in pan.
- While the brownies cool, make the peppermint buttercream. Once the buttercream taste is to your liking (avoid adding too much peppermint or mint extract), add green gel food dye and mix well until a vibrant green color.**
- Frost completely cooled brownies and sprinkle with gold sanding sugar.
Enjoy!
Brownies will last in an airtight container at room temperature for 3-5 days, if you can resist eating them all before then!
*European butter is best! It has less water and makes a better brownie, in my opinion.
**If able, make the buttercream ahead of time and let the color and flavor deepen in the fridge for a few days. Let come to room temperature on the counter and stir well before using.
